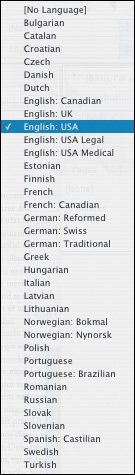
Hyphenation and User Dictionaries
Hyphenation and spelling are controlled by the language dictionary associated with your text. When a wordusually a technical term, proper noun, or expletiveis not found in your language dictionary, you may wish to add it to your User Dictionary. Click Add and the word is added to the chosen language's user dictionary. If you wish to add and word and specify its hyphenation breaks. Click Dictionary and then click Hyphenate to view the word's suggested hyphenation points. You can add your own hyphenation points by inserting tildes and ranking them: One tilde indicates the best break, two tildes the second best, and so on. If you don't want the word to be hyphenated, add a tilde before its first character. You can also customize the hyphenation of words already in the language dictionary by typing (or pasting) the word into the Word field and clicking Hyphenate. If appropriate, insert tildes as above to customize the hyphenation. You can also import a word list (saved as a text file) by clicking Import, then quickly add these words to you user dictionary. Figure 11.7. InDesign's Language Dictionaries.
Figure 11.8. Adding a Word.
Figure 11.9. Adding a Word and choosing its hyphenation breaks.
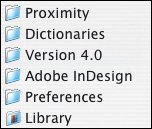
Sharing User DictionariesIf you are part of a workgroup, make sure that each user has the same customized user dictionary installed so that the same spelling and hyphenation rules are applied to a particular document regardless of who is working on it. Dictionary file names end with the extensions UDC and are stored in the InDesign Preferences folder. Figure 11.10. The path to the user dictionary (Mac).
Alternatively, you can merge the user dictionary into the InDesign document. Choose InDesign > Preferences > Dictionary and check Merge User Dictionary into Document. The advantage of this approach is that you don't have to worry about sharing user dictionaries. Figure 11.11. Dictionary Preferences.[View full size image] 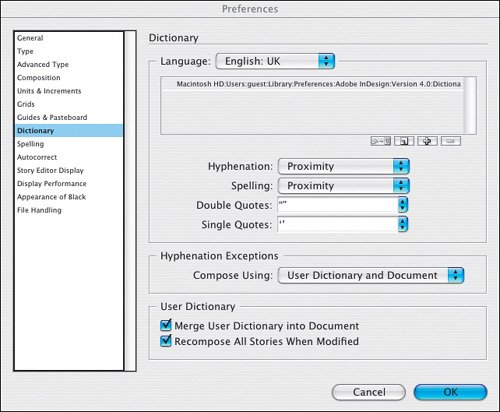
Hyphenation Dos and Don'tsDo: Check your language dictionary. Hyphenation (and spelling) rules are based on the language dictionary specified for the text. You can choose which language to use from the Language menu on the Control palette or in the Character palette. Better yet, apply this as part of a Paragraph Style definition. You can specify a default language in your Preferences. Do: Hang your hyphens. When hyphenating, don't forget about Optical Margin Alignment to hang the hyphens (and other punctuation) in the right margin. Choose Type > Story and check Optical Margin Alignment. Tip: Check Spelling and Ligatures InDesign is smart enough to recognize ligatures in your text and won't flag words containing ligatures as being misspelled. In Spelling Preferences (InDesign > Preferences > Spelling) you can specify the kind of problems you want InDesign to look for. You can also turn on Dynamic Spelling, which will underline potential spelling errors in your text. This is a feature that has been available in word processing applications for some time, but is of limited utility in a page layout application. Likewise the Autocorrect feature, which you can turn on in Preferences, second-guesses you on any unorthodox spellingsoften with comical results.
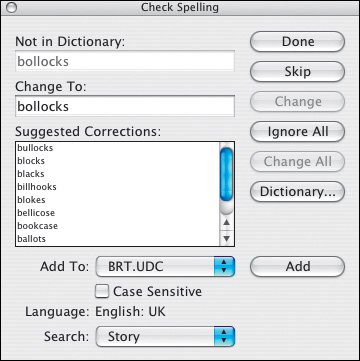
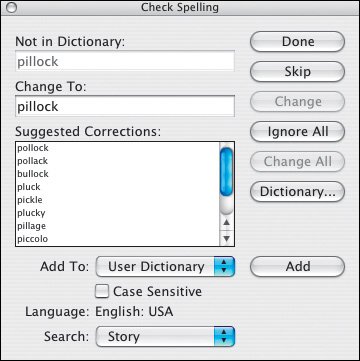
Figure 11.12. Check Spelling.
Figure 11.13. Spelling Preferences. Dynamic Spellinggodsend or minor irritation? You decide.[View full size image] 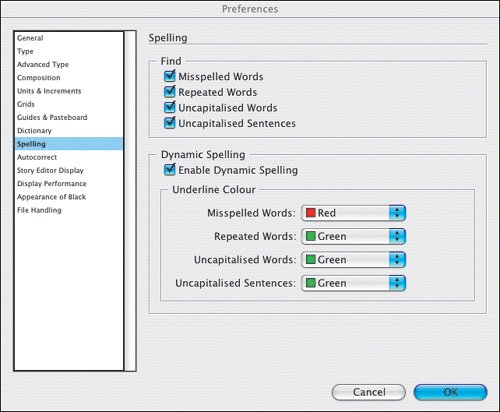
Figure 11.14. Advanced Character Formats.[View full size image] 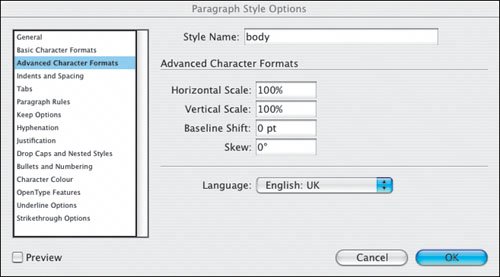
Figure 11.15. Hanging punctuation.
Do: Consult a dictionary for hyphenation breaks. When inserting discretionary hyphens divide the word after a vowel, turning over the consonant to the next line. In present participles, turn over -ing, as in walk-ing, driv-ing, design-ing. When two consonants come together, put the hyphen between them. Try to divide the word so that the first part of the division suggests what is following: con-serva-tion not con-servation, re-appear not reap-pear, cam-ellia not camel-lia. Do: Use Nonbreaking Hyphens (Cmd+Option[Ctrl+Alt--]) in phone numbers and Web addresses to prevent them breaking over a line. Don't: Use stupid hyphenations like crap-ulous or the-rapist Figure 11.16. Insert Nonbreaking Hyphen.[View full size image] 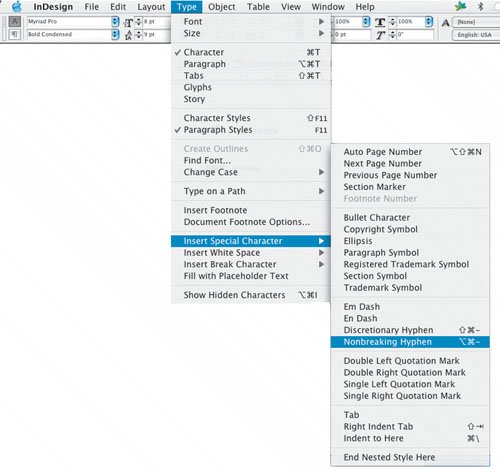
Don't: Hyphenate headlines or subheads. Be sure to uncheck Hyphenation in the relevant Style Sheet definitions. Don't: Hyphenate a word at the end of a paragraph. Uncheck the Hyphenate Last Word option in the Hyphenation dialog box to prevent this. Don't: Hyphenate a word at the bottom of a column or page break. Don't: Double-hyphenate a word. This can happen if you have a long compound word that contains a hard hyphen occurring at the end of the line and requiring a second hyphen. Select the type on either side of the hyphen and choose No Break to prevent this. Don't: Use more than two consecutive hyphens. Hyphens set in a row cause an ugly stepped effect down your right margin. Turn over one of the words by selecting it and choosing No Break, or by inserting a discretionary hyphen at the beginning of the word.
Tip When switching back and forth between the Story Editor and the layout use the keyboard shortcut Cmd/Ctrl+Y rather than closing the Story Editor window. This way InDesign will automatically scroll to your Type cursor position, rather than leaving you to find your place in the text you were just editing. Figure 11.17. Part of a story viewed in the Story Editor and the associated Story Editor preferences. The Story Editor is a good place to check your spelling as well as view overset text (redlined) and quickly apply Paragraph and Character Styles. When you have Spelling preferences set up to Enable Dynamic Spelling, words not found in InDesign's dictionary are underlined in red.[View full size image] 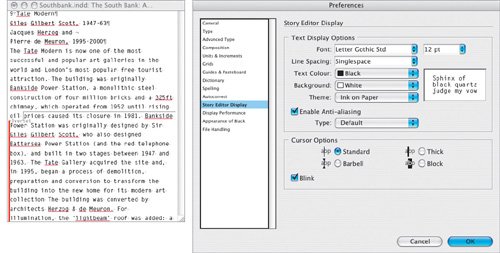
|