Creating a Table
|
There are three approaches to creating a table: from scratch, converting existing text to a table, or importing a table from Microsoft Word or Excel. From Scratch
Each table cell is like a text frame. You type or paste text, or place text into a table cell just as you would do with a text frame. You can also paste or place (File > Place) graphics into table cells. Note If you add a graphic that is larger than the cell, the cell height expands to accommodate the graphic, but the cell width remains fixed, causing the graphic to extend beyond the right side of the cell. If the row is set to a fixed height, a graphic that is taller than the row height causes the cell to be overset. Converting Text to a TableIf you are going to convert text to a table, it pays to set up the text properly with tabs separating the columns and paragraph returns separating the rows. Once your tabs and carriage returns are in the right place, select your text and choose Table > Convert Text to Table. It's rare that you'd want to, but you can also make this conversion in reverse by inserting your Type Tool in a table and choosing Table > Convert Table to Text. Figure 12.11. Tab Delimited Text.[View full size image] 
Figure 12.12. The same text converted to a Table (it looks worse than it is).[View full size image] 
Figure 12.13. The cleaned-up table: Column Widths and Row Heights adjusted. Cell Inset Spacing reduced. Paragraph Styles Applied. Table Border, Row, and Column Strokes removed. Alternating Fills of 20 percent cyan applied.[View full size image] 
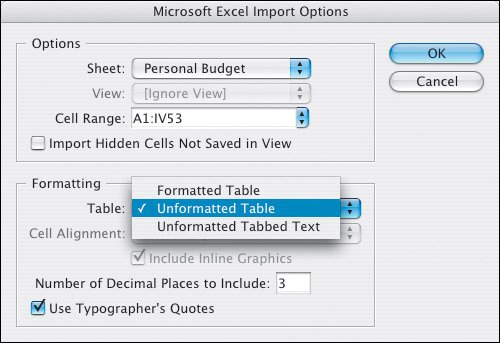
Importing a TableThere's no point in reinventing the wheel: If you already have a table in a Microsoft Excel spreadsheet or in Microsoft Word, choose File > Place to import it into InDesign, either retaining the formatting (probably not a good idea) or stripping out the formattingthe information will appear as tabbed textand then using InDesign's Table tools to prettify it. Figure 12.14. Table Import Options.
Selecting a TableSelecting a whole table allows you to change the formatting of all the table's cells. To do so, move your pointer to the upper left corner of the tableit becomes a southeast pointing arrowand click. Alternatively, with your pointer inside the table, choose Table > Select > Table (Cmd+Option+A/Ctrl+Alt+A). Breaking Tables Across FramesLarge tables can be a pain, but, thankfully, if the table is taller than the text frame in which it resides, you can thread the frame with another framein the same way as you would thread a regular text frameto continue the table. Keep Options determines how many rows should remain together. You can also specify where a row breaks, such as at the top of a column or frame. If you want a header or footer row to repeat information in the new frame, choose Table > Headers and Footers. If you didn't set up a header or footer row first time around, you can easily convert an existing row to a header or footer row by choosing Table > Convert Rows > To Header or To Footer. Tip: Tabs in Tables When you're working in a table, pressing Tab moves your cursor to the next cell. If you want to insert a tab in a cell, choose Type > Insert Special Character > Tab. Figure 12.15. Header and Footer Options.[View full size image] 
Adding Borders, Strokes, and Fills to a TableIn the Table Options dialog box, you can change the stroke of the table border and add alternating strokes and fills to columns and rows. To enhance the readability of a complicated table with a wide measure, use alternating strokes and/or fills to help the eye to track along the table rows. Depending on the nature of your data, you may want to experiment with Alternating Patterns. You can apply your fills or strokes to every other row, every second row, every third row, or, using the First and Next menus, come up with a Custom Row pattern. The same is true with columns. Note Unless you choose Preserve Local Formatting, any formatting previously applied to individual table cells will be overridden by the row and column formatting. Figure 12.16. Preserve Local Formatting. Note that the Fill Color and Tint are shown as blank when this option is checked.[View full size image] 
Confusingly, row strokes are set on even when Alternating Pattern is set to None. To turn off row strokes, columns strokes, and the table border at the same time, select the whole table and then target the Stroke swatch on the Swatches palette or at the bottom of the Tool Palette, and then choose None. To turn off just row strokes, choose Every Other Row as the Alternating Pattern, and then choose None as the color for the First and the Next row. If you want row strokes on, but want to change their weight and/or color, make sure you change both the First and the Next row. Likewise when working with column strokes: They are on even though Alternating Pattern is set to None. To change their stroke weight, choose a different alternating pattern and change the options for the First and the Next column stroke weights. Tip:Tables and Text Wraps Text wraps do not work in tables without first jumping through a few hoops. Let's say you have a graphic and some text that you want to wrap around that graphic and you want to insert both items into a single table cell. Create your text frame and graphic outside the table, and then group them together (Cmd+G/Ctrl+G). Select the group, and copy and paste into the table cellthe relationship between the type and graphic is preserved. Figure 12.17. Changing the weight of row strokes.[View full size image] 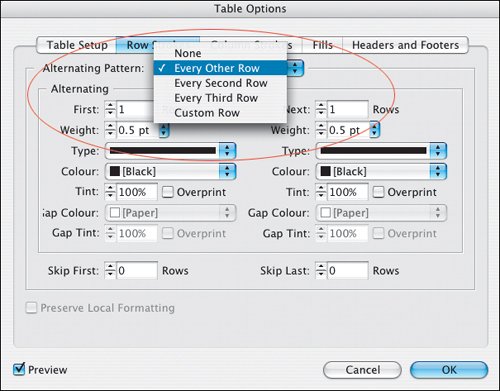
Figure 12.18. Table Formatting Shortcuts[View full size image] 
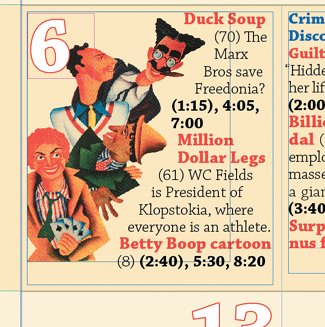
Figure 12.19. Tables and Text Wraps. This section of a film calendar shows a grouped text frame and graphic with text wrap pasted into a single table cell.
Figure 12.20. Using a table in a film poster is the best way to get a "double baseline" with the small credits. Without a table it would be necessary to position separate text frames next to the big credits, an approach that is cumbersome and difficult to edit.
Figure 12.21. This table of contents page uses a clearly defined grid that is a good candidate for a table. Using a table in such a context can make it easier to edit the contents of individual cells in the publication's next issue.[View full size image] 
|