Nested Styles
Nested Styles will rock your world. If you're like meessentially lazy, but love gadgets and stuff that makes life easierthen Nested Styles is for you. Nested Styles allows you to apply Paragraph Styles and Character Styles at the same time. This is profound, so let me reiterate: Nested Styles allows you to apply a Paragraph Style with a Character Style (or styles) applied to specific range or ranges of a paragraph. All with a single mouse click! Nested Styles can eliminate hours of repetitive drudgery, freeing you up to be more creative. It was the Best of times, it was the worst of times, it was the age of wisdom, it was the age of foolishness, it was the epoch of belief, it was the epoch of incredulity, it was the season of Light, it was the season of Darkness, it was the spring of hope, it was the winter of despair, we had everything before us, we had nothing before us, we were all going direct to Heaven, we were all going direct the other wayin short, the period was so far like the present period, that some of its noisiest authorities insisted on its being received, for good or for evil, in the superlative degree of comparison only. Figure 14.10. Adding Nested Styles to an opening paragraph.[View full size image] 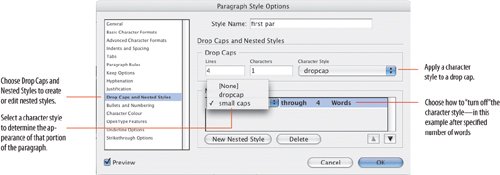
To create a Nested Style, you need to add a Character Styleor stylesto a Paragraph Style definition.
Choosing Through includes the character that ends the Nested Style, while choosing Up To formats only those characters that precede the designated character. If you have more than one Nested Style you can use the up button or down button to change the order of the styles in the list, determining the order in which the formatting is applied. The formatting defined by the second style begins where the formatting of the first style concludes. Figure 14.11. Apply Nested Styles from the beginning of the paragraph forward. The Nested Style will be "on" until the specified number of the chosen delimiterfor example 4 Words, 1 sentence, 1 en spaceis found in the text. You can also type a specific character such as a colon (:) into this field.
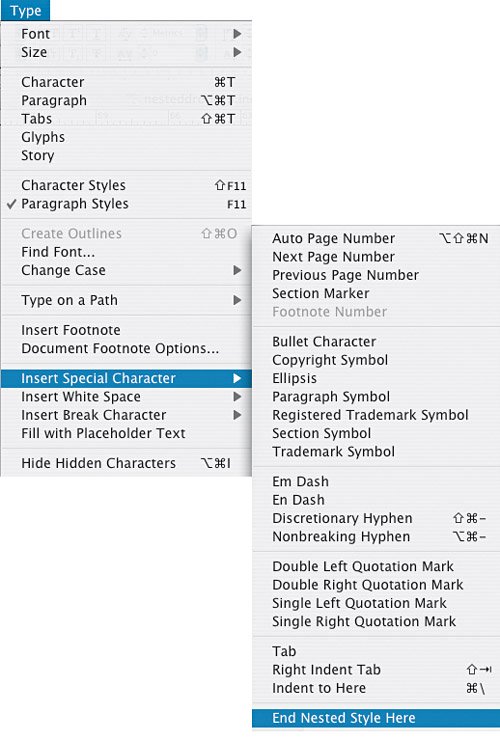
Figure 14.12. Insert End Nested Style Here.
Tip Use a keyboard shortcut to insert the End Nested Style Here character. Create your own custom keyboard shortcut to quickly place this character in your text. I use Ctrl+Cmd+Option+X (on a Mac). All well and good, but what if there's nothing consistent about your paragraphs that you can use to turn off the Nested Style? Enter the End Nested Style Here character. The End Nested Style Here character is an invisible character you can insert into your text to turn off character styling at that specific point. Here are some practical applications of Nested Styles: Run-in HeadsRun-ins are usually third-level subheads that have the heading on the same line as the body text that follows. The heading is distinguished from the body text with a contrasting font. The key with run-in headsand for all Nested Stylesis some identifiably consistent element. This might be separating the subhead from the body text with a colon or an en space. Tip: Using Multiple Delimiters What if there just isn't anything that you can designate as a consistent delimiter? Well, it's possible to accommodate just about any kind of variation by entering multiple characters in the delimiter field of a Nested Style. If you enter all the possible characters that could end a sentence.?!InDesign will use the first one it encounters to turn off the Nested Style. Figure 14.13. Run-in Head.[View full size image] 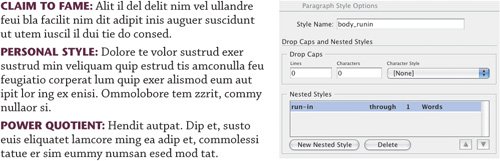
Contents PageA common style of a contents page uses the page number as a run-in head. Additional run-in elements can include identifying tags like "Cover Story" or "Feature Article." In the example shown, this tag is reversed out of a gray bar. As we saw with Paragraph Rules, it's easy to create reverse heads that move with the flow of the text. However, in this example the "rule" is applied to only a portion of the paragraph and therefore needs to be defined as a Character Style. To make this possible, use Underline Styles. Figure 14.14. Contents Page.[View full size image] 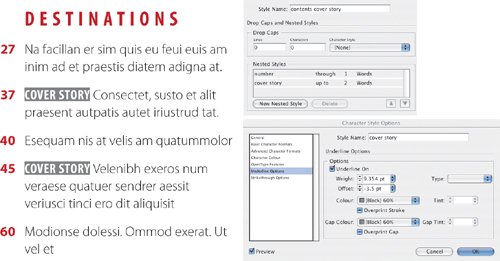
Review SectionIn this example, Nested Styles can be combined with Sequential Styles. The review section follows a consistent format: Artist and Album Title as the first paragraph, Record Label and Star Rating as the second, and the review itself as the third paragraph. Paragraphs 1 and 2 contain Nested Styles (with an en space delimiter) and a Next Style specified. Select the three paragraphs and Ctrl+Click (Right Click) on the Artist Paragraph Style. From the context menu, choose Apply Artist then Next Style. Figure 14.15. Review Section: From moth to butterfly in 2 clicks![View full size image] 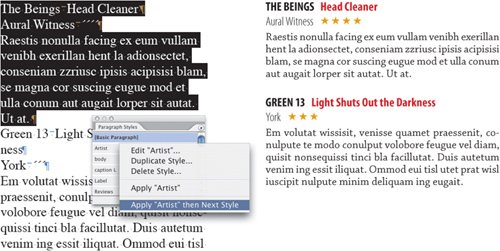
|