Layers
|
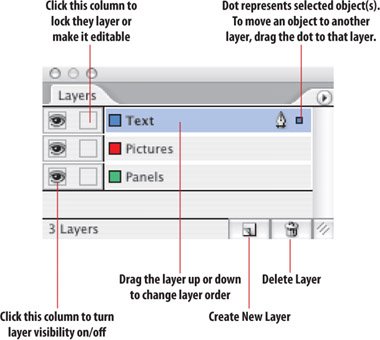
If you are familiar with using Layers in either Photoshop or Illustrator, then InDesign's layers will look very familiar. Layers determine the stacking order of objects on your page. In the example shown below, elements on the Text layer display (and print) on top of any elements on the Pictures or Panels layers. Each individual layer also has a stacking order, which you can control using the Object>Arrange menu. But layers trump Bring to Front and Send to Back. For instance, in the example shown, an object at the front of the Pictures layer is still beneath an object that is at the back of the Text layer. Where there are no objects on a layer you see through to the layer(s) beneath. You're under no obligation to use layers in InDesign, but it's a good idea to do so, especially if you're working on layouts that involve combining text with graphics. Layers allow you to view and edit specific kinds of content in your document without affecting other kinds of content, significantly speeding up your workflow. For example, you can hide the pictures layer when concentrating on the text and vice versa. You can also use layers when working on multilingual documents, to display the text for different languages. Figure 15.13. The Layers palette. What you name the layers is up to you, and there's no limit to the number of layers, except common sense. Generally a maximum of five is enough for even the most complex of documents.
Fair enough, but for our purposestypelayers are necessary to avoid printing problems. The potential for printing problems arises when you use transparent elements in your layout. In InDesign, transparency can mean a drop shadow, feathering, a Photoshop image with an alpha channel, or any object with a blend mode other than Normal and/or an opacity of less than 100 percent (See Chapter 18: "Text Effects"). When a document is printed it is flattened and any text that is in close proximity to a transparent elementfor example, a text wrap around a layered Photoshop imageis in danger of being rasterized, and possibly ending up looking rather furry as a result. The simple step to prevent this from happening is to move all text objects (except those that actually use transparency effects) to the top layer of your documentthat way they get flattened last. As an extra security measure, be sure to talk to the person responsible for printing your files, and mention that you're using transparency. And if you're unsure about whether you are using transparency, if any of the page icons in the Pages palette display a checkerboard, then you are. Figure 15.14. Transparency.
|