Text Editing with ed and vi
Text Editing with ed and vi
Text editing is an important part of all operating systems, including Linux. In Linux, you need to create and edit a variety of text files, as the following list describes:
-
System configuration files, including /etc/fstab, /etc/hosts, /etc/inittab, /etc/X11/XF86Config, and many more
-
User files, such as .newsrc and .bash_profile
-
Mail messages and news articles
-
Shell script files
-
Perl, Python, and Tcl/Tk scripts
-
C or C++ programs
All Unix systems, including Linux, come with the following two text editors:
-
ed—A line-oriented text editor
-
vi—A full-screen text editor that supports the command set of an earlier editor by the name of ex
In Red Hat Linux, another text editor, vim, emulates vi and ex, but you can invoke the editor by using the vi command.
| Insider Insight |
Although ed and vi may seem more cryptic than other, more graphical text editors, you should learn the basic editing commands of these two editors, because at times, these editors may be the only ones available. If you run into a system problem and Linux refuses to boot from the hard disk, for example, you may need to boot from a floppy. In this case, you must edit system files by using the ed editor, because that editor is small enough to fit on the floppy. |
As I show in the following sections, learning the basic text-editing commands of ed and vi is easy.
Using ed
The ed text editor works by using a buffer—an in-memory storage area where the actual text resides until you explicitly store the text in a file. You must use ed only if you boot a minimal version of Linux (for example, from a boot floppy), and the system doesn’t support full-screen mode.
Starting ed
To start ed, use the following command syntax:
ed [-] [-G] [-s] [-pprompt-string] [filename]
The arguments in brackets are optional. The following list explains these arguments:
-
- suppresses the printing of character counts and diagnostic messages.
-
-G forces backward compatibility with older versions of ed.
-
-s is the same as the single hyphen.
-
-p prompt-string sets the text that the editor displays when waiting for a command. (The default is a null prompt string.)
-
filename is the name of the file to be edited.
Learning ed
If you use the ed editor, you work in either command mode or text-input mode, as the following list explains:
-
Command mode is what you get by default. In this mode, ed interprets anything that you type as a command. As you see in the section “Summarizing ed Commands,” later in this chapter, ed uses a simple command set, wherein each command consists of a single character.
-
Text-input mode enables you to enter text into the buffer. You can enter input mode by using the commands a (append), c (change), or i (insert). After entering lines of text, you can leave text-input mode by entering a period (.) on a line by itself.
The ed editor embodies the concept of the current line—the line to which ed applies the commands that you type. Each line has an address: the line number. You can apply a command to a range of lines by prefixing the command with an address range. The p command, for example, prints (displays) the current line. To see the first 10 lines, use the following command:
1,10p
In a command, the period (.) refers to the current line, and the dollar sign ($) refers to the last line in the file. Thus, the following command deletes all the lines from the current line to the last one:
.,$d
Examining a Sample Session with ed
The following example shows how to begin editing a file in ed:
ed -p: /etc/fstab
621
:
This example uses the -p option to set the prompt to the colon character (:) and opens the file /etc/fstab for editing. Turning on a prompt character is helpful, because without the prompt, determining whether ed is in input mode or command mode is difficult.
The ed editor opens the file, reports the number of characters in the file (621), displays the prompt (:), and waits for a command.
After ed opens a file for editing, the current line is the last line of the file. To see the current line number, use the .= command, as follows:
:.=
8
The output tells you that the /etc/fstab file contains eight lines. (Your system’s /etc/fstab file, of course, may contain a different number of lines.) The following example shows how you can see all these lines:
:1,$p
LABEL=/                 /                       ext3    defaults        1 1
LABEL=/boot             /boot                   ext3    defaults        1 2
none                    /dev/pts                devpts  gid=5,mode=620  0 0
none                    /proc                   proc    defaults        0 0
none                    /dev/shm                tmpfs   defaults        0 0
/dev/hda6               swap                    swap    defaults        0 0
/dev/cdrom              /mnt/cdrom              udf,iso9660 noauto,owner,kudzu,ro 0 0
/dev/fd0                /mnt/floppy             auto    noauto,owner,kudzu 0 0
:
To go to a specific line, type the line number and the editor then displays that line. Here is an example that takes you to the first line in the file:
:1
LABEL=/                 /                       ext3    defaults        1 1
Suppose that you want to delete the line that contains cdrom. To search for a string, type a slash (/) and follow it with the string that you want to locate, as follows:
:/cdrom
/dev/cdrom              /mnt/cdrom              udf,iso9660 noauto,owner,kudzu,ro 0 0
That line becomes the current line. To delete the line, use the d command, as follows:
:d
:
To replace a string with another, use the s command. To replace cdrom with the string cd, for example, use the following command:
:s/cdrom/cd/
:
To insert a line in front of the current line, use the i command, as follows:
:i
    (type the line you want to insert)
.   (type a single period)
:
You can enter as many lines as you want. After the last line, enter a period (.) on a line by itself. That period marks the end of text-input mode, and the editor switches to command mode. In this case, you can tell that ed has switched to command mode, because you see the prompt (:).
If you’re happy with the changes, you can write them to the file by using the w command. If you want to save the changes and exit, type wq to perform both steps at the same time, as follows:
:wq
645
The ed editor saves the changes in the file, displays the number of characters that it saved, and exits.
If you want to quit the editor without saving any changes, use the Q command.
Summarizing ed Commands
The preceding sample session should give you an idea of how to use ed commands to perform the basic tasks of editing a text file. Table 11-1 lists all commonly used ed commands.
|
Command |
Meaning |
|---|---|
|
!command |
Execute a shell command |
|
$ |
Go to the last line in the buffer |
|
% |
Apply the command that follows to all lines in the buffer (for example, %p prints all lines) |
|
+ |
Go to the next line |
|
+n |
Go to nth next line (n is a number) |
|
, |
Apply the command that follows to all lines in the buffer (for example, ,p prints all lines); similar to % |
|
- |
Go to the preceding line |
|
-n |
Go to nth previous line (n is a number) |
|
. |
Refer to the current line in the buffer |
|
/regex/ |
Search forward for the specified regular expression (see Chapter 24 for an introduction to regular expressions) |
|
; |
Refer to a range of line (if you specify no line numbers, the editor assumes current through last line in the buffer) |
|
= |
Print the line number |
|
?regex? |
Search backward for the specified regular expression (see Chapter 24 for an introduction to regular expressions) |
|
^ |
Go to the preceding line; also see the - command |
|
^n |
Go to the nth previous line (where n is a number); see also the -n command |
|
a |
Append after the current line |
|
c |
Change the specified lines |
|
d |
Delete the specified lines |
|
e file |
Edit the file |
|
f file |
Change the default filename |
|
h |
Display an explanation of the last error |
|
H |
Turn on verbose-mode error reporting |
|
i |
Insert text before the current line |
|
j |
Join contiguous lines |
|
kx |
Mark the line with letter x (later, you can refer to the line as ‘x) |
|
l |
Print (display) lines |
|
m |
Move lines |
|
n |
Go to line number n |
|
newline |
Display the next line and make that line current |
|
P |
Toggle prompt mode on or off |
|
q |
Quit the editor |
|
Q |
Quit the editor without saving changes |
|
r file |
Read and insert the contents of the file after the current line |
|
s/old/new/ |
Replace old string with new |
|
Space n |
A space, followed by n; nth next line (n is a number) |
|
u |
Undo the last command |
|
W file |
Append the contents of the buffer to the end of the specified file |
|
w file |
Save the buffer in the specified file (if you name no file, ed saves it in the default file—the file whose contents ed is currently editing) |
You can prefix most editing commands with a line number or an address range, which you express in terms of two line numbers that you separate with a comma; the command then applies to the specified lines. To append text after the second line in the buffer, for example, use the following command:
2a
(Type lines of text. End with single period on a line.)
To print lines 3 through 15, use the following command:
3,15p
Although you may not use ed often, much of the command syntax carries over to the vi editor. As the following section on vi shows, vi accepts ed commands if it’s in its command mode.
Using vi
The vi editor is a full-screen text editor that enables you to view a file several lines at a time. Most UNIX systems, including Linux, come with vi. If you learn the basic features of vi, therefore, you can edit text files on almost any UNIX system.
As does the ed editor, vi works with a buffer. As vi edits a file, it reads the file into a buffer—a block of memory—and enables you to change the text in the buffer. The vi editor also uses temporary files during editing, but it doesn’t alter the original file until you save the changes by using the :w command.
Setting the Terminal Type
Before you start a full-screen text editor such as vi, you must set the TERM environment variable to the terminal type (such as vt100 or xterm). The vi editor uses the terminal type to look up the terminal’s characteristics in the /etc/termcap file and then control the terminal in full-screen mode.
If you run the X Window System and a GUI, such as GNOME or KDE, you can use vi in a terminal window. The terminal window’s terminal type is xterm. (To verify, type echo $TERM at the command prompt.) After you start the terminal window, it automatically sets the TERM environment variable to xterm. You can normally, therefore, use vi in a terminal window without explicitly setting the TERM variable.
Starting vi
If you want to consult the online manual pages for vi, type the following command:
man vi
To start the editor, use the vi name and run it with the following command syntax:
vi [flags] [+cmd] [filename]
The arguments shown in brackets are optional. The following list explains these arguments:
-
flags are single-character flags that control the way that vi runs.
-
+cmd causes vi to run the specified command after it starts. (You learn more about these commands in the section “Summarizing the vi Commands,” later in this chapter.)
-
filename is the name of the file to be edited.
The flags arguments can include one or more of the following:
-
-c cmd executes the specified command before editing begins.
-
-e starts in colon command mode (which I describe in the following section).
-
-i starts in input mode (which I also describe in the following section).
-
-m causes the editor to search through the file for something that looks like an error message from a compiler.
-
-R makes the file read-only so that you can’t accidentally overwrite the file. (You can also type view filename to start the editor in this mode to simply view a file.)
-
-s runs in safe mode, which turns off many potentially harmful commands.
-
-v starts in visual command mode (which I describe in the following section).
Most of the time, however, vi starts with a filename as the only argument, as follows:
vi /etc/hosts
Another common way to start vi is to jump to a specific line number right at startup. To begin editing at line 107 of the file /etc/X11/XF86Config, for example, use the following command:
vi +107 /etc/X11/XF86Config
This way of starting vi is useful if you edit a source file after the compiler reports an error at a specific line number.
Learning vi Concepts
If you edit a file by using vi, the editor loads the file into a buffer, displays the first few lines of the file in a full-screen window, and positions the cursor on the first line. If you type the command vi /etc/fstab in a terminal window, for example, you get a full-screen text window, as shown in Figure 11-1.
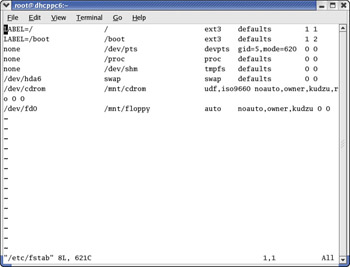
Figure 11-1: A File Displayed in a Full-Screen Text Window by the vi Editor.
The last line shows information about the file, including the number of lines and the number of characters in the file. Later, vi uses this area as a command-entry area. It uses the rest of the lines to display the file. If the file contains fewer lines than the window, vi displays the empty lines with a tilde (~) in the first column.
The cursor marks the current line, appearing there as a small black rectangle. The cursor appears on top of a character. In Figure 11-1, the cursor is on the first character of the first line.
In vi, you work in one of the following three modes:
-
Visual-command mode is what you get by default. In this mode, vi interprets anything that you type as a command that applies to the line containing the cursor. The vi commands are similar to those of ed, and I list the in the section “Summarizing the vi Commands,” later in this chapter.
-
Colon-command mode enables you to read or write files, set vi options, and quit. All colon commands start with a colon (:). After you enter the colon, vi positions the cursor at the last line and enables you to type a command. The command takes effect after you press Enter. Notice that vi’s colon-command mode relies on the ed editor. When editing a file using vi, you can press Escape at any time to enter the command mode. In fact, if you are not sure what mode vi is in, press Escape a few times to get vi into command mode.
-
Text-input mode enables you to enter text into the buffer. You can enter text-input mode by using the command a (insert after cursor), A (append at end of line), or i (insert after cursor). After entering lines of text, you must press Esc to leave text-input mode and reenter visual-command mode.
One problem with all these modes is that you can’t easily determine vi’s current mode. Typing text, only to realize that vi isn’t in text-input mode, can be frustrating. The converse situation also is common—you may end up typing text when you want to enter a command. To ensure that vi is in command mode, just press Esc a few times. (Pressing Esc more than once doesn’t hurt.)
| Tip |
To view online Help in vi, type :help while in command mode. |
Examining a Sample Session with vi
To begin editing the file /etc/fstab, enter the following command (before you edit the file, please make a backup copy by typing the command cp /etc/fstab /etc/fstab-saved):
vi /etc/fstab
Figure 11-1, earlier in this chapter, shows you the resulting display, with the first few lines of the file appearing in a full-screen text window. The last line shows the file’s name and statistics: the number of lines and characters.
The vi editor initially positions the cursor on the first character. One of the first things that you need to learn is how to move the cursor around. Try the following commands (each command being a single letter; just type the letter, and vi responds):
-
j moves the cursor one line down.
-
k moves the cursor one line up.
-
h moves the cursor one character to the left.
-
l moves the cursor one character to the right.
You can also move the cursor by using the arrow keys.
Instead of moving one line or one character at a time, you can move one word at a time. Try the following single-character commands for word-size cursor movement:
-
w moves the cursor one word forward.
-
b moves the cursor one word backward.
The last type of cursor movement affects several lines at a time. Try the following commands and see what happens:
-
Ctrl-D scrolls down half a screen.
-
Ctrl-U scrolls up half a screen.
The last two commands, of course, aren’t necessary if the file contains only a few lines. If you’re editing large files, however, the capability to move several lines at a time is handy.
You can move to a specific line number at any time by using a colon command. To go to line 1, for example, type the following and then press Enter:
:1
After you type the colon, vi displays the colon on the last line of the screen. From then on, vi uses the text that you type as a command. You must press Enter to submit the command to vi. In colon-command mode, vi accepts all the commands that the ed editor accepts—and then some.
To search for a string, first type a slash (/). The vi editor displays the slash on the last line of the screen. Type the search string, and then press Enter. The vi editor locates the string and positions the cursor at the beginning of that string. Thus, to locate the string cdrom in the file /etc/fstab, type the following:
/cdrom
To delete the line that contains the cursor, type dd. The vi editor deletes that line of text and makes the next line the current one.
| Tip |
To begin entering text in front of the cursor, type i. The vi editor switches to text-input mode. Now you can enter text. After you finish entering text, press Esc to return to visual-command mode. |
After you finish editing the file, you can save the changes in the file by using the :w command. If you want to save the changes and exit, you can type :wq to perform both steps at the same time. The vi editor saves the changes in the file and exits. You can also save the changes and exit the editor by pressing Shift-zz (press and hold the Shift key and press z twice).
To quit the editor without saving any changes, type the :q! command.
Summarizing the vi Commands
The sample editing session should give you a feel for the vi commands, especially its three modes:
-
Visual-command mode (the default)
-
Colon-command mode, in which you enter commands, following them with a colon (:)
-
Text-input mode, which you enter by typing a, A, or i
In addition to the few commands that the sample session illustrates, vi accepts many other commands. Table 11-2 lists the basic vi commands, organized by task.
|
Command |
Meaning |
|---|---|
|
Insert Text | |
|
a |
Insert text after the cursor |
|
A |
Insert text at the end of the current line |
|
I |
Insert text at the beginning of the current line |
|
i |
Insert text before the cursor |
|
o |
Open a line below the current line |
|
O |
Open a line above the current line |
|
Ctrl-v |
Insert any special character in input mode |
|
Delete Text | |
|
D |
Delete up to the end of the current line |
|
dd |
Delete the current line |
|
dw |
Delete from the cursor to the end of the following word |
|
x |
Delete the character on which the cursor rests |
|
Change Text | |
|
C |
Change up to the end of the current line |
|
cc |
Change the current line |
|
cw |
Change the word |
|
J |
Join the current line with the next one |
|
rx |
Replace the character under the cursor with x (x is any character) |
|
~ |
Change the character under the cursor to the opposite case |
|
Move Cursor | |
|
$ |
Move to the end of the current line |
|
; |
Repeat the last f or F command |
|
^ |
Move to the beginning of the current line |
|
e |
Move to the end of the current word |
|
fx |
Move the cursor to the first occurrence of character x on the current line |
|
Fx |
Move the cursor to the last occurrence of character x on the current line |
|
H |
Move the cursor to the top of the screen |
|
h |
Move one character to the left |
|
j |
Move one line down |
|
k |
Move one line up |
|
L |
Move the cursor to the end of the screen |
|
l |
Move one character to the right |
|
M |
Move the cursor to the middle of the screen |
|
n| |
Move the cursor to column n on current line |
|
nG |
Place cursor on line n |
|
w |
Move to the beginning of the following word |
|
Mark a Location | |
|
'x |
Move the cursor to the beginning of the line that contains mark x |
|
`x |
Move the cursor to mark x |
|
mx |
Mark the current location with the letter x |
|
Scroll Text | |
|
Ctrl-b |
Scroll backward by a full screen |
|
Ctrl-d |
Scroll forward by half a screen |
|
Ctrl-f |
Scroll forward by a full screen |
|
Ctrl-u |
Scroll backward by half a screen |
|
Refresh Screen | |
|
Ctrl-L |
Redraw the screen |
|
Cut and Paste Text | |
|
"xndd |
Delete n lines and move them to buffer x (x is any single lowercase character) |
|
"Xnyy |
Yank n (a number) lines and append them to buffer x |
|
"xnyy |
Yank n (a number) lines into buffer x (x is any single uppercase character) |
|
"xp |
Put the yanked lines from buffer x after the current line |
|
P |
Put the yanked line above the current line |
|
p |
Put the yanked line below the current line |
|
yy |
Yank (copy) the current line into an unnamed buffer |
|
Colon Commands | |
|
:!command |
Execute the shell command |
|
:e filename |
Edit the file |
|
:f |
Display the filename and current line number |
|
:N |
Move to line n (n is a number) |
|
:q |
Quit the editor |
|
:q! |
Quit without saving changes |
|
:r filename |
Read the file and insert after the current line |
|
:w filename |
Write the buffer to the file |
|
:wq |
Save the changes and exit |
|
Search Text | |
|
/string |
Search forward for string |
|
?string |
Search backward for string |
|
n |
Find the next string |
|
View File Information | |
|
Ctrl-g |
Show the filename, size, and current line number |
|
Miscellaneous | |
|
u |
Undo the last command |
|
Esc |
End text-input mode and enter visual-command mode |
|
U |
Undo recent changes to the current line |


