Section 6.5. djbdns
If after reading or skimming my BIND hints you're still suspicious of BIND's size, complexity, and history, you may wish to try djbdns, Daniel J. Bernstein's lightweight but robust alternative. My esteemed colleague and friend, Bill Lubanovic, a web consultant and designer of note, is such a person. He's written most of what follows.
While this section makes particular note of djbdns' security features, our intent is to provide a general primer on djbdns use. This is justified (we hope) for two reasons. First, the very act of choosing djbdns rather than BIND has positive security ramifications, if for no other reason than it "diversifies the DNS gene pool." Second, while widely used, djbdns hasn't yet received much treatment in the print media, so this primer is one of the first of its kind (if not the first).
If neither of these assumptions seems compelling to you, you needn't feel guilty for sticking with BIND (provided you run Version 9 and take the time to configure, secure, and maintain it carefully). For what it's worth, I'm a BIND v9 user myself.
6.5.1 What Is djbdns?
BIND can be considered the nuclear-powered kitchen sink, blender, and floor polisher of DNS software. It gurgles busily in the corner and occasionally springs a leak or explodes. Despite its market share, it's an old machine with spotty maintenance records.
djbdns, then, is the set of tools that you'd find at a DNS specialty store: simple, secure, fast, and safe when used as directed. Almost unnoticed, this package serves millions of domain names every day at large Internet domain-hosting companies and other busy sites. It is very reliable. The software just keeps running without human intervention, other than to modify domain data. Memory use is limited, processes are monitored and restarted when needed, and logs are automatically rotated to avoid filling up the disk.
Like BIND, djbdns is free software for Unix and Unix-like systems. djbdns can replace BIND or coexist as a primary or secondary nameserver.
djbdns comprises servers, clients, libraries, and helper services (see Table 6-2).
|
djbdns package |
Description |
|---|---|
|
dnscache |
Caching name server |
|
tinydns |
Authoritative name server |
|
axfrdns |
Zone-transfer server |
|
axfr-get |
Zone-transfer client |
|
Walldns |
A reverse DNS wall; provides reverse look-ups without revealing internal network layouts |
|
Rbldns |
IP-address list server, suited for blackhole lists |
|
dnsip, dnsname, dnsmx, dnsipq, dnsfilter |
DNS utility clients |
|
dnsq, dnsqr, dnstrace |
DNS debugging clients |
|
dns |
A C library for DNS |
|
Associated package |
Description |
|
Daemontools |
Service-management utilities, used by dnscache and tinydns |
|
ucspi-tcp |
TCP client-server interface, used by axfrdns and axfr-get |
We'll discuss how to install and configure the main components shortly. First, let's see why djbdns was written and what problems it solves.
6.5.1.1 Why not BIND?
In a nutshell, djbdns was written in response to problems with BIND's security, complexity, and performance. It therefore makes sense to talk about what djbdns is in the context of how it relates to BIND. Table 6-3 shows such a comparison.
|
Characteristic |
BIND |
djbdns |
|---|---|---|
|
Security |
BIND has had many security problems. Since it normally runs with root privileges, any exploit (by buffer overflow or some other means) can compromise the server. It takes extra effort to run as a normal user or in a chrooted environment. There are no security guarantees. |
Each djbdns program runs as a dedicated nonroot user in a chrooted jail. Even if cracked, it can't go anywhere else or gain control of the server. The author offers a $500 reward to "the first person to publicly report a verifiable security hole in the latest version of djbdns." |
|
Ease of use |
BIND is notoriously hard to learn, use, and manage. The file format is cryptic, hard to parse, and unforgiving (although BIND 9 is better). There is no automatic error checking, so system integrity relies on the knowledge and discipline of the administrators. The same administrators are sometimes reluctant to apply security patches to a working but fragile system, increasing the window of vulnerability. |
The djbdns zone file format (tinydns-data) is simple and intuitive. Input errors are checked automatically, so the name-server database is only updated with good data. Intelligent defaults are used for values like TTL and timestamps, so you don't need to specify everything. PTR records are autogenerated. Split-horizon DNS is simple. |
|
Efficiency |
BIND is a resource hog. It gobbles up memory like a turkey dinner; sometimes it passes out and pulls the tablecloth with it. |
The default size of dnscache's memory cache is one megabyte, but can be changed on the fly. When free cache space is low, it discards the oldest cache entries. |
|
Clarity |
Like Orson Welles, BIND is big, complex, and hard to manage. Some of its logic is convoluted and does not work as intended. Unexpected code interactions between caching and authoritative serving have left BIND susceptible to attacks like cache poisoning. |
djbdns is simple. Since each program does less and has much less code, there is less opportunity for problems. dnscache starts with the root servers to find the true authoritative servers for domains, and it can't be tricked to follow hijacked name servers. |
|
Separation of functions |
BIND is a caching server, an authoritative server, and a zone-transfer server and client. If you only need one function, you need to disable the others and ensure that your firewall is blocking access to their ports. Code complexity has caused many bugs and security problems. |
Separate functions are handled by separate servers. Each server is small, easier to learn, easier to understand, and easier to use day-to-day. You only install what you need: dnscache for caching, tinydns for serving, axfrdns and/or axfr-get for zone transfers. |
|
Data availability |
During zone transfers, BIND goes into a trance and will not communicate with anyone else. |
tinydns always serves data from a consistent authoritative database, so name services stay available during database updates and zone transfers. |
|
Data integrity |
By default, zone data is transferred as clear text. DNSSEC has been proposed to encrypt the data stream, but it isn't really working yet. |
Secure, incremental zone transfers are simple: just use rsync with ssh to copy data files between tinydns servers. No special protocols or tools are needed. AXFR zone transfers to and from BIND are also supported. |
|
Code ubiquity |
BIND comes with every version of Unix and handles most of the name serving on the Internet. File locations, versions, and patch levels may vary significantly across different systems. |
djbdns is not a standard component of any Linux or BSD installation. Its license requires any redistributed version to work the same on every platform. This is at odds with package managers (BSD ports, Red Hat RPM, etc.), which mold the package to fit the distribution. In the author's words: "Breaking cross-platform compatibility for the sake of cross-package similarity is a horrible idea." It is permissible to distribute patches. |
|
RFC compliance |
BIND supports almost anything related to DNS. BIND 9.1.1 includes over 60 DNS-related RFCs and over 50 Internet Drafts. |
djbdns does not support some RFCs: IXFR (RFC 1995), DNSSEC (RFC 2535, 2931, 3008), TSIG (RFC 2845), Dynamic DNS (RFC 2136), A6 (RFC 2874), and DNAME (RFC 2672). In each case, Bernstein argues that these standards either don't work or have a better alternate implementation. |
6.5.2 Choosing djbdns Services
djbdns is modular by design: you choose and run only the parts you need on a given system. There are three main servers and one client in djbdns, corresponding to each of its major functions:
- dnscache
-
Is a caching nameserver. It has no data of its own, but manages a local DNS cache for local clients such as web browsers. DNS queries from clients are directed to dnscache; dnscache in turn asks the root name servers, follows the trail to delegated (authoritative) name servers, gets the results, and caches these results locally to speed up later queries. It can serve a single machine or a group. It is never authoritative for a domain. dnscache only accepts recursive queries.
- tinydns
-
Is an authoritative name server. It serves information about your domains to machines on the public Internet. It does not cache and does not return information about domains for which it has no authority. tinydns answers iterative queries.
- axfrdns
-
Transfers zone data from a primary tinydns name server to a secondary name server like BIND.
- axfr-get
-
Requests zone-data transfers from a primary name server like BIND to a secondary tinydns name server.
The separation of these functions in djbdns requires you to decide what name services you want to provide and where. Here's a guide for the most common situations:
If you have one Unix machine and you only want to provide caching name services to local client programs, install an internal DNS cache with dnscache.
If you have multiple machines, you can install an internal DNS cache with dnscache on each machine or an external DNS cache on one machine (dnscachex) to serve its neighbors.
If you manage some domains and want to provide look-up services to these for the Internet, install the authoritative DNS server, tinydns.
If you manage some domains and want redundancy, install tinydns on more than one server and transfer data among them with rsync and ssh.
If you install tinydns but also need to transfer zone data to BIND (with tinydns as a primary or master server), install axfrdns.
If you install tinydns but also need to accept zone data from BIND (with tinydns as a secondary or slave server), install axfr-get.
6.5.3 How djbdns Works
Figure 6-3 shows the components and data flow for dnscache. This server uses only a memory cache. If the record is found in the cache and has not expired, it's returned directly. Otherwise, dnscache looks it up. For a new domain, it starts with the most authoritative servers and follows the delegations down. This avoids cache poisoning from following a forged glue record.
Figure 6-3. dnscache architecture and data flow
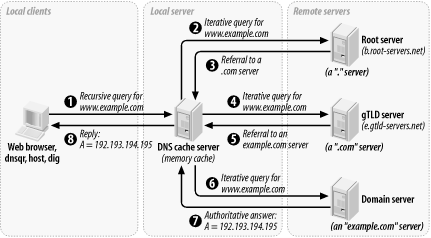
Figure 6-4 shows tinydns, axfrdns and axfr-get, each performing separate functions:
- A
-
Add or modify a name server record for a host like www.example.com. If you provide authoritative host data to the Internet for example.com, this is where you'd work.
- B
-
Query an authoritative tinydns name server for a www.example.com record. External clients and servers looking up example.com hosts would follow this path.
- C
-
Transfer zone data for www.example2.com to a secondary name server like BIND. axfrdns may send a notify request to the secondary to encourage it to request the data now rather than waiting for an expiration time.
- D
-
Transfer zone data for www.example3.com from a primary name server like BIND. The data is saved to a local file in tinydns-data format, but is not automatically merged with the main data file used by functions A or B.
Note that there is no connection between dnscache and any of these.
Figure 6-4. tinydns family architecture and data flow
6.5.4 Installing djbdns
Once you've decided which role or roles your djbdns name server is to fill, you can install the appropriate packages. All djbdns installations have certain packages in common.
6.5.4.1 Installing the service manager: daemontools
The standard installation of djbdns requires daemontools to be installed first. These utilities start the djbdns servers and keep them running. Why another set of tools? These also were written in response to bugs and inconsistencies in popular Unix utilities like syslogd and inetd. The daemontools actually work well and are simple to install, so try them and see how you like them. Although there are RPMs from various sources, installing from source is recommended and well documented. Here's how:
Using wget (or your favorite FTP client), download the daemontools tarball (see http://cr.yp.to/daemontools/install.html for the latest version):
$ wget http://cr.yp.to/daemontools/daemontools-0.76.tar.gz
Unpack the distribution:
$ tar xvzf daemontools-0.76.tar.gz

$ rm daemontools-0.76.tar.gz

$ cd admin/daemontools-0.76
As root, compile and configure:
# ./package/install
This installation script does the following:
Compiles the programs.
Creates the directory /command and fills it with some programs.
Creates symbolic links from /usr/local/bin to programs in /command.
Creates the directory /service.
Starts /command/svscan, which monitors the /service directory for something to do. We'll give it something to do shortly.
|

6.5.4.2 Installing djbdns itself
Once daemontools is compiled and in place, it's time to install djbdns proper:
Download the latest tarball (see http://cr.yp.to/djbdns/install.html for the latest version information):
$ wget http://cr.yp.to/djbdns/djbdns-1.05.tar.gz
Unpack the distribution:
$ tar xvzf djbdns-1.05.tar.gz

$ rm djbdns-1.05.tar.gz

$ cd djbdns-1.05
Compile:
$ make
Become root, and install the programs under /usr/local/bin:
# make setup check
6.5.4.3 Installing an internal cache: dnscache
If you want to offer DNS caching services to one or more local machines, then you will need to install dnscache.
Create a user for dnscache and another user for logging:
# adduser -s /bin/false dnscache

# adduser -s /bin/false dnslog
Decide what IP address to use for dnscache. If the DNS cache is only for your local machine, a good choice is your "localhost" address, 127.0.0.1. (This is also the default if you don't supply an address.) To provide a DNS cache for multiple machines, see the upcoming section on dnscachex.
Choose a directory for the server and its associated files. The conventional one is /etc/dnscache.
Create the dnscache service directory dir, and then associate the server with the dnscache account acct, with the log account logacct and with port 53 (UDP and TCP) on address ip. This is the command to do all of this (except creating the service directory, which you must do manually):
 dnscache-conf

acct logacct dir ip
Using our example choices, we get the following:
# /usr/local/bin/dnscache-conf dnscache dnslog /etc/dnscache 127.0.0.1
Tell daemontools to manage the new service:
# ln -s /etc/dnscache

/service
Make sure your local resolver uses the new server. Edit the file /etc/resolv.conf to reflect the fact that you are now running dnscache:
nameserver 127.0.0.1
That's it! You are now the proud owner of a caching name server. Run some applications that will call your system's resolver libraries. djbdns includes the utilities dnsqr, dnsip, and dnsname (these are all described later in this chapter). You can also use ping or host, but avoid nslookup, which is unpredictable in this context (see http://cr.yp.to/djbdns/faq/tinydns.html#nslookup).
To see what's happening under the hood, let's have a look at what turns up in the dnscache logs after we look up the address for www.slashdot.org:
$ tail /service/dnscache/log/main/current

@400000003bd238e539184794 rr 401c4337 86400 ns slashdot.org. ns1.andover.net.

@400000003bd238e539185f04 rr 401c4337 86400 ns slashdot.org. ns2.andover.net.

@400000003bd238e53918728c rr 401c4337 86400 ns slashdot.org. ns3.andover.net.

@400000003bd238e539188614 rr 401c4337 86400 cname www.slashdot.org. slashdot.org.

@400000003bd238e539189d84 cached 1 slashdot.org.

@400000003bd238e53918a93c sent 627215 64

@400000003bd238f62b686b4c query 627216 7f000001:1214:a938 12 20.113.25.24.in-addr.arpa.

@400000003bd238f62b689644 cached 12 20.113.25.24.in-addr.arpa.

@400000003bd238f62b68a9cc sent 627216 88
The log is ASCII, but it's not very human readable. The first field is a TAI64 timestamp, which has a one-second resolution and a range of billions of years (Unix time will overflow a signed 32-bit integer in the year 2038). The other fields encode various aspects of the DNS messages. Run the logs through a filter such as tinydns-log.pl (available at http://tinydns.org/tinydns-log.pl.txt) to see a more traditional format:
10-20 21:54:19 rr 64.28.67.55 086400 a slashdot.org. 64.28.67.150

10-20 21:54:19 rr 64.28.67.55 086400 ns  slashdot.org. ns1.andover.net.

10-20 21:54:19 rr 64.28.67.55 086400 ns  slashdot.org. ns2.andover.net.

10-20 21:54:19 rr 64.28.67.55 086400 ns  slashdot.org. ns3.andover.net.

10-20 21:54:19 rr 64.28.67.55 086400 cname  www.slashdot.org. slashdot.org.

10-20 21:54:19 cached a slashdot.org.

10-20 21:54:19 sent 627215

10-20 21:54:36 query 627216 127.0.0.1:4628:43320 ptr 20.113.25.24.in-addr.arpa.

10-20 21:54:36 cached ptr 20.113.25.24.in-addr.arpa.

10-20 21:54:36 sent 627216
6.5.4.4 Installing an external cache: dnscachex
If you want to provide a DNS cache to more than one machine in a local network, you need to choose an address that all of these machines can access. If you are within a protected network, you can use the address of the machine. You cannot run dnscache and tinydns on the same address, since both use UDP port 53.
It's conventional to call the service dnscachex when serving multiple clients. For this example, assume the service address is 192.168.100.9:
Create users dnscache and dnslog as described earlier for dnscache:
# adduser -s /bin/false dnscache

# adduser -s /bin/false dnslog
Create the dnscachex service directory:
# /usr/local/bin/dnscache-conf dnscache dnslog /etc/dnscachex 192.168.100.9
Start dnscachex by connecting it to daemontools:
# ln -s /etc/dnscachex /service
Permit other machines in the local network to access this external cache:
# touch /etc/dnscachex/root/ip/192.168.100
You don't need to restart the server.
Modify the /etc/resolv.conf file on each machine that will be using the dnscachex server:
nameserver 192.168.100.9
Test the client machines with ping or other applications as described earlier for dnscache.
6.5.4.5 Installing a DNS server: tinydns
If you want an authoritative name server for your domains, install tinydns :
Create a user for tinydns and another user for its logging (if you installed dnscache, you already have the second user):
# adduser -s /bin/false tinydns

# adduser -s /bin/false dnslog
Pick a public IP address for tinydns. dnscache and tinydns must run on different IP addresses, since they both use UDP port 53. If you're running both on one machine, use the loopback address (127.0.0.1) for dnscache and the public address for tinydns. If you're running dnscachex on the machine's public address, allocate another IP with ifconfig, and use that for tinydns. The tinydns-conf syntax is similar to dnscache-conf:
tinydns-conf  acct

logacct  dir

ip
Assuming that you've chosen to use the public address 208.209.210.211, configure the service like this:
# /usr/local/bin/tinydns-conf tinydns dnslog /etc/tinydns 208.209.210.211
Activate the service by giving svscan a link on which to act:
# ln -s /etc/tinydns /service
tinydns will now be running, but without any data to serve. Let's do something about that.
6.5.5 Running tinydns
Now it's time to add some data to your name server. You can do this in two ways:
Use tinydns' helper applications. These are shell scripts that call tinydns-edit with default values and check the database for consistency as you make modifications.
Edit the tinydns data file directly. This gives you more control, but less automatic checking.
6.5.5.1 Helper applications
Let's use the helpers first. These all modify the text file data while checking with the authoritative database file, data.cdb:
Become root.
Go to the tinydns data directory:
# cd /service/tinydns/root
Add a primary name server entry for your domain:
# ./add-ns hackenbush.com 192.193.194.195
Add a secondary name server entry for your domain:
# ./add-childns hackenbush.com 200.201.202.203
Add a host entry:
# ./add-host hugo.hackenbush.com 192.193.194.200
Add an alias for the same address:
# ./add-alias another.hackenbush.com 192.193.194.200
Add a mail server entry:
# ./add-mx mail.hackenbush.com 192.193.194.201
Make these additions public (convert data to data.cdb):
# make
tinydns will serve these immediately. Let's see what these helper applications actually did, and then we can learn how to modify the results by hand.
6.5.5.2 The tinydns-data format
The helper applications modify the data file, a text file that uses the tinydns-data format. This format is simple, compact, and easy to modify. Here are the lines created by the helper-application examples in the previous section:
.hackenbush.com:192.193.194.195:a:259200

&hackenbush.com:200.201.202.203:a:259200

=hugo.hackenbush.com:192.193.194.200:86400

+another.hackenbush.com:192.193.194.200:86400

@mail.hackenbush.com:192.193.194.201:a::86400
Rather than using the helper applications, we could have created the lines with a text editor and used the default ttl values:
.hackenbush.com:192.193.194.195:a

&hackenbush.com:200.201.202.203:a

=hugo.hackenbush.com:192.193.194.200

+another.hackenbush.com:192.193.194.200

@mail.hackenbush.com:192.193.194.201:a
If the primary name server was within our domain (at a.ns.hackenbush.com) but a secondary name server was at ns.flywheel.com, here's how to specify it:
.hackenbush.com:192.193.194.195:a

&hackenbush.com::ns.flywheel.com
If the primary name server was at ns.flywheel.com, here's how to specify that:
.hackenbush.com::ns.flywheel.com
A few characters perform a lot of work and avoid some common sources of error in BIND zone files:
Records starting with a dot (.) create an SOA record, an NS record, and an A record if an IP address was specified.
Records starting with an equals sign (=) create A and PTR records.
6.5.5.3 tinydns data reference
Each record (line) in a tinydns-data (formatted) file starts with an identifying character. Fields are separated by colons. Trailing fields and their colons may be omitted, and their default values will be used. Table 6-4 describes some fields common to many types of tinydns-data records.
|
Field |
Description |
Default |
|---|---|---|
|
dom |
A domain name like hackenbush.com. |
None. |
|
fqdn |
A fully qualified domain name like hugo.hackenbush.com. A wild card can also be used: *.fqdn means every name ending with .fqdn, unless a name has a more specific record. |
None. |
|
ip |
An IP address like 192.193.194.195. |
None. |
|
ttl |
Time-to-live (number of seconds that the record's data can be cached). |
SOA: 2560 (42.6 minutes) NS: 259200 (3 days) MX, A, others: 86400 (1 day). |
|
ts |
If ttl is missing or nonzero, the starting time for information in this line; if is zero, the end time. ts is specified as an external TAI64 timestamp, which is a 16-character, lowercase hex string with a resolution of one second. The hex value 4000000000000000 corresponds to ISO time 1970-01-01 00:00:00, the reference start time for Unix systems. |
Empty, meaning the line is active. |
|
loc |
A location-identifier string, used to provide different answers to clients, depending on their locations; see the djbdns documentation for details. |
None. |
The next table, Table 6-5, shows the correspondence between djbdns helper applications and equivalent lines in data; you can specify your data either way. Notice that the helper applications require IP addresses rather than names; if you wish to specify a name instead, you need to edit the data file.
|
Helper application syntax |
Data format |
Description |
|---|---|---|
|
add-ns dom ip |
.dom:ip:x:ttl:ts:loc |
Specify a primary name server for domain dom. Create an SOA record for the domain and an NS record for the name server specified as x and/or ip. If x contains any dots, it is treated as a literal hostname; otherwise, it is interpreted as x.ns.dom. If ip is present, an A record is created. Using add-ns generates the sequential values a, b, etc. for x. These correspond to a.ns.dom, b.ns.dom, etc. This default behavior generates in-bailiwick (intradomain) names for the name servers. Specifying a domain's name server within the domain itself avoids a trip to the root name servers for resolution. |
|
Add-childns dom ip |
&dom:ip:x:ttl:ts:loc |
Specify a domain's secondary name server. Create only an NS record for the name server, specified as x and/or ip. If x contains any dots, it is treated as a literal hostname; otherwise, it is interpreted as x.ns.dom. If ip is present, an A record is created. Add-childns also generates a, b, etc. for x. |
|
Add-host fqdn ip |
=fqdn:ip:ttl:ts |
Specify a host: create an A record (fqdn [Symbol_MonotypeSorts_217] ip) and a PTR record (reverse-ip.in-addr.arpa [Symbol_MonotypeSorts_217] fqdn). |
|
Add-alias fqdn ip |
+fqdn:ip:ttl:ts |
Specify an alias: create another A record (fqdn [Symbol_MonotypeSorts_217] ip). |
|
Add-mx fqdn ip |
@dom:ip:x:dist:ttl:ts |
Specify a mail server: create an MX record. If x contains any dots, it is treated as a literal hostname; otherwise, it is interpreted as x.mx.dom. dist in distance and defaults to 0. Add-mx also generates sequential hostnames of a, b, etc. for x. |
The less common record types shown in Table 6-6 have no helper applications.
|
Helper application syntax |
Data format |
Description |
|---|---|---|
|
(No helper) |
Zdom:fqdn:con:ser:ref:ret:exp:min:ttl:ts:loc |
Create only an SOA record for dom, with contact con, serial number ser, refresh time ref, retry time ret, expire time exp, and minimum time min. |
|
(No helper) |
Chost2:fqdn:ttl:ts:loc |
Create a CNAME record for host2 to refer to host. |
|
(No helper) |
'fqdn:text:ttl:ts:loc |
Create a TXT record for fqdn. text can contain octal escape codes (e.g., \F3D) to create non-ASCII values. |
|
(No helper) |
^fqdn:ip:ttl:ts:loc |
Create a PTR record for fqdn [Symbol_MonotypeSorts_217] ip. |
|
(No helper) |
:fqdn:type:data:ttl:ts:loc |
Create a record of type type (an integer between 1 and 65,535). Data bytes data may contain octal escapes. |
After making changes to a datafile, type make. This runs the tinydns-data program to convert data to data.cdb. The conversion will only overwrite the existing database if the source data is consistent. tinydns will start serving the new data immediately.
6.5.6 Running djbdns client programs
In addition to its server daemons and support processes, djbdns includes client utilities (Table 6-7). These perform the same functions as BIND's old utilities, nslookup and dig, and are useful for troubleshooting and testing your DNS infrastructure.
|
Program |
Syntax |
Description |
|---|---|---|
|
dnsip |
dnsip fqdn1 [fqdn2...] |
Print the IP addresses of one or more fully qualified domain names. |
|
dnsname |
dnsname ip1 [ip2...] |
Print the first domain name of one or more IP addresses. |
|
dnsmx |
dnsmx fqdn |
Print the MX record for fqdn. |
|
dnstxt |
dnstxt fqdn |
Print the TXT record for fqdn. |
|
dnsq |
dnsq type fqdn server |
Send a nonrecursive query to server for records of type type for fqdn. |
|
dnsqr |
dnsqr type fqdn |
Get records of type type for fqdn. This sends a recursive query to the name server specified in /etc/resolv.conf. dnsqr and is similar to the programs dig, host, and nslookup. |
|
dnstrace |
dnstrace type fqdn server1 [server2...] |
Find all DNS servers that can affect the resolution of records of type type for fqdn starting from one or more root name servers server. |
|
dnsfilter |
dnsfilter [-c queries] [-n lines] |
Substitute hostnames at the start of text lines to IP addresses. Reads from standard input and writes to standard output. queries is the maximum number of DNS queries to do in parallel (default is 10). lines is the number of lines to read ahead (default is 1000). |
6.5.7 Coexisting with BIND
You may decide to install some components of djbdns on your servers to handle name-service duties. By choice or necessity, you may need to share these duties with an existing BIND installation. This section describes how to exchange zone data between name servers running djbdns and BIND.
6.5.7.1 Installing ucspi-tcp
You first need to install a small external toolkit, also written by Bernstein, called ucspi-tcp. This contains the tcpserver and tcpclient programs. Similar to inetd, they manage external access to TCP-based clients and servers, but they do so more reliably due to better load and resource controls. Follow these steps to install ucspi-tcp:
Using wget (or the FTP tool of your choice), download the latest tarball from http://cr.yp.to/ucspi-tcp/install.html:
$ wget http://cr.yp.to/ucspi-tcp/ucspi-tcp-0.88.tar.gz
Extract:
$ tar xvzf ucspi-tcp-0.88.tar.gz
Build:
$ cd ucspi-tcp.0.88

$ make
As root, install under /usr/local/bin:
# make setup check
6.5.7.2 Running axfr-get
The axfr-get client requests a zone transfer from a name server via AXFR. The syntax is as follows:
axfr-get dom file file.tmp
This requests a zone transfer for domain dom. The data is written to the file file.tmp in tinydns-data format. The first line written to file.tmp is a comment with the zone's serial number. If the transfer is successful, file.tmp is renamed to file.
Make sure you only request data for zones where your tinydns server is a secondary server. Merge this data with that for which your tinydns server is primary in the tinydns datafile /service/tinydns/root/data.
A simple solution is this addition to /service/tinydns/root/Makefile. Our tinydns server is a.ns.hackenbush.com, and we are providing secondary name services for the domain flywheel.com, whose name server is ns.flywheel.com:
all: data.cdb

flywheel.data:

    /usr/local/bin/tcpclient -i \

    a.ns.hackenbush.com \

    53 \

    /usr/local/bin/axfr-get \

    flywheel.com \

    flywheel.data \

    flywheel.tmp

data: hackenbush.data flywheel.data

    cat *.data > data

data.cdb: data

    usr/local/bin/tinydns-data
Run make as often as necessary to get flywheel's data.
axfr-get is a client. It does not support NOTIFY (RFC 1996) or IXFR (RFC 1995). It does not automatically send an AXFR request to the primary external name server when the SOA's refresh timeout expires; you need to ensure that axfr-get is called often enough (such as in an hourly cron job). It will first get the SOA and check its serial number. If it's larger than the local value, then it will request the zone data via AXFR.
It would be nice to have a server version of axfr-get that handles BIND primaries the same as BIND secondaries. Then we would have a complete drop-in replacement for a BIND secondary (unless you're using DNSSEC or an experimental protocol).
6.5.7.3 Installing axfrdns
axfrdns uses TCP port 53, so it can share an IP with tinydns, which uses UDP port 53. Assuming you'll use the IP 192.193.194.195, follow these steps:
Create the service directory:
# axfrdns-conf axfrdns dnslog /etc/axfrdns /etc/tinydns 192.193.194.195

# cd / etc /axfrdns
Edit the tcp file to allow zone transfers from 200.201.202.203 for hackenbush.com and its reverse:
200.201.202.203:allow,AXFR="hackenbush.com,194.193.192.in-addr.arpa"
Get tcp into a binary format:
# make
Tell daemontools about the service:
# ln -s /etc/axfrdns /service
6.5.7.4 Running axfrdns
The secondary server will request a zone transfer from axfrdns when the TTL of the zone's SOA record expires. axfrdns will serve the zone from the same authoritative database used by tinydns: data.cdb. You can also cause the secondary server to request a zone transfer immediately by sending it a notify message. Although not a part of standard djbdns, the Perl script tinydns-notify (available online at http://www.sericyb.com.au/tinydns-notify) can be used for this.
axfrdns only responds to AXFR requests, and it transfers whole zones. If an external name server like BIND makes an IXFR request to axfrdns, it will fail. RFC 1995 says the requester should then try AXFR (RFC 1995), but a bug in BIND prevents this. The problem is fixed by any of these:
Patch axfrdns to accept IXFR. A two-line patch has been proposed.
Upgrade BIND to Version 9.2 or higher.
Configure BIND with request-ixfr no;.
For incremental and secure transfers, Bernstein recommends using rsync and ssh instead of AXFR and IXFR.
6.5.8 Encrypting Zone Transfers with rsync and ssh
If you're using djbdns on all your servers, you don't need to transfer domain data with AXFR. Instead, you can use rsync and ssh for incremental secure transfers:
If you haven't already, install the rsync and ssh servers and clients.
Start the rsync and sshd daemons on the secondary server.
Give the primary server permission to write to the secondary server via ssh.
Edit /service/tinydns/root/Makefile. If your secondary server's address is 192.193.194.195, your Makefile should look like this:
remote: data.cdb

    rsync -az -e ssh data.cdb 192.193.194.195:/service/tinydns/root/data.cdb

data.cdb: data

    /usr/local/bin/tinydns-data
You will normally be prompted for a passphrase by ssh. To avoid this, create a key pair and copy the public key to the user's directory on the secondary server. Details can be found in SSH, The Definitive Guide (O'Reilly).
That's it! Now, whenever you make changes to tinydns, whether through the helper applications or by directly editing zone files and typing make to publish them, the database data.cdb will be copied to the secondary server. Using rsync guarantees that only changed portions will be copied. Using ssh guarantees that the data will be encrypted in transit and protected against snooping or modification.
Alternatively, you can rsync the datafile rather than the data.cdb database and then run make on the secondary server to create the database.I
6.5.9 Migrating from BIND
If you are only using BIND as a caching server, then installing dnscache will replace BIND completely. Don't forget to turn off the named process.
If BIND is serving data on your domains and it's configured like most, it can be replaced by tinydns. Some newer features like DNSSEC and IXFR are not supported, but ssh and rsync provide simpler and better functionality.
Bernstein describes at length how to migrate your site from BIND to tinydns in http://cr.yp.to/djbdns/frombind.html. This description includes the following:
Using axfr-get to get zone data from a BIND server and convert it to tinydns-data format.
Replacing serial numbers and TTLs with automatic values.
Merging record types.
Testing your setup while BIND is running and replacing it gracefully.


