3.4 Using the AirPort Admin Utility
For detailed configuration of any of the AirPort Base Stations, you'll need to turn to the AirPort Admin Utility. This program lets you select and configure any of the Apple Base Stations on your network (and a few older base stations from Lucent or Orinoco). In this section, we'll run through the different screens of the AirPort Admin Utility and discuss the settings on each screen. We'll be administering an AirPort Extreme Base Station; prior models have fewer settings, and the AirPort Admin Utility shows a correspondingly smaller set of options when used with those models. But many of the settings are common to all models, so you may find discussion of the features you're interested in even if you have a Graphite or Snow Base Station.
To administer an AirPort Extreme Base Station, follow these steps:
Launch the AirPort Admin Utility, found in /Applications/Utilities/. The application's main window appears, as shown in Figure 3-19. The utility scans the network for all available base stations.
Figure 3-19. AirPort Admin Utility screen
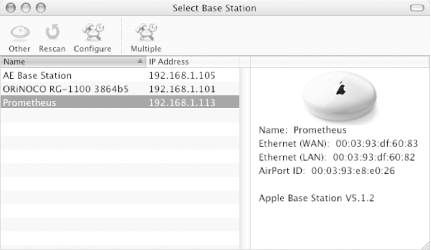
In the list, select the base station that you want to administer.
Click Configure.
Enter the password for the base station, then click OK. The Summary screen for the base station appears, showing some of the basic settings for the base station, as in Figure 3-20.
The AirPort Admin Utility has two simplified screens, Name and Password, and Internet Connection, which have commonly accessed settings. These settings are also available on the detailed screens available from Show All Settings.
Figure 3-20. AirPort Admin Utility Summary screen
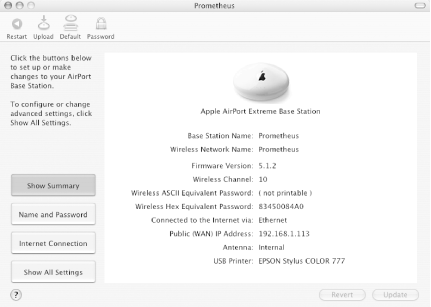
Click Show All Settings. The detailed settings (discussed in the following sections) appear.
3.4.1 AirPort Tab
The AirPort tab of the AirPort Admin Utility, shown in Figure 3-21, allows you to change the names and passwords for the base station and wireless network.
Figure 3-21. AirPort tab
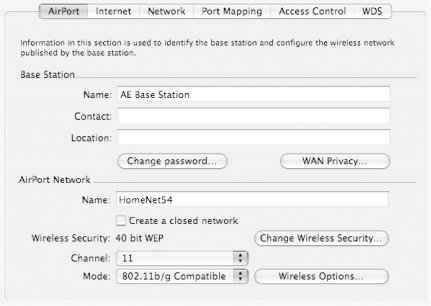
Things to know about this screen:
The Base Station Name is the name used by the AirPort Admin Utility.
The AirPort Network Name is another name for the SSID. It is the name that shows up in the AirPort menu on client machines.
In the Base Station section, clicking the WAN Privacy button brings up a sheet that allows you to enable or disable certain access features sent over the WAN port, as shown in Figure 3-22.
Figure 3-22. WAN privacy settings
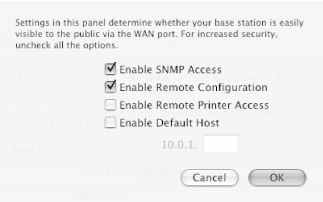
These access features include:
Enable SNMP Access allows the base station to be managed using the Simple Network Management Protocol (SNMP). Networks using SNMP are more vulnerable to denial-of-service attacks, and leaving SNMP on makes it easier for unauthorized people to change network settings.
Enable Remote Configuration allows the base station to be configured over the WAN port, i.e., over the Internet. When this is turned on, the base station's Rendezvous information (its name and IP address) is published over the WAN port.
Enable Print Remote Access enables computers using the WAN port to print using the printer connected to the USB port on the AirPort Extreme Base Station. This would, for example, allow you to print over the Internet to a printer at home while you are on the road.
Enable Default Host allows you to select a computer on your wireless network to be exposed to the Internet, bypassing the AirPort Extreme Base Station's built-in firewall. On base stations from other manufacturers, this feature is often referred to as the DMZ host.
The "Create a closed network" setting turns on or off the broadcast of the AirPort Network Name (SSID). If this setting is turned on, clients will have to manually type in the name of the wireless network to gain access to it.
To enable encryption for the Base Station, click the Change Wireless Security button. From the resulting sheet, you may then set one of four levels of security, which are, in increasing order of security strength, WEP 40-bit, WEP 128-bit, WPA Personal, and WPA Enterprise. The WPA settings are available only on AirPort Extreme Base Stations.
You can set the wireless channel the base station uses, from 1 to 11, using the Channel pop-up menu.
The Mode pop-up menu allows you to set an AirPort Extreme Base Station to one of three settings: 802.11b Only, 802.11b/g Compatible, or 802.11g Only.
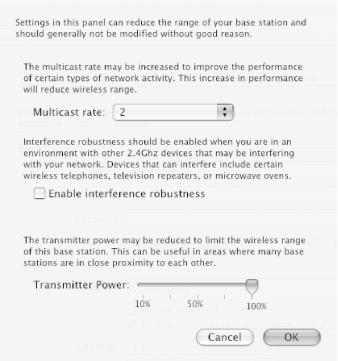
The Wireless Options button (labeled More in older versions of the Admin Utility) brings up a sheet with three advanced settings and their explanations, as shown in Figure 3-23.
Figure 3-23. Advanced AirPort settings
3.4.2 Internet Tab
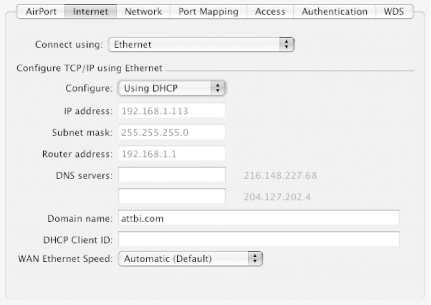
The Internet tab, shown in Figure 3-24, is where you enter the settings needed to connect to your ISP.
Figure 3-24. The Internet tab
Things to know about this screen:
The contents of the screen change according to the choice made in the "Connect using" pop-up menu. The choices are:
Ethernet is chosen when connecting to a DSL or cable modem over the WAN port.
Modem (V.90) is chosen when you are using the base station's modem to connect to an ISP at 56 Kbps.
Modem (V.34) is chosen when you are using the base station's modem to connect to an ISP at 28.8 Kbps.
PPP over Ethernet (PPPoE) is chosen to connect to some DSL or cable modem ISPs.
America Online (AOLnet, V.90) is chosen when you are using the base station's modem to connect to America Online at 56 Kbps.
America Online (AOLnet, V.34) is chosen when you are using the base station's modem to connect to America Online at 28.8 Kbps.
America Online (DSL) is chosen when you are using America Online as your ISP over a DSL connection.
AirPort (WDS) is chosen when the base station is part of a Wireless Distribution System. See Section 3.4.7 later in this chapter for more information.
3.4.3 Network Tab
The Network tab, shown in Figure 3-25, controls how the base station's Internet connection is shared with its wireless clients. Things to know about this screen:
Figure 3-25. Network tab
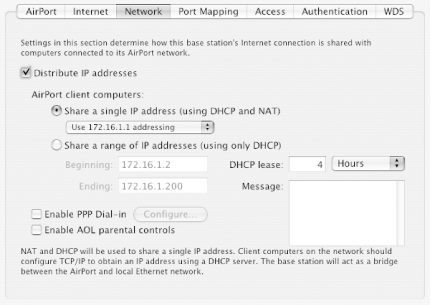
Deselecting "Distribute IP addresses" will turn off the base station's DHCP server, and wireless clients will be able to access the Internet only if they set up their TCP/IP settings manually, and if the ISP provides multiple IP addresses. Deselecting this setting is rarely done.
You can choose the IP numbering for your wireless network from the pop-up menu under "Share a single IP address (using DHCP and NAT)." You can choose to begin your numbering at one of three address blocks: 10.0.1.1 (the default choice), 172.16.1.1, or 192.168.1.1.
The "Share a range of IP addresses (using only DHCP)" setting turns off Network Address Translation (NAT) and should only be used if you are prepared to have your wireless clients use a specific range of IP addresses that have been assigned by a network administrator.
"Enable PPP Dial-in" will cause the base station's modem to answer telephone calls. This enables you to dial into the wireless network using a modem. Apple recommends that you use this feature with a dedicated telephone line. If you enable this setting, you'll need to use the Configure button to set up a username and password for the base station.
The "DHCP lease" setting controls the amount of time a dynamic IP address will be valid for a computer on the wireless network. The default lease time is four hours.
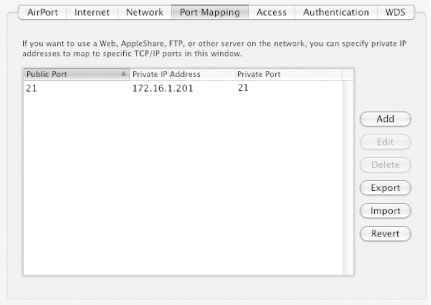
3.4.4 Port Mapping Tab
The Port Mapping tab allows you to use a wireless client as a web, FTP, or AppleShare server. This ensures that requests are properly routed to the server. In order to use port mapping, you must configure TCP/IP manually on the computer that is running the server (so that it has a permanent IP address).
To set up port mapping, follow these steps:
On the Port Mapping tab, click the Add button. The Port sheet appears, as shown in Figure 3-26.
Figure 3-26. Setting port mapping
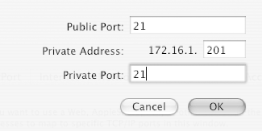
Enter the Public Port, which is the port number that other computers will use to access the server.
Enter the Private IP Address, which is the manually assigned, private IP address of the server.
Enter the Private Port, which is the port that will be used on the server to provide the service. In most cases, it can be the same number as the public port.
Click OK. The new port assignment will appear in the Port Mapping screen, as shown in Figure 3-27.
Figure 3-27. The Port Mapping tab
3.4.5 Access Tab
This tab lets you restrict access to your base station by the MAC (Media Access Control) address of the client. You'll find further discussion in Chapter 5, in Section 5.6.1.1.
3.4.6 Authentication Tab
This tab handles setting up your base station to support centrally managed user authentication using a RADIUS server. This is discussed in depth in Chapter 5, in Section 5.5.3.3.
3.4.7 WDS Tab
The WDS tab allows you to set up the AirPort Extreme Base Station as part of a Wireless Distribution System. This allows you to extend the range of your AirPort wireless network by using multiple AirPort Extreme Base Stations. There are three possible components to a WDS:
A main base station is connected to the Internet and shares its Internet connection with remote and relay base stations.
A remote base station shares the main base station's Internet connection.
A relay base station shares the main base station's Internet connection and passes on the connection to other remote or relay base stations.
|

The remote and relay base stations act as wireless bridges to the main base station, as illustrated in Figure 3-28. By using a WDS, you can share a single high-speed Internet connection over a much wider area, such as in a school or office, breaking the 150-foot effective range of a single AirPort Extreme Base Station. A main base station can support up to four remote base stations and one relay base station in a WDS.
Figure 3-28. Diagram of a WDS

To set up a WDS, follow these steps:
Begin by using the AirPort Admin Utility to configure the main base station (the one that has the high-speed Internet connection).
Click Show All Settings, then click the WDS tab, shown in Figure 3-29.
Figure 3-29. WDS tab
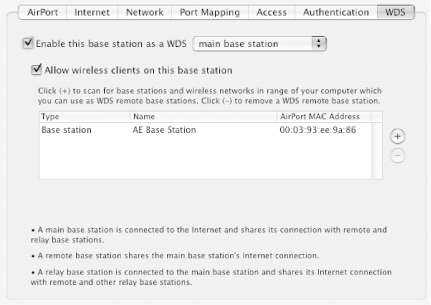
Select "Enable this base station as a WDS," then choose "main base station" from the pop-up menu.
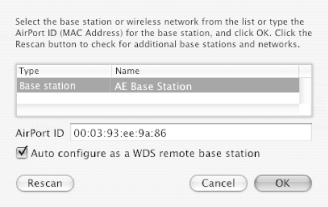
Click the Plus button to scan for other base stations that are in range of the main base station. A sheet will appear with the found base stations. Select the one you want, as shown in Figure 3-30, then click OK.
If you want to set up the remote base station manually, deselect "Auto configure as a WDS remote base station."
Figure 3-30. Selecting the remote base station
Click Update at the bottom of the AirPort Admin Utility window to save your changes.
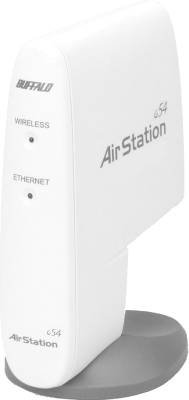
A Cheaper Remote WDS UnitBecause WDS is part of the IEEE 802.11 standard, it is being added to hardware from several different manufacturers (though because those manufacturers have not tested for interoperability, WDS-enabled boxes from different manufacturers may not work together). If you want to set up a WDS, you could purchase several AirPort Extreme Base Stations, but at $200 each (you probably wouldn't want the more expensive model as a remote base station), the costs can quickly mount up. The Buffalo WLA-G54C AirStation 54 Mbps Compact Repeater Bridge, shown in Figure 3-31, is an inexpensive ($99) 802.11g wireless bridge that supports WDS and can work with the AirPort Extreme Base Station as a remote base station. You'll have to configure the Apple unit as the main base station using the AirPort Admin Utility, and the Buffalo unit as the remote base station, using its web-based configuration utility. The WLA-G54C can even accept an external antenna for improved reception. And at half the price of an AirPort Extreme Base Station, it makes a lot of sense to use it as a remote WDS station. |
Figure 3-31. The Buffalo WLA-G54C wireless bridge/access point
|


