3.6 Internet Sharing (Software Base Stations)
One of the nicest things about Mac OS X and AirPort is that you don't need a base station to share an Internet connection wirelessly. When we travel, both of us bring our PowerBooks. One of us hooks up to the hotel's broadband Internet connection with an Ethernet cable and shares that connection with the other PowerBook via AirPort. No more fighting over the broadband connection when we're on the road!
When using Internet Sharing in Mac OS X, you will typically share your connection between two different network ports. For example, you can share the Ethernet connection with computers using AirPort, as in the next example. This was called a software base station in previous versions of the AirPort software.
|
To set up Internet Sharing, follow these steps:
Connect the computer that will be sharing its connection to the high-speed connection.
Choose Apple
System Preferences.
Click Sharing.
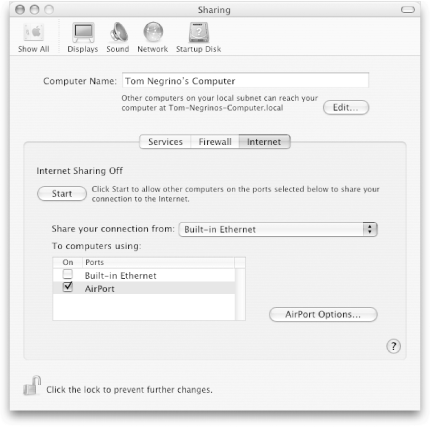
Click the Internet tab. The Internet Sharing screen appears, as shown in Figure 3-33.
Figure 3-33. The Internet Sharing screen

From the "Share your connection from" pop-up menu, choose Built-in Ethernet.
In the "To computers using" list, click the On checkbox next to AirPort. The Start button will be enabled.
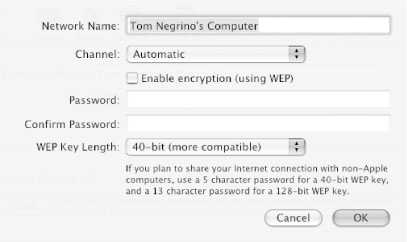
(Optional) Click AirPort Options. The Options sheet appears, as shown in Figure 3-34.
Figure 3-34. AirPort Options for Internet Sharing

(Optional) If you want, set the channel for wireless sharing and turn on WEP, click "Enable encryption (using WEP)" and enter the password twice. You can choose to use a 40-bit or 128-bit WEP key; the higher number is marginally more secure. Click OK to close the Options sheet.
Click Start. An alert sheet will appear, asking if you really want to turn on Internet Sharing.
Show the computer who's the boss by clicking Start. After a moment, Internet Sharing turns on.
|


