5.2 Native Access
The preferred mechanism for accessing native functionality on Mac OS X is the standard Java Native Interface (JNI). This section builds a simple JNI library using Apple's Project Builder tool, found in /Developer/Applications/.
|
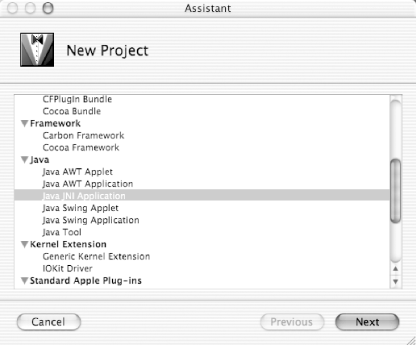
To begin, launch Project Builder and select "File


Figure 5-3. JNI's new project
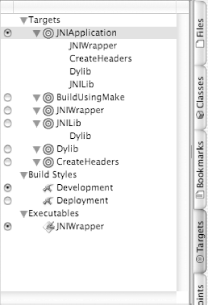
The assistant will generate several files for you automatically, as shown in Figure 5-4. Before looking at the files, however, consider the build process and the targets, as shown in Figure 5-5. When building applications with JNI, you should usually first write Java application code, and then flag methods that will have a native implementation using the native keyword:
native boolean loginAsRoot(String username, String password);
Figure 5-4. JNI files
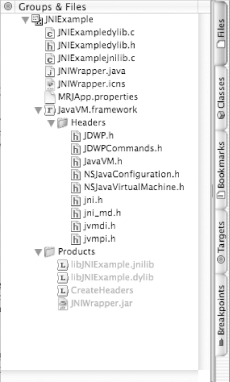
Figure 5-5. JNI targets
This Java source file is then read by the javah tool (a standard JDK command-line tool), and an appropriate C header file is generated. You then write a native implementation in C, build a library appropriate for the target platform, and ship both the original Java source file and the native library.
|
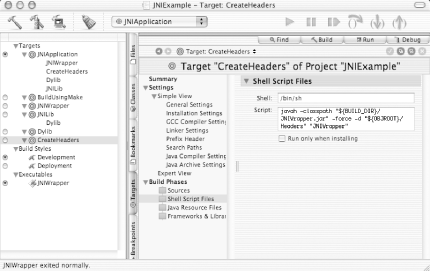
The project generated by Project Builder includes all these steps as targets in its build process. The JNIWrapper target compiles the JNIWrapper.java source file and archives it into a JAR. The CreateHeaders target calls javah on that JAR file. This scenario is shown in Figure 5-6, accessible by clicking on the "Targets" tab, and then clicking on CreateHeaders.
Figure 5-6. JNI CreateHeaders target
The final stage is building a JNI library and creating a sample dylib library. The JNI library conforms to library conventions as required by JNI, whereas a dylib is the preferred format for Mac OS X native libraries (similar to a DLL on Windows). Mac OS X native libraries are typically shipped as dylib libraries, and it's important to know how to call from a JNI library to a dylib library so you can access most Mac OS X native functionality. To facilitate this process, Project Builder provides the JNILib target, which builds the JNI library, and the Dylib target, which builds a sample dylib library.
JNI and DependenciesA common problem for JNI developers coming from other platforms is an assumption that JNI dynamic libraries can be built with interdependencies. For example, libA.jnilib contains a function foo( ). libB.jnilib needs to link against libA.jnilib in order to use foo( ). This linkage will not work on Mac OS X because JNI libraries are bundles, and all symbols are private to a bundle. This effectively makes the foo( ) method private and inaccessible by libB. One way to solve this dependency problem is to put the common functions into separate dynamic libraries (libC.dylib, for example) rather than JNI libraries, and link both libA.jnilib and libB.jnilib to libC.dylib. In other words, JNI native libraries can link only to external native functions in dynamic libraries, not to other JNI library functions. |
The rest of this section adds a new native method to access a system function to the JNIExample application. First, create a new method called test_method( ) in a JNIWrapper.java source file, as shown in Example 5-4. Be sure and do this in your new JNI Application project in Project Builder to avoid having to perform the JNI setup steps manually.
Example 5-4. The JNIWrapper source file
import java.util.*;

public class JNIWrapper {

    static {
        // Ensure native JNI library is loaded
        System.loadLibrary("JNIExample");
    }

    public JNIWrapper(  ) {
        System.out.println("JNIWrapper instance created");
    }

    native int native_method(String arg);
    native String test_method(String arg, int arg2);

    public static void main (String args[]) {
        // insert code here...
        System.out.println("Started JNIWrapper");
        JNIWrapper newjni = new JNIWrapper(  );
        int result = newjni.native_method("Hello World !");

        System.out.println(newjni.test_method("Test", 1));

        System.out.println("Finished JNIWrapper. Answer is " + result);
    }

}
Build the application in Project Builder by selecting
"Build 
When you build the project, Project Builder generates a JNIWrapper.h file, which can be found in ~/JNIExample/build/Headers/. After opening this file, you'll see the declarations shown here:
/* DO NOT EDIT THIS FILE - it is machine generated */
#include <jni.h>
/* Header for class JNIWrapper */

#ifndef _Included_JNIWrapper
#define _Included_JNIWrapper
#ifdef _  _cplusplus
extern "C" {
#endif
/*
 * Class:     JNIWrapper
 * Method:    native_method
 * Signature: (Ljava/lang/String;)I
 */
JNIEXPORT jint JNICALL Java_JNIWrapper_native_1method
  (JNIEnv *, jobject, jstring);

/*
 * Class:     JNIWrapper
 * Method:    test_method
 * Signature: (Ljava/lang/String;I)Ljava/lang/String;
 */
JNIEXPORT jstring JNICALL Java_JNIWrapper_test_1method
  (JNIEnv *, jobject, jstring, jint);

#ifdef _  _cplusplus
}
#endif
#endif
Of particular interest is the declaration for test_method. Copy and paste this declaration into the JNIExamplejnilib.c file, and add arguments and an implementation to the method, as shown in Example 5-5.
Example 5-5. Adding native code
/*
 *  JNIExamplejnilib.c
 *  JNIExample
 *
 *  Created by Will Iverson on Mon Dec 16 2002.
 *  Copyright (c) 2002 __MyCompanyName_  _. All rights reserved.
 *
 */

#include "JNIWrapper.h"
#include "JNIExampledylib.h"

JNIEXPORT jint JNICALL Java_JNIWrapper_native_1method(JNIEnv *env, jobject this,
                                                          jstring arg) {
  /* Convert to UTF8 */
  const char *argutf  = (*env)->GetStringUTFChars(env, arg, JNI_FALSE);

  /* Call into external dylib function */
  jint rc = shared_function(argutf);

  /* Release created UTF8 string */
  (*env)->ReleaseStringUTFChars(env, arg, argutf);

  return rc;
}

JNIEXPORT jstring JNICALL Java_JNIWrapper_test_1method
  (JNIEnv * env, jobject argObject, jstring argString, jint argInt)
{
  return (*env)->NewStringUTF(env, "Greetings from the native library.");
}
|
With these methods defined, you can now compile and run the
application. Select "Build 
Started JNIWrapper
JNIWrapper instance created
Greetings from the native library.
Finished JNIWrapper. Answer is 42
shared_function called with Hello World !

JNIWrapper has exited with status 0.
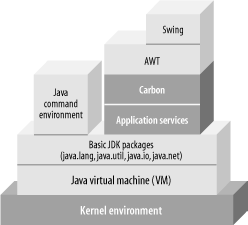
When working with native application code, you need to pay attention to the rest of the native environment you're working in. As shown in Figure 5-7, the Mac OS X JDK 1.3 user interface implementation relies on Carbon. Carbon is Apple's legacy interface provided for compatibility with Mac OS Classic applications that are recompiled (but not rewritten) for Mac OS X.
Figure 5-7. JDK 1.3 JVM implementation
|
Apple's JDK 1.4 implementation replaces the Carbon layer with an implementation based on Cocoa. For information on Cocoa and Mac OS X Unix interfaces, visit Apple's web site at http://developer.apple.com/, or check out Learning Cocoa with Objective-C, by James Duncan Davidson and Apple Computer, Inc.


