Working with Mac OS X Menus
One of the strengths of the Mac OS is that it has always featured certain menus that are very similar in all applications.
The Mac OS X Apple Menu
The Apple menu has long been one of the staples of the Mac desktop. Its main purpose has always been to provide access to certain items while you are working on the desktop as well as from within any application.
NOTE
As hard as it is to believe now, the Apple menu was not part of early versions of Mac OS X. Rather than being a menu, the Apple icon appeared in the center of the menu bar and did not have a menu associated with it. Because many longtime Mac users were unhappy about this, Apple added the Apple menu back, although certainly not with the same form or substance as the Apple menu in previous versions.
The Mac OS X Apple menu contains the commands listed in Table 4.1.
Command | What It Does |
|---|---|
About This Mac | Opens a. window showing the version of Mac OS X installed, the physical RAM installed, and the number and type of processors. You can also open Software Update to get the latest versions of Apple software and the System Profiler from this window to get more information about your Mac. |
Software Update | Opens the Software. Update tool, which you can use to get the latest versions of the Apple software installed on your Mac. |
Mac OS X Software | Opens the default Web browser and moves to the Mac OS X software downloads Web page. |
System Preferences | Opens the System Preferences application. |
Dock | Provides control over the Dock's magnification, hiding, and position settings and enables you to open the Dock Preferences pane of the System Preferences application. |
Location | Enables you to select a location for your Mac, which changes the network settings you are using. |
Recent Items | Provides a menu of applications and documents you have recently accessed; you can select an item to move back to it. The menu is organized into separate sections for applications and documents. It also has the Clear Menu command, which clears the menu. |
Force Quit | Opens the Force Quit Applications window that enables you to kill open applications (for example, when they are hung). |
Sleep | Puts the Mac to sleep. |
Restart | Restarts the Mac. |
Shut Down | Shuts down the Mac. |
Log Out Acctname | Logs the current user (whose account name is Acctname) off the Mac and opens the Login window. |
 To learn more about working with locations, see "Configuring and Using Locations," p. 989.
To learn more about Mac OS X's Force Quit command, see "Controlling Open Applications," p. 225.
TIP
If you use an Apple Cinema Display, you can put your Mac to sleep by pressing the Power button on the display.
Mac OS X Application Menus
Under Mac OS X, every application has its own Application menu. The Application menu provides the commands you use to control the application in which you are working. A certain set of commands is consistent among all Mac OS X applications. Specific applications can have more commands on their Application menu, but they must support certain basic commands on that menu. The name of the Application menu is the name of the application itself. For example, the Finder's Application menu is Finder.
NOTE
If you used Mac OS 9 or earlier versions, don't confuse the Application menu in those versions with Application menus under Mac OS X. In previous Mac OS versions, the Application menu was a single menu that showed you all the applications running on the computer; this menu was always located in the upper-right corner of the desktop. You used the Application menu to hide or show applications as well as switch between running applications. Under Mac OS X, this functionality is provided by the Dock and the Application menus. You still see the Mac OS 9 Application menu when you use the Classic environment.
The following commands appear on all Application menus:
About Application? The About Application command, where Application is the name of the active application, displays version information about the application. Some About windows also provide links to support sites, the publisher's Web site, and so on. The About Finder command displays the version of the Finder you are using.
Preferences? You use the Preferences command to set the preferences for an application. For example, you can use Finder Preferences to control specific properties of the desktop.
To learn about Finder Preferences, see "Changing the Desktop's Appearance," p. 122.TIP

The keyboard shortcut for the Preferences command has been standardized (for Apple applications at least) to be
 -,. This enables you to open the Preferences dialog box for any application with the same keys. This is a good thing.
Hide and Show commands? The Hide and Show commands enable you to control which running applications are visible. There are three of these commands on the Application menu. The Hide CurrentApplication command (where CurrentApplication is the name of the running application) hides the current application. The Hide Others command hides all the running applications except the current one, and the Show All command shows all open applications.
NOTE
Hiding an application causes all its windows and its menu bar to disappear. The application continues to run and any processes that are being completed continue. You can also minimize application windows, which places the window on the Dock; the application's menu bar continues to appear while the application is active, even if its windows are minimized.
All Application menus, except the Finder menu, also contain the following commands:
Quit? The Quit command does the same thing as it always has?it stops the running application.
Services? The Services command provides commands to enable you to work with other applications from within the current application. For example, if you are using the TextEdit word processing application, you see the Grab command on its Services menu. Selecting this command activates the Grab application that enables you to capture something on the screen. After you capture the image, it is automatically pasted into the current TextEdit document. Many other commands appear on this menu; the commands available depend on the applications installed on your Mac and how those applications support the Services menu.
To learn more about using the Services command with Mac OS X applications, see "Working with Mac OS X Application Menus," p. 152.
TIP
The keyboard shortcut for the Quit command hasn't changed. It is still ![]() -Q. When you are working on the desktop,
-Q. When you are working on the desktop, ![]() -Q doesn't do anything because you can't quit the Finder. However, you can relaunch the Finder using the Force Quit command.
-Q doesn't do anything because you can't quit the Finder. However, you can relaunch the Finder using the Force Quit command.
The Finder's Application menu (the Finder menu) also has the Empty Trash and Secure Empty Trash commands, which are unique to its Application menu. The Empty Trash command does what it always has, which is to delete any files located in the Trash. The new Secure Empty Trash deletes files located in the Trash and overwrites the disk space on which those files were stored so they can't be recovered. Because the Secure Empty Trash command overwrites the disk space on which the files where written, it takes much longer to execute than does the Empty Trash command (of course, because it works in the background, it shouldn't really be noticeable). |
Mac OS X File Menus
The Mac has always had a File menu; under Mac OS X, this menu is purer than it was in previous versions of the OS. For example, in previous versions, the File menu contained commands for working with files as well as controlling the application. Under Mac OS X, the File menu contains only commands for working with files or folders.
The specific commands you see on an application's File menu depend on the application. Most applications' File menus have the New, Open, Save, Save As, Print, and Page Setup commands. Many other commands might appear on the File menu as well.
The Finder's File menu contains the commands listed in Table 4.2.
Command | What It Does |
|---|---|
New Finder Window | Opens a new Finder window |
New Folder | Creates a new folder |
Open | Opens the selected item |
Open With | Enables you to open a selected file with a specific application |
Close Window | Closes the active window |
Get Info | Opens the Info window |
Duplicate | Creates a duplicate of the selected item |
Make Alias | Creates an alias of the selected item |
Show Original | Exposes the original item for which an alias was created |
| Adds an alias of the selected item to the Places Sidebar |
Create Archive | Compresses the selected folders and files into a ZIP file |
Move to Trash | Moves the selected item to the Trash |
Eject | Ejects the selected item (disc, disk image, server volume, and so on) |
Burn Disc | Burns the selected CD or DVD |
Find | Opens the Finder's Find tool so you can locate files and folders |
| Applies the label you choose to the selected items |
NOTE
The Mac OS X version 10.3 Archive command is one of the most useful Finder commands. This command enables you to create compressed files from any folders and files on your Mac. Even better, Mac OS X now supports the ZIP compression format, which is the standard, native compression format on Windows computers. You no longer need a separate application to compress files. You can also expand any ZIP file from the desktop by opening it.
Mac OS X Edit Menus
Under Mac OS X, the Edit menu is much as it has always been. The Edit menu contains commands for editing data. The commands that always appear on the Edit menu are Cut, Copy, and Paste. Applications can provide many more commands on this menu, such as Undo, Redo, Select All, and so on.
In addition to the standard Edit commands, the Finder's Edit menu also has the Select All command, which selects everything in the active window; the Show Clipboard command, which shows what has been copied to the Clipboard; and the Special Characters command, which opens the Character palette.
The Finder View Menu
The Finder's View menu contains the commands you use to view Finder windows.
To learn about using the Finder's View commands, see Chapter 3, "Viewing and Navigating Mac OS X Finder Windows," p. 47.
The Finder Go Menu
The Finder's Go menu, as you might guess from its name, contains commands you use to go places. The Go menu enables you to move to the following locations:
Back or Forward? You can move among the windows in a chain of open Finder windows by using the Back and Forward commands.
Enclosing Folder?
You can move into the folder that contains the currently selected item by choosing this command.Directories? You can move to any of the directories listed on the Go menu by selecting the directory into which you want to move.
Recent Folders? This command lists the most recent folders you have used; select a folder to return to it. You can clear the Recent Folders menu by selecting Clear Menu.
Folders? Use the Go To Folder command to enter the path to a specific folder to open it.
Servers? Use the Connect To Server command to open a server on your network.
To learn how to use the Go menu to navigate directories, see "Changing Directories with the Go Menu," p. 65.
To learn how to connect to servers, see "Accessing Shared Files from a Mac OS X Computer," p. 834.
Mac OS X Window Menus
Another standard Mac OS X menu is the Window menu. This menu provides commands you use to work with windows that are currently open. Common choices on the Window menu include the following:
Minimize Window? This does the same thing as clicking the Minimize button in a window?it moves the window onto the Dock.
Bring All to Front? This command brings all open windows to the front. For example, if you have a lot of open Finder windows and then switch to an application and then back to the Finder, you might not see all your open Finder windows. If you use this command, they all come to the foreground so you can see them.
List of Open Windows? The Window menu always displays a list of the windows open for the application providing that menu. You can switch to an open window by selecting it on the menu.
Close Window? This closes the active window. (You won't see this command on the Finder's Window menu.)
Zoom Window? This does the same thing as the Maximize button. (You won't see this command on the Finder's Window menu either.)
TIP
A great way to manage all open windows (not just those open in the current application) is by using the Exposé feature. More on that later in this chapter.
NOTE
The Window menu is not really new; many Mac applications have always used a Window menu to enable you to switch between open documents. However, the menu was new to the Finder for Mac OS X, and because it is now a system function, it should appear in all applications.
On the Window menu, the active window in the application you are currently using is marked with some sort of icon. The active Finder window is marked with a check mark; other applications might use a different indicator (for example, a diamond). Be aware that a window can be both active and minimized, in which case the active icon on the Window menu can help you identify the active window even if you can't see that window (because it is on the Dock).
You might see more or fewer commands on the Window menu when you are working in specific applications.
NOTE
Note that the Window menu provided by Classic applications is not the same as the Window menu provided by Carbonized or Cocoa applications. For example, if you are running the Classic version of Word 2001, you see its Window menu rather than one provided by Mac OS X (so you won't see the Minimize or other commands you would expect to see on an OS X Window menu).
Mac OS X Help Menus
Most applications provide a Help menu that enables you to open their help system.
The Finder's Help menu contains one command?Mac Help. This command opens the Mac Help application, which provides extensive help for many areas of the OS (see Figure 4.2). Even better, many applications you install integrate their help systems into the OS help system. This enables you to access plenty of help using the same tool.
Figure 4.2. You can get a lot of Mac OS help by using the Help application.
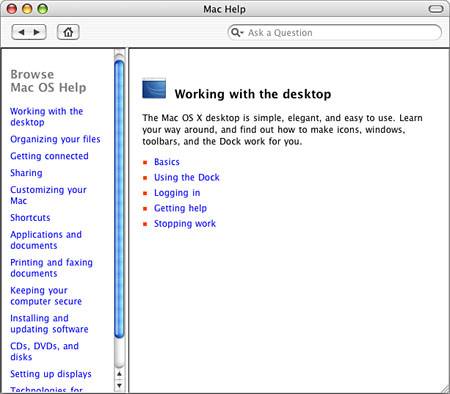
The Help application is based on HTML, so it works the same way Web pages do. You can search for help and click links and buttons to access information and move around. Fortunately, the Help engine works much more quickly in Mac OS X version 10.3 than it did under previous versions.
The Home button in the Help Center's toolbar takes you back to the current help's home page. Like other Mac OS X applications, you can customize the Help application's toolbar by using the View, Customize Toolbar command.
TIP
When you search for help, you frequently see the Tell Me More link. This link opens other pages that contain topics related to the one for which you searched.
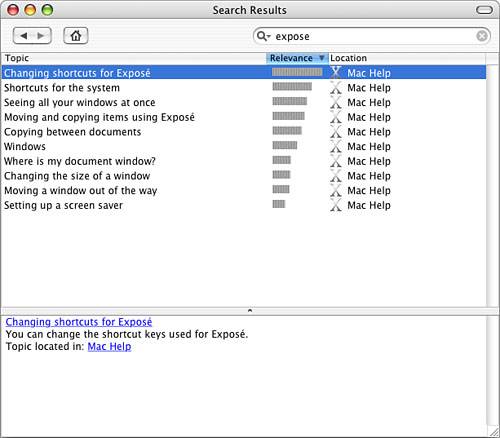
You can search the Help application using the Search tool located in the toolbar. This tool works just like the Search tool in other areas. Select the help area you want to search using the Magnifying Glass icon and then type the text for which you want to search. Press Return to perform the search; the results appear in the Search Results window (see Figure 4.3). This window lists each help topic that matches your search. By default, this window is sorted by the Relevance column, which is the Help system's judgment of how well a topic addresses your search criterion. The Location column shows you in which help system the topic is included.
Figure 4.3. You can search the Help application to find specific topics.
TIP
You can also browse most help systems from their home pages. This is often an even better way to find a specific topic because you don't have to be concerned about using specific words as you do when you search for help.
You can open a topic by double-clicking it. The topic appears in the window for viewing. If you select a topic by single-clicking it, a summary of the topic appears in the bottom pane of the Help window.
The Help system's Go menu tracks the recent topics you have visited; you can return to a topic by selecting it on the menu. You can use the Library menu to view a list of all help resources served through the Mac OS X Help application; to move into another help resource such as iMovie Help, click it in the list. |
NOTE
Need help with Help? Select Help, Help Viewer Help. (Try to use the word help more times in the same sentence than that!)
Some help topics assist you in performing the action about which you are asking by providing hyperlinks that open the related application or resource.
Mac OS X Contextual Menus
As with previous versions of the OS, Mac OS X supports contextual menus. Contextual menus are pop-up menus that appear in various locations and contain commands specifically related to the context in which you are working. You can access contextual menus by pointing to an object that provides a contextual menu, holding down the Control key, and clicking the mouse button. The contextual menu appears and you can select a command on it.
TIP
Mac OS X version 10.3 (finally!) supports a two-button mouse by default. You can open an item's contextual menu by right-clicking it. You can also program most multibutton input devices to perform a right-click. This is one area where Windows has been ahead of the Mac for some time; all Windows mouse devices have at least two buttons. I strongly recommend that you use a mouse or trackball that has at least two buttons, if for no other reason than the convenience or opening contextual menus with one hand. |
The desktop and Finder provide contextual menus, as do many applications, including those not provided by Apple. For example, the Microsoft Office application provides excellent support for contextual menus.
NOTE
Most Mac OS 9 applications still provide their contextual menus when you run them under the Mac OS X Classic environment.
In Finder windows or on the desktop, you can tell when a contextual menu is provided by pointing to something and pressing the Control key. If a contextual menu is available, you see the contextual menu pointer, which is a small rectangle containing horizontal lines. When you see this pointer, click the mouse button to see the menu.
A summary of some of the more useful Finder contextual menu commands is provided in Table 4.3.
Object | Command | What It Does |
|---|---|---|
Desktop | Change Desktop Background | Opens the Desktop & Screen Saver pane of the System Preferences application. |
Folder, file | Color Label | Applies a label to the selected items. |
Folder, file | Copy | Copies selected items. |
Folder, file | Create Archive | Creates a Zip file containing the selected items. |
Mac OS X window toolbars | Customize Toolbar | Enables you to customize the current toolbar. |
Folder, file | Duplicate | Duplicates the selected items. |
Desktop, Finder window, folder, file | Folder Action commands | Folder actions are AppleScripts you can attach to folders so those actions are performed automatically. You use the Attach a Folder Action command to select the actions associated with the selected item. You use the Configure Folder Actions command to configure how actions for an item work. You use the Disable Folder Actions command to disable an item's folder actions. |
Desktop, Finder window, folder, file | Get Info | Opens the Info window (this is covered in more detail later in this chapter). |
Folder, file | Make Alias | Creates an alias of the selected items. |
Folder, file | Move to Trash | Moves the selected items to the Trash. |
Desktop, Finder window | New Folder | Creates a new folder. |
Folder, file | Open | Opens the selected item. |
File | Open With | Enables you to choose the application to use to open the selected file. |
Folder | Paste item | Pastes the previously created copy of files or folders in the current location. |
Mac OS X window toolbars | Toolbar Format commands | Use these to change the format of the toolbar, such as Text Only to hide the icons and display only text. |
The Finder Action Pop-up Menu
New to Mac OS X is the Action pop-up menu on the Finder window's toolbar. This pop-up menu provides contextual commands that work just like those on contextual menus. When you select an item or view a folder, the appropriate commands appear on the menu (see Figure 4.4). |
Figure 4.4. The new Action pop-up menu provides contextual commands.
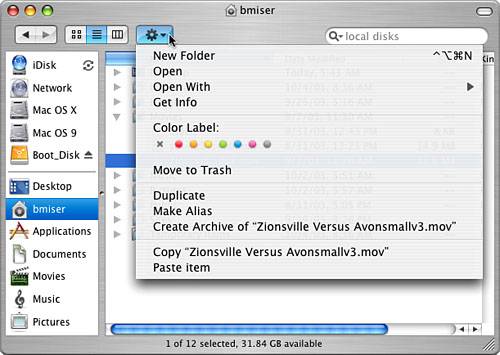
The commands that appear on this menu are the same as those that appear on contextual menus (refer to Table 4.3). The one exception is that, when you are viewing the contents of a folder with no items selected, the Show View Options command appears on the Action pop-up menu.


