Mac OS X to the Max: Making the Most of AirPort
AirPort is an amazingly powerful yet easy-to-use technology. In the section, you learn a couple of tricks to make the most of it.
Using a Graphite AirPort Base Station to Share an Internet Connection with a Wired Network
AirPort enables you to easily share an Internet connection among AirPort-equipped machines. However, you can also use an AirPort base station to share an Internet account among machines that are connected to it via a wired network, such as an Ethernet network. You can do this because the base station is actually a DHCP server.
 To learn more about DHCP servers, see Chapter 27, "Sharing an Internet Connection," p. 855.
Snow and AirPort Extreme base stations include a LAN port to which you can attached a wired network. These base stations provide services to the wired network automatically and no further configuration is required.
However, the original Graphite base station did not have this additional port and therefore has to be configured to act as a bridge between an Ethernet and AirPort network.
To configure an original Graphite AirPort HAP as a DHCP server, use steps similar to those you used to manually configure the AirPort HAP earlier in this chapter. On the Network tab, check the following boxes: "Ethernet client computers also share a single IP address (using NAT)" and "Enable DHCP server on Ethernet." Update the base station settings by clicking the Update button. Any machines set to use a DHCP server can then access the Internet through the AirPort HAP whether they connect to it via AirPort or Ethernet.
If you want AirPort-connected machines to be capable of accessing devices on an Ethernet network, such as printers, check the Enable AirPort to Ethernet Bridging check box.
To configure an AirPort HAP, see "Configuring a Base Station Manually," p. 307.
Making AirPort Go Farther
AirPort provides large range in most circumstances, and a single base station can usually provide coverage for an entire house easily.
NOTE
The original PowerBook G4s have a very poor internal antenna and often have trouble connecting in the same location as other machines, such as iMacs.
However, there are a couple of ways you can extend the range of an AirPort network to make it cover an even larger area.
If you use an AirPort Extreme base station with an Antenna Port, you can plug an external antenna into this port to increase the base station's range by a significant amount. There are several third-party antennas available; check out www.smalldog.com to get more information about them.
You can also link AirPort Extreme base stations together wirelessly so that the signal is rebroadcast from one base station to the next. You can continue this chain of base stations to extend a network over a very large area. This is called a wireless distribution system (WDS). Following are the general steps to create a WDS:
Configure one base station to connect to the Internet.
Open the AirPort Admin Utility, select that base station, and click Configure.
Click Show All Settings and then click the WDS tab (see Figure 11.17).
Figure 11.17. Using WDS, you can dramatically extend the range of an AirPort network.
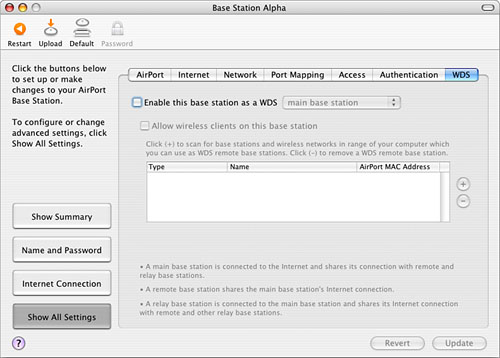
Check the "Enable this base station as a WDS" check box and select "main base station" on the pop-up menu.
NOTE
A remote base station shares the Internet connection of the main base station. A relay base station shares the main base station's Internet connection and can also share its connection with additional base stations.
Check the "Allow wireless clients on this base station" check box.
Click the Add Base Station button, which is the plus sign next to the list of base stations. The Base Station Selection sheet appears (see Figure 11.18).
Figure 11.18. Use this sheet to select a base station to add to the WDS you are creating.

Choose the base station you want to add to the WDS. Its ID should be configured automatically; if not, enter it (this ID is located on the base station).
Check the "Auto configure as a WDS remove base station" check box.
Click OK to return to the Base Station window; the base station you added is shown on the list.
Repeat steps 6?9 to add other base stations to the WDS.
Click Update. The Admin Utility selects and connects to each base station. As it does, you must enter the appropriate passwords. When the process is complete, you see a sheet that provides a status for each base station. If the WDS setup was successful, you can use that base station as part of the WDS.
After you have configured the WDS, you can place the base stations on it in various locations throughout an area to increase the coverage. You can then set machines to use the base station that is closest to their locations.


