Using a .Mac iDisk and HomePage to Create and Serve Your Web Pages
Apple's .Mac is a suite of services you can access. These services include the following:
Email? Using .Mac provides you with an email account you can use to send and receive email. Your .Mac email address ends in @mac.com, so using it is a good way to identify yourself as a Mac user. Using the Webmail service, you can also access your .Mac email account from a Web browser.
 To learn how to configure the Mail application to use your .Mac email account, see "Configuring Email Accounts," p. 349.
iCards? These are electronic greeting cards you can send to others via email. There are numerous card combinations you can send?these are great for the artistically challenged because you can create a customized greeting card by selecting from the available images and styles.
Software? The .Mac service enables you to download and use software for free, such as Apple's Backup, Virex Anti-virus, and games. You can also access a lot of other software, such as demos, updates, and more.
Online resources? You can store your Address Book and bookmarks online so you can access them from anywhere you can access the Web. You can share your iCal calendar online as well.
Online chat? Take advantage of iChat AV to chat online via text, audio, and video.
iDisk?
 The iDisk is a virtual disk space you can use to store files. A number of folders exist on an iDisk by default. For example, you can place items in your Public folder, and any Mac users who know your .Mac member name can access the files in that folder (which is an excellent way to share files with other Mac users around the world). And, you can create a Web site to share the files in your Public folder with anyone. You also store the data that forms your .Mac Web page on your iDisk. Under Mac OS X version 10.3, you can configure your Mac to create a local copy of your iDisk and keep it automatically synchronized with the online version.
HomePage? The HomePage service enables you to create and serve a Web site.
The only requirement to use .Mac is that you are using Mac OS 9 or later. Because you are using Mac OS X, this certainly isn't a problem.
Creating a .Mac Account
Before you can access .Mac services, you need to obtain a .Mac account.
At press time, the cost of a .Mac account was $99.95 per year. However, you can obtain and use a trial .Mac account that provides access to most of the .Mac services free for 60 days. Obtaining a .Mac account is pretty straightforward.
When you installed Mac OS X, you were prompted to enter your existing .Mac account information or to create a .Mac account. If you entered your .Mac account information or created a .Mac account at that time, you are all set and can skip to the next section.
NOTE
If you created or configured an existing .Mac account when you installed Mac OS X, your .Mac email account was configured in the Mail application for you automatically.
To create a .Mac account outside of the Mac OS X installer, do the following:
Open the System Preferences utility and click the .Mac icon to open the .Mac pane.
NOTE
The .Mac pane replaces the Internet pane that was part of previous versions of Mac OS X.
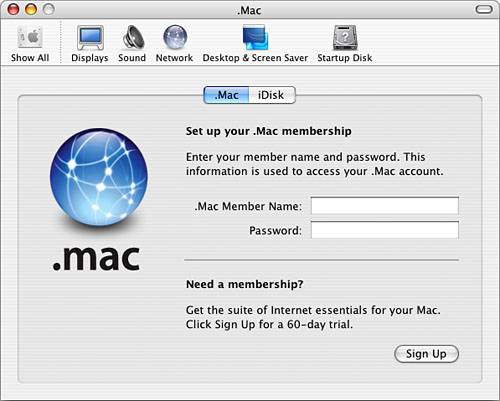
Click the Sign Up button (see Figure 14.1). Your default Web browser opens and you move to the .Mac Signup Web site.
Figure 14.1. Clicking the Sign Up button takes you to the .Mac Account Setup Web site.
Follow the onscreen instructions to create your .Mac account. You will have to provide personal information and accept a license agreement. As part of the process, you create a member name and password for your account. You can choose to create a free trial account, or you can pay for a full account. If you create a full account, you must provide payment information, such as a credit card.
Create your member name by typing it in the .Mac Member Name text box. You should put some thought into this step. The member name you choose will be part of your .Mac email address (which will be membername@mac.com), and it will also be part of the URL to your .Mac Web site. Typically, you should choose some variation of your name so that people can remember your email address and URL and can easily associate both with you. Your member name has to be at least 3 characters long and must be fewer than 20 characters. Again, you should keep your member name fairly short to make it easier for other people to work with.
Create your password and password hint question. Your password has to be between 6 and 32 characters long, and you can use special characters if you want. The password hint question is a means that you can use to identify yourself if you forget your password (and if you have a memory as poor as mine is, you will!). Try to use a question you can answer only one way, such as your birth city or your mother's last name. Don't use something that can change (such as the name of your favorite movie), because by the time you need to use the hint, it might have changed and you won't be able to answer your own question.
When you have successfully created an account, you see a page that provides your member name, password, email address, and email server information. You might consider printing this page so you will have the information if you need to retrieve it at a later time.
TIP
You can also save the page using your browser's Save As command. You can also save it as a PDF via the Print command.
Move back to the .Mac pane of the System Preferences utility. Enter your .Mac member name and password in the pane.
Quit the System Preferences utility.
Accessing Your .Mac Account
To use .Mac services, you need to log in to your .Mac account. When you enter your member name and password in the .Mac pane, your Mac handles the login process for you automatically if you access .Mac from your desktop, such as when you work with your iDisk.
For other services, such as HomePage, you need to log in to your .Mac account on the .Mac Web page. Open a Web browser, move to www.apple.com, and click the .Mac tab. When the .Mac page appears, log in using your member name and password. Your member name will be entered for you automatically; all you have to do is input your password and click Log in. You will move to the .Mac services page; click an icon to begin working with that service (such as HomePage).
After you have logged in once, you can sometimes return to your .Mac services page without having to log in again. If you can move directly to one of the services pages, such as the HomePage page, you are already logged in to your account. If you see the Login page instead, you have to log back in to your account before you can use a service. (At the time of writing, this behavior seemed to be a bit inconsistent, so you just have to try it for yourself.)
To log out from your current .Mac account, click the Logout link on the .Mac Web page. If you click the "Log out completely" link, your member name won't be remembered on the .Mac login screen.
NOTE
Each user account on your Mac can have its own .Mac account. The settings in the .Mac pane of the System Preferences utility of one account do not affect the other accounts. The steps to work with other accounts are exactly the same as those to work with the first one you create.
TIP
You can log in to your .Mac account from any computer running Mac OS 9 or later by visiting the .Mac Web page and logging in.
If the Member sign-in area doesn't appear, see "No Member Sign-In Area Appears" in the "Troubleshooting" section at the end of this chapter. |
Using Your iDisk
Your iDisk is a vital element of the creation of your Web site because you store all the files you use on your Web page in the appropriate folders on your iDisk. And, you can use your iDisk to store any files you choose online. You can make these files available to others, or you might use the space to back up important files. You can also store files on your iDisk and access them from another Mac. Under version 10.3, you can configure a Mac to create a local copy of your iDisk and keep it synchronized with your online iDisk. This is especially useful when you work with the same set of files from multiple locations, such as a work Mac and your home Mac. |
To learn more about iSync, see "Synchronizing with iSync," p. 689.
When you purchase a .Mac account, your default iDisk can store up to 100MB of data. You can increase this up to 1GB, but you'll have to pay a fee for additional storage.
CAUTION
Using an iDisk over a slow Internet connection can be an exercise in futility. When you use an iDisk, you are usually moving a large amount of data from your machine to the iDisk. When using a dial-up account or other slow connection, this can be quite frustrating?even simple tasks such as opening the iDisk can seem to take forever. If you use a dial-up account to connect to the Internet, try to use the iDisk at less popular times of the day (such as early in the morning) so that the performance will be as good as it gets. The speed might still annoy you, but at least you stand a better chance of being able to tolerate it. A good choice for dial-up users is to create a copy of your iDisk on your Mac and choose the manual synchronization option. Then, you can move files to and from the local copy of your iDisk. When you are ready to put those files on the Net, you can perform synchronization. This might take a long time to do, but you don't have to be at your Mac during the process (unlike if you work with your online iDisk to move files).
The good news is that using the iDisk is faster under Mac OS X than it was using previous versions of the Mac OS.
Configuring Your iDisk
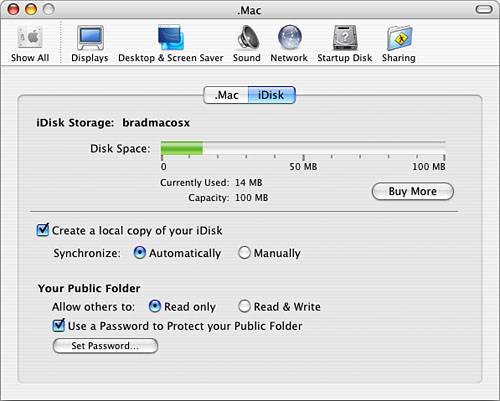
You can configure your iDisk for your Mac OS X user account by opening the iDisk tab of the .Mac pane of the System Preferences utility (see Figure 14.2).
Figure 14.2. Using the iDisk tab of the .Mac pane, you can configure your iDisk; here, you can see that I have 100MB of space available, but I am currently using only 14MB.
To configure your iDisk, perform the following steps:
Open the System Preferences utility and click the .Mac button to open the .Mac pane.
Click the iDisk tab.
Use the Disk Space bar to assess the status of your disk space. You can upgrade the amount of space you have by clicking the Buy More button (more on that later).
To create a copy of your iDisk on your Mac, check the "Create a local copy of your iDisk" check box. This causes your Mac to download a copy of your iDisk so you can access it from your desktop. If you want your Mac to keep the local copy and the online iDisk synchronized at all times, click the Automatically button (this option should be selected only if you have a broadband connection to the Net). If you prefer to manually synchronize your local and online iDisks, click the Manually button (this option should be used if you use a dial-up account).
To control whether others can input information to the Public folder on your iDisk, use the radio buttons. Click the Read-Only button if you want users to only be able to read files in the Public folder on your iDisk. Click the Read & Write button if you want them to also be able to place files there. If you chose the latter option, you should protect your iDisk with a password.
To protect your iDisk with a password, check the "Use a Password to Protect your Public Folder" check box and click the Set Password button.
In the resulting sheet, enter the password you want to use, confirm it, and click OK.
Quit the System Preferences utility.
Working with a Local Copy of Your iDisk
If you chose to create a local copy of your iDisk, you can open it from the Finder by clicking its icon in the Places sidebar (see Figure 14.3). In the resulting Finder window, you will see the folders on your iDisk. At the bottom of the window, you can see the current space being used along with information about the last synchronization that was performed.
Figure 14.3. You can access your local copy of your iDisk by clicking its icon in the Places sidebar of a Finder window.

NOTE
The local iDisk is actually a disk image file called Previous local iDisk for username.dmg, where username is your member name.
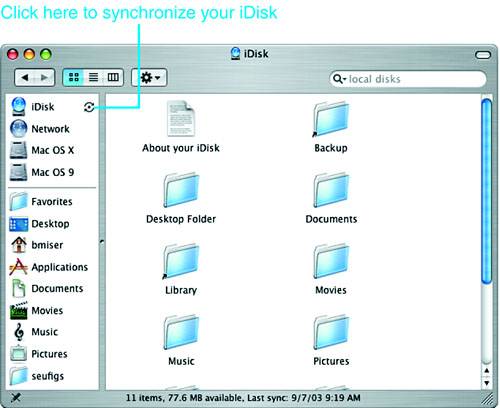
If you set the local copy of your iDisk for manual synchronization, you can perform synchronization by clicking the Synchronize now button located to the right of the iDisk icon in the Places sidebar (see Figure 14.4). The two versions of the iDisk are synchronized; a progress bar at the bottom of the Finder window informs you about the status of the process.
Figure 14.4. You can click the Synchronize button to synchronize the online and local versions of your iDisk.
TIP
If you open the Action button or the contextual menu for a Finder window showing your iDisk, you can select the Sync Now command to perform synchronization or the Automatic Syncing command to set your iDisk to be synchronized automatically.
Working with Your Online iDisk
If you choose not to create a local copy of your iDisk, you can still work with your iDisk from the Finder. However, when you move files to and from the iDisk, you will actually be moving those files across the Net rather just between locations on your hard drive. In most cases, you should use a local copy instead. However, you can access your online iDisk directly to work with it.
To do so, select Go, iDisk, My iDisk or press Shift-![]() -I. The contents of your iDisk are shown in a Finder window.
-I. The contents of your iDisk are shown in a Finder window.
If you have set your desktop preferences such that mounted disks appear on your desktop, you will see a disk with your member name as its name and an icon of a hard disk in front of a globe?this is your online iDisk. If your mounted disks don't appear on your desktop, open the Computer directory and you will see your iDisk there.
To learn how to set the preference for disks being shown on the desktop, see "Customizing the Mac OS X Desktop," p. 121.
TIP
Look for the Synchronize symbol to the right of the iDisk volume in the Places sidebar of the Finder window to tell the difference between the online iDisk and a local copy of your iDisk. If you don't see any symbol, you are working with the online iDisk. If you do see a symbol, you are working with a local copy. Telling the difference on the desktop is easier. The online version has your member name as its name, whereas the local copy is just called iDisk.
TIP
If you use more than one .Mac account, you can download and use the iDisk Utility application to make working with multiple .Mac accounts more convenient. You can download this application from the .Mac Web site.
Working with Your iDisk
After your iDisk is mounted on your Mac (whether it is a local copy or the online version), you can work with it just like the other volumes and disks on your machine. Open your iDisk and you will see the following folders:
Documents
Library
Movies
Music
Pictures
Public
Sites
Backup
Software
The Documents, Movies, Music, and Pictures folders contain elements for Web pages you might want to add to your .Mac Web site. For example, if you want to include a Pictures page on your site, you can store the images you want to include on the page in the Pictures folder.
The Public folder is where you can store files you want other .Mac users to be able to access.
The Sites folder is where you store your own HTML pages to be served from the .Mac Web site (rather than using the page templates that are provided for you).
The Software folder contains software you can download to your Mac. Apple stores system and application software updates here so you can easily access and download them. To see what software is available, simply open the Software folder. To download any of the files you see to your Mac, drag the file from the Software folder to a folder on your machine. For example, a folder called Mac OS X Software contains applications you can download to your Mac by simply dragging them from the folder to your hard drive. The contents of the Software folder do not count against the 100MB size limit (or other size if you have increased it) of your iDisk.
The Backup folder is where your data is stored if you use the Apple Backup application to back up your Mac.
The Library folder contains files that support use of the iDisk, such as application support files.
TIP
When working with an early version of Mac OS X version 10.3, I couldn't delete files on my local copy of my iDisk by selecting them and pressing ![]() -Delete or by selecting File, Move To Trash as I do with files on other local volumes. I had to actually drag the files to the Trash icon on the Dock to delete them. I could remove files from the online iDisk using the usual techniques. This might be related to the early version of 10.3 I was using, but if you ,are unable to remove files from your local copy of your iDisk, try the good old drag method.
-Delete or by selecting File, Move To Trash as I do with files on other local volumes. I had to actually drag the files to the Trash icon on the Dock to delete them. I could remove files from the online iDisk using the usual techniques. This might be related to the early version of 10.3 I was using, but if you ,are unable to remove files from your local copy of your iDisk, try the good old drag method.
Accessing iDisks from the GO Menu
The iDisk commands on the Finder's Go menu are the following:
My iDisk? The command opens your own iDisk.
Other User's iDisk? When you select this command, you see the Connect To iDisk dialog box. Enter the member name and password of the user's iDisk that you want to access and click Connect. That iDisk is mounted on your Mac and you can work with it just like the iDisk that is configured as part of your Mac OS X user account. For example, if you have two .Mac accounts, you can configure one iDisk as part of your Mac OS X user account and use this command to access the iDisk that is part of another .Mac account.
Other User's Public Folder? When you select this command, the Connect To iDisk Public Folder dialog box appears. Enter the member name of the user whose Public folder you want to access and click Connect. If the user has not selected the option to protect the Public folder with a password, that user's Public folder on her iDisk is shown in a Finder window. If the folder is protected with a password, enter the password and click Connect when prompted to do so.
TIP
When you need to enter a password to access someone else's Public folder, your username is Public, which is entered for you. If you add the password to your keychain, you don't have to enter it again. The Public folder is unlocked for you automatically when you access it.
Sharing Information on Your iDisk with Others
One of the most useful things about an iDisk is that you can place files in the Public folder and then share them with other .Mac users.
To share your Public folder, you can publish it so that others can access it using a Web interface. You don't have to do this for others who use .Mac because they can mount your Public folder directly (as you saw in the previous section). However, publishing a File Sharing Web page can be helpful to users who don't or can't use .Mac. To create your File Sharing Web page, follow these steps:
Move to the .Mac page and click the HomePage icon to open HomePage (if you aren't logged in already, you will be prompted to do so). You move to the HomePage window. Toward the bottom of the window are tabs that enable you to create various types of Web pages.
TIP
If you have more than one site, click the site on which you want to place the file-sharing page before doing step 2.
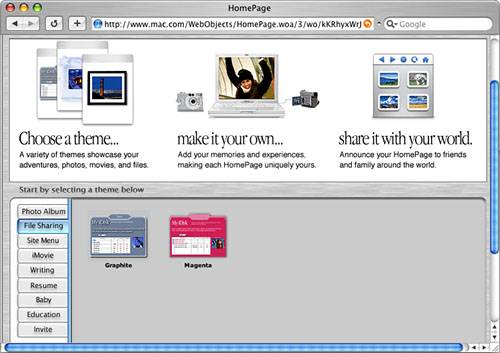
Click the File Sharing tab. You will see the format options for a file-sharing Web page (see Figure 14.5).
Figure 14.5. When you create a file-sharing Web page, you can choose the format of that page.
Choose the look of your Public folder page by clicking one of the Appearance choices (such as Graphite or Magenta). You will move to the My iDisk page.
Click the Edit button. Three fields become editable: the name of the page, the member name displayed, and the page description.
Change the text as needed.
Click Publish.
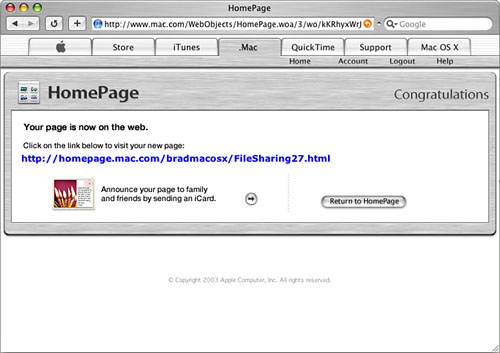
You'll see a screen confirming that you have successfully published the page, and you also see its URL (see Figure 14.6).
Figure 14.6. The contents of my Public folder have been published to the File Sharing page located at the URL shown in this window.
NOTE
When HomePage creates a page for you, the URL ends in the name of the template you selected to create the page followed by a sequential number (in Figure 14.7, you can see the URL ends in FileSharing27.html). These URLs aren't likely to be easy for others to type. However, you can create site menu navigation pages on your site and link to each page (you'll learn how later in this section). People can access your site menu at http://homepage.mac.com/membername/, where membername is your member name.
Figure 14.8. Anyone who accesses the files on this Web page can download them from my iDisk's Public folder.
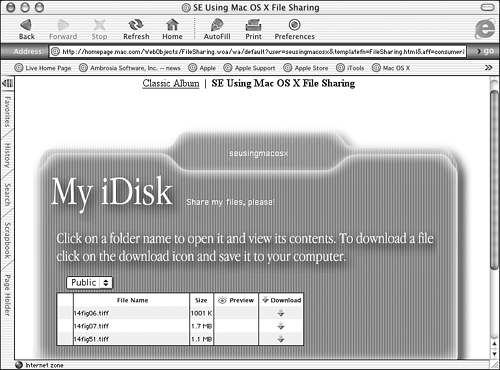
To make files available from your iDisk Web page, drag them into the Public folder on your iDisk. When you do so, they will appear on the iDisk Web page (see Figure 14.7).
NOTE
If you work with a local copy of your iDisk, it must be synchronized before the files will be available on the Web. If you use the manual synchronization option, click the Synchronize button after you put the files in the Public folder.
Other people can download these files by moving to the Web page and clicking the Download link for the files they want to download.
TIP
Anyone who can access the Web can use the files you share. This includes Windows PC users as well as users of Macs running Mac OS 9 or earlier. Using a .Mac Web site is a great way to share files because it is easy to upload files and others can also access the files easily. Using a Web site is better than emailing large files because the recipient can choose when he wants to deal with the files (especially for those people using a dial-up connection to the Internet). And you don't have to worry about an email application properly decoding the files.
NOTE
For some file types, you can preview the file before you download it. When this is possible, the Preview icon appears in the Preview column.
Upgrading Your iDisk
You might need to have more space available than the 100MB that is provided as part of a standard .Mac account. In fact, if you want to create a Web site with lots of movies, music, and photos on it, 100MB might not be enough for you. If you will be using the .Mac backup application to back up your data, you will definitely want to obtain more iDisk space. You can purchase additional storage space for your iDisk. At the moment, you can choose to have 200MB for $60/year, 300MB for $100/year, 500MB for $180/year, or 1GB for $350/year.
To add more space to your iDisk, go to the iDisk tab of the .Mac pane and click the Buy More button. Follow the onscreen instructions to add more space to your iDisk.
NOTE
You can also upgrade other aspects of your .Mac account. You can add email accounts or increase the amount of email storage space you have for your .Mac email account.
Creating a .Mac Web Site
As you saw in the previous section, you can easily create a Web page using .Mac. However, you can just as easily create an entire Web site using the HomePage tools. Your site can include multiple sites, with each having multiple pages.
There are two basic ways to use .Mac to publish your Web site. The first is to use the HomePage templates to build your Web pages. You add content to these pages by placing files in the related folders on your iDisk. The second, and more flexible, way is to add your own Web site files to the Sites folder on your iDisk to publish it. For example, you can create your Web site using your favorite tools, such as Adobe's GoLive, and then post those files in the Sites folder on your iDisk. Apple's .Mac server takes care of serving the site you upload to the Internet.
Creating Your Web Site Using the HomePage Templates
When you build a Web site using the HomePage templates, you actually can create a set of sites and place different pages on each site. People can access each site directly, or you can provide a site menu to help them navigate your sites.
To build a Web site using the HomePage templates, you first create some pages. Then you can add sites and add each page to each site, one page at time. When you choose a page to add to your site, you choose a template (called a theme) for that page. Then, you select the contents for the page, edit it as needed, and publish it. You can also choose the start page for your site, which is the first page a visitor to your site sees (more commonly called the home page).
You can use templates to add any of the following pages to your site:
Photo Album? I bet you can guess what you store on these pages. Use these pages to share your photos with friends and family.
File Sharing? As you have already seen, this page presents the files in your Public folder for easy downloading.
Site Menu? These pages help you create a menu so visitors can explore your site by clicking links.
iMovie? You can serve iMovies you create so others can watch them over the Web.
Writing? These pages are formatted as personal newsletters.
Résumé? You can create a résumé to land that next big job.
Baby? Use these pages to make a grandparent's day.
Education? These pages are designed for those involved in education. The template pages include pages for school events, a school album, teacher information, and so on.
Invite? You can use these pages to create custom Web invitations.
To learn how to create photos to share over the Web, see Chapter 15, "Creating and Editing Digital Images," p. 457.
To learn how to create movies to share over the Web, see Chapter 17, "Making Digital Movie Magic with iMovie," p. 571.
Before you get started adding pages to your site, decide what kinds of pages you want to have on your site or what types of sites you want to include. Add the files for each page to the appropriate folder on your iDisk. For example, if you are going to have an iMovie page, add your movie files to the Movies folder. Add photos you want to post by placing the files in the Pictures folder, and so on, until you have added the content you want to have on your site to the appropriate folder on your iDisk.
The process to add each type of page is quite similar. You can create pages based on any of the available templates by following these steps:
Move to the .Mac Web page.
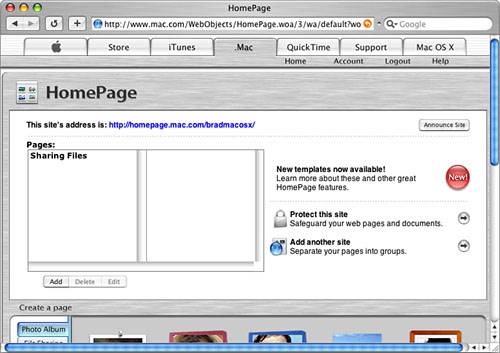
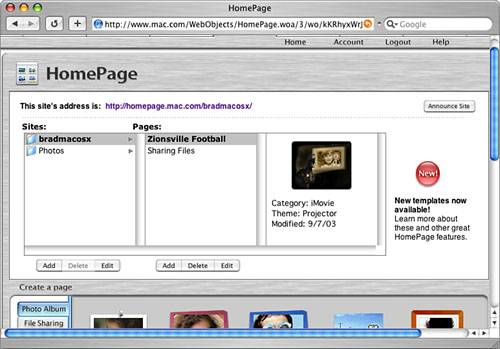
Click the HomePage icon. You will see the HomePage page (see Figure 14.8). This page contains the tools you need to build and edit your site. In the upper part of the window, you see all the sites and pages that are currently part of your site. You will also see the URL to your site. In the lower part of the page, you will see the tools you use to create pages.
Figure 14.8. The HomePage Web page enables you to build your own Web site quickly and easily; so far, my Web site contains only one set of pages (called a site), and that set contains only one page (called Sharing Files).
TIP
The page shown in bold is the Start Page?your home page?which is the first page people see when they access your Web site.
In the Create A Page area, click the button for the type of page you want to create (for example, iMovies to create a movie page). You will see the various themes (templates) available for the type of page you selected.
Click the template you want to use. You will move to the default page that is based on the template you selected. Here, you edit the text associated with the page (usually, this means the title of the page and a description of its contents) and add the content to it.
Click the Edit button and the text fields become editable.
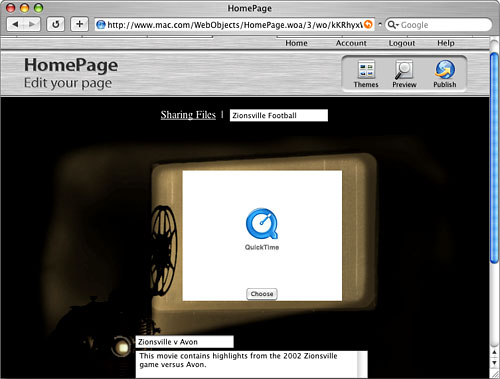
Edit the text that will appear on your page (see Figure 14.9).
Figure 14.9. Here I have changed the default text to be more appropriate to the movie I am posting on the page.
Click the Choose button. You will see the Select Files screen.
Select the files you want to appear on the page. For example, if you are creating a movie page, click Choose, select a movie from your Movies folder, and then click Choose to add the movie to the page. Other templates present these controls in slightly different formats, but they all work similarly?for example, for a Photo Album page, you choose the folder in which the images that will be stored on it are located.
Scroll to the bottom of the window. Check the check boxes for any special features you want to add. Most pages provide for a counter that shows the number of people who have visited the page (the check box next to the zero) and a "Send me a message" link that enables visitors to send email to you.
Click the Preview button to see how your page will look.
If you need to make changes, click the Edit button.
When you are done with the page, click Publish. The Web page you created is added to your site and you see its URL.
Click the URL to visit your new page (see Figure 14.10).
Figure 14.10. An example of a Web page that offers some movie entertainment; using .Mac, I was able to create this page in just a few minutes (and most of that was the time required to upload the movie file into the Movies folder on my iDisk).

Continue adding pages to your site until it contains all you want it to. When you are done, you will see all the pages on your site in the upper-left corner of the HomePage window.
You can also create additional sites and then add pages to those sites using the same process. In .Mac lingo, these additional sites are called groups, meaning you can collect a set of pages and place them into groups.
To create another group on your site, carry out the following steps:
On the HomePage page, click the arrow button next to "Add another site." You will move to the "Create a site" page.
Enter the name of the site you are creating in the Site Name field.
If you want a password to be required for someone to be able to view your site, check the On check box and enter the password in the Password field.
Click Create Site. You will return to the HomePage page and will see the new site you have created. The HomePage page now contains boxes for your sites and the pages on those sites.
To see the pages included in a group, select the group on the Sites pane; its pages appear in the Pages pane. Select a page and a preview appears in the third column on the screen (see Figure 14.11).
Figure 14.11. My Web site now includes two groups of pages: One is called Photos, and the other is the default group that is called bradmacosx.
The URL for the Web site you create is http://homepage.mac.com/yourmembername/. (Don't include the period shown in this URL?that is only to please my editors!)
When someone visits this URL, she sees the page you designated as the Start Page. She can use the links on this page to move to the other pages on your Web site.
You can move directly to a specific page using the URL for that page. For example, if you create an iMovie page, the URL for that page will be http://homepage.mac.com/yourmembername/iMovieTheater.html, where yourmembername is your member name. As you add more pages of each type, the names are differentiated by sequential numbers, as in iMovieTheater1, iMovieTheater2, and so on.
Creating Web sites using HomePage is easy and powerful. Following are some additional tips for your consideration:
Set the home page for each group (called the start page in .Mac lingo) for your Web site by dragging the page you want to use to the top of the Pages list.
You can see the URL for any group by selecting it. Its URL appears at the top of the HomePage screen.
The Home site is always the one with your member name as its URL. Any other sites you create have URLs based on this one. For example, if you create a site called Book_Information, its URL is http://homepage.mac.com/yourmembername/Book_Information, where yourmembername is your member name.
To add more pages to a site, select that site on the Sites list and click the Add button under the Pages list.
To add more sites, click the Add button under the Sites list.
You can delete sites or pages by selecting what you want to delete and clicking Delete. Then click Yes on the resulting confirmation screen.
Password-protect any sites that contain information you want to limit access to.
Use site menu pages to organize your site and enable visitors to move around using links. You can also place images on site menu pages as a preview of the pages that are linked to the site menu page.
To place a counter on a page, use the Show check box next to the counter icon (a box with a zero in it) that becomes available when you edit the page. This counter counts the number of visits to that page.
Use the "Send me a message" check box next to the Send me a message icon to place an email link on a page. Visitors can click this link to send email to your .Mac email address.
Creating Your Web Site by Adding Your Own Pages to the Sites Folder
Although you can quickly and easily create a basic Web site using the .Mac templates and tools, you are somewhat limited in what you can do. The available templates might or might not be suitable for the site you want to create. Even if you want to do more than you can with the .Mac Web page templates, .Mac is still valuable because you can use .Mac to host any Web site you create using any other Web site editing tools, such as Adobe's GoLive or Macromedia's Dreamweaver. In this scenario, .Mac acts just like any other Web hosting service you might use.
The general process to get your customized Web site on the .Mac is the following:
Create your Web site using the tools you prefer.
NOTE
Name the home page of your site index.html. This ensures that a viewer is taken to the right start page for your site when he moves to its URL.
Test the site by accessing it while it is stored on your Mac. You can test a Web site by opening it from within a Web browser. For example, open your site using Safari by selecting File, Open File. Then, maneuver to the home page for your site and open it. The site will work just as it will after you post it on your .Mac Web site (except that it will be a lot faster, of course). You should test your site in various browsers and operating systems to ensure that it can be viewed properly.
Fix any problems you find.
When your site is ready to post, copy all its files and folders into the Sites folder on your iDisk.
Test your site again by accessing it over the Net.
To access the Web site in your Sites folder, use the following URL: http://homepage.mac.com/yourmembername/. (For this to work, you must have named the home page for the site index.html.)
When you move to the site, you see the page you named index.html (see Figure 14.12).
Figure 14.12. I created this site on my Mac and uploaded it to the Sites folder on my iDisk.
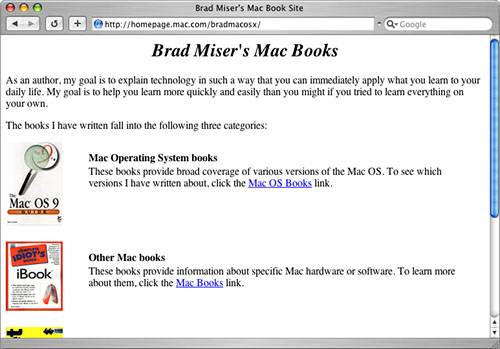
The Web site you store in the Sites folder is not integrated into a .Mac Web site you create using the .Mac template. In fact, any pages you create using the .Mac templates are not accessible after you copy your own site into the Sites folder because your custom site replaces any HomePage sites you have created.
Using Other Hosting Services to Publish a Web Site
Thousands of Web hosting services are available for you to use. All of them work similarly to .Mac; you first create your Web site and then upload all the files onto the hosting service's servers. As with the .Mac, the hosting service maintains all the hardware and software needed to serve your site to the Web.
Unlike .Mac, however, many hosting sites are free or charge only a minimal fee. Some hosting services offer more than just Web serving, including domain name registration, email, FTP, and other services. Hosting services that offer these additional services are usually fee-based. Such fees usually depend on the size of your site and how much traffic it will be generating.
To learn about domain name registration, see "Registering Your Domain," p. 448.
NOTE
You might wonder why companies would offer hosting services free. Most free hosting services generate income by including advertising on the sites they host. When someone views your Web site, he also sees whatever advertising the hosting service has been able to sell. You usually don't get any say in the sorts of ads that appear on the sites, so you should investigate this before you start using a free site. Sometimes these ads can be more than just annoying for people visiting your site. Often, they can be offensive.
If you want to explore the hosting services that are available, develop answers to the following questions:
How large is your site? Many hosting services limit the amount of storage space you have (such as the .Mac 100MB limit) or charge you additional fees for larger sites (again, like .Mac).
Do you want a more specific URL for your site? If you want your site to have a more specific URL, such as www.yourname.com, you need to register a domain name for that site. Many hosting services will take care of this for you. Most free sites provide the same domain and your page is accessed via a path or document name (such as a .Mac Web address that looks like homepage.mac.com/yourmembername).
How much traffic do you expect to generate? Many hosting services limit the total amount of data transferred across your site. Some for-fee companies might allow you to have as much traffic as you can generate, whereas with others, you might have to pay additional fees if the traffic goes over the maximum allowed in your service agreement.
What is the purpose of your site? Some hosting sites, especially the free ones, do not permit you to conduct business using their free sites. However, many hosting services specialize in commercial sites and offer many tools to help you transact business across the Net.
What is the nature of the information on your site? Many hosting services have specific guidelines about what is allowed on a site they host. Make sure that the material you intend to post on your site does not violate these guidelines.
What software do you use to create your site? Different Web-creation software offers different tools and creates pages in slightly different ways. Some hosting services are optimized for particular Web-creation applications.
How much information about your site will you want? Some services offer information about the traffic that comes across your site (such as the number of hits on it), whereas others (mostly the free services) offer little to no feedback.
After you have answered these questions for yourself, you can find many hosting services by doing a quick search on the Web. After you find a hosting service, you can create an account with it (you might also need to pay for it and provide additional information depending on the services you are getting). When you have an account, most hosting services work similarly to .Mac.
NOTE
One of the nice things about .Mac is that posting the files for your site to your iDisk is so easy. Many services require that you use FTP software to post your files, and sometimes they even require specific FTP applications to be used. Typically, the required applications are shareware or freeware, so it usually isn't a big deal. However, if you try to use the wrong FTP application, you can have problems.


