Downloading Images to Your Mac
There are several ways in which you can transfer the images you capture from the camera to the Mac. These are covered in the following sections.
Using iPhoto to Download Images
iPhoto is the best and easiest way to download and manage your images.
 To learn how to use iPhoto to download images from your camera, see "Downloading Images from a Digital Camera into iPhoto," p. 475.
Using Image Capture to Download Images
Mac OS X was designed to work with digital cameras; it includes the basic Image Capture application that provides a consistent interface for various models of digital cameras. Its single purpose is to download images from digital devices to your Mac. Because iPhoto is also included with Mac OS X, there isn't a whole lot of reason to use Image Capture, but because Image Capture remains part of the standard Mac OS X applications, you should understand its capabilities.
Image Capture works with cameras that support the Picture Transfer Protocol (PTP). If you aren't sure whether your camera supports this protocol, check the manufacturer's Web site and product specifications to see whether your particular model supports PTP.
NOTE
The more technical name for PTP is ISO 15740.
Image Capture can be used to download images from some scanners, and that is the more likely circumstance in which you will use it. But it works similarly whether your image source is a camera or a scanner.
Image Capture can be configured so it automatically downloads images when you plug your camera or scanner into your Mac. By default, Mac OS X is configured to open iPhoto when it detects a camera. You can change this behavior with the Image Capture Preferences command.
Working with Image Capture is straightforward. Use the following steps to get images from your camera to your Mac:
Connect your camera to your Mac using its USB cable.
NOTE
By default, your Mac opens iPhoto when you connect a camera to it. You can allow that to happen and then open Image Capture. Both applications can be running at the same time.
Power up your camera (if it has a mode selector to communicate with a computer, choose that mode?most cameras switch to this mode automatically). If you haven't configured Image Capture to open automatically, open the application (Applications folder). If you have configured Image Capture to open automatically, it will do so when your Mac detects the camera. You will see the Image Capture window (see Figure 15.1). The application communicates with the camera to determine how many images need to be downloaded. When the camera is ready to begin downloading images, the Download Some and Download All buttons become active.
Figure 15.1. When you connect a supported camera to your Mac, Image Capture displays the number of images that are ready to be downloaded (and you might even see an image of the camera, as is the case for this Kodak DC4800).

NOTE
If your camera is not recognized by Image Capture, it probably does not support PTP. In that case, you have to use the camera's software to download images from it.
Select the folder into which you want the images to be downloaded on the Download To pop-up menu. By default, Image Capture selects the Pictures, Movies, and Music folders option. You can select Other on the menu to choose a different folder.
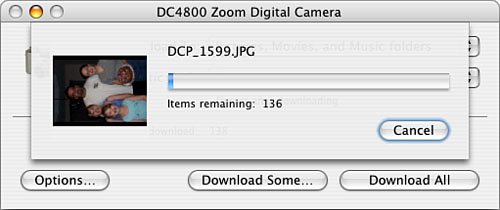
To download all the images on the camera, click Download All. The images you download are downloaded into the appropriate directories in your Home folder or in the folder you selected on the Download To pop-up menu. For example, photos are downloaded to the Pictures directory. As the images are downloaded, you see a progress dialog box that shows you a preview of the images being downloaded (see Figure 15.2). When the application is done downloading images, it moves to the background and the directories into which it downloaded images are opened.
Figure 15.2. As Image Capture downloads your photos, you see a preview of each image it is downloading.
Move to the appropriate folder to work with the files you have downloaded.
NOTE
Notice that the default download folders are Pictures, Movies, and Music. Some cameras can capture movies and sound. If your camera has QuickTime movies on it, those are placed in the Movies directory in your Home directory. Likewise, sounds are placed in the Music directory.
If Image Capture does not recognize your camera, see "The Digital Camera Is Not Recognized by Image Capture or iPhoto" in the "Troubleshooting" section at the end of this chapter. |
TIP
When you connect a camera, the Options button in the Image Capture window becomes active. You can use this feature to configure various aspects of how your camera interacts with your Mac. For example, you can set the camera's time and date, cause images to be automatically deleted after they are downloaded, and so on.
To download only selected images, use the following steps:
Connect your camera and open Image Capture.
After the application is ready to begin downloading images, click Download Some. You will see a window that shows a preview of each image stored in the camera (see Figure 15.3). By default, the window appears in the Icon view.
Figure 15.3. You can use the preview window to select images to download; you can also rotate images or delete them.
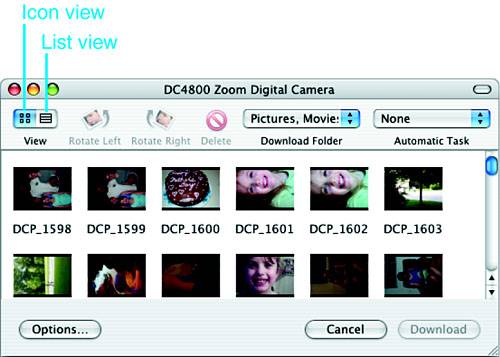
Click the List View button or select View, as List to see the images in the List view. In this view, you see the images in a Finder-like window. You see a lot of information for each image, including its name, file size, date and time of capture, width and height in pixels, and so on.
NOTE
You can change the width of the columns in the List view; however, you can't change the sort order?the window is always sorted by image number.
Return the window to the Icon view by clicking the Icon view button or by selecting View, as Icons.
If you need to rotate images, select the images you want to rotate and click the Rotate Left or Rotate Right button.
Select the folders into which you want to download the images on the Download folder pop-up menu. The default is the same as when you download all images, but you can change it to be any folder you'd like to use.
Select the images you want to download (use the Shift key or
 key to select multiple images) and click Download. The images are downloaded into the selected directory.
TIP
You can connect multiple cameras to your Mac at the same time. To choose the one with which you want to work, use the Camera pop-up menu.
Using Image Capture Options
Image Capture has other options that are useful:
Automatic Task? You can attach AppleScripts to Image Capture so it performs an action you select from the Automatic Task pop-up menu when you download images. A number of actions are on the menu by default, including Build Web Page, Build Slide Show, Crop to 3x5, and so on. You can use any of these tasks or add your own. To add a task to the menu, place it in the Mac OS X/System/Library/Image Capture/Automatic Tasks directory, where Mac OS X is the name of your Mac OS X startup volume.
Options dialog box? If you click the Options button in the Image Capture window, you will see a sheet that contains three tabs. The Download Options tab enables you to configure how downloads are handled, such as whether all images are downloaded automatically or whether images are deleted from the camera after they are downloaded. The View Options tab enables you to configure the two views in the Download Some window; for example, you can select the size of the icons in the Icon view or determine which columns are displayed in the List view. The Device Options tab displays information about the device you are using, such as the type of camera and the application your Mac is using to interface with it. If you use Image Capture regularly, you should explore these options.
NOTE
Image Capture downloads only those images that aren't already in the selected directory. So, you won't get duplicate files if you have previously downloaded images on the camera and then perform another download with new images.
Setting Image Capture Preferences
If you use Image Capture to download images from a camera or a scanner, you should configure it to suit your preferences.
NOTE
Although the Image Capture Preferences is accessed via the Image Capture application, what you choose here affects other applications. For example, you must use this preference to set the application that opens automatically when you connect a camera to your Mac. This is because Image Capture provides the basic framework your Mac uses to interact with cameras and scanners regardless of the specific application you use.
To set your preferences, perform the following steps:
Select Image Capture, Preferences. The Image Capture Preferences dialog box appears.
On the Camera tab, and select Image Capture (iPhoto is selected by default) on the pop-up menu.
TIP
If you want an application other than Image Capture or iPhoto to open when you connect a digital camera, select Other and select the application you want to open automatically.
Click the Scanner tab.
If you want to use TWAIN software to capture images from a scanner, check the "Use TWAIN software whenever possible" check box.
If you want the scanner window not to be opened when Image Capture is launched, uncheck the lower check box.
Close the Preferences window.
Capturing Digital Images Using a Scanner
A scanner enables you to create a digital image from a hard-copy image. The uses for a scanner are almost limitless; these include scanning photographs, business cards, slides and film, 3D objects, and so on. Having and using a scanner enables you to bring items from the analog age into the digital lifestyle.
You can use Image Capture to download images to your Mac. For this purpose, it works very much like it does when you download images from a camera.


