Sharing Imaging Devices on a Network or Via the Web
With Mac OS X version 10.3, you can share image devices on a network or over the Web. This enables others to access devices connected to your Mac and you to access devices others are sharing. |
 To learn how to configure Web sharing, see "Using Mac OS X to Serve Web Pages," p. 446.
To configure a local network, see Chapter 26, "Building and Using a Network," p. 821.
Sharing a Camera over a Network or the Web
To share a device connected to your Mac with a network, use the following steps:
Open Image Capture; then select Image Capture, Preferences.
In the Preferences dialog box, click the Sharing tab (see Figure 15.4).
Figure 15.4. Using the Image Capture Preferences Sharing tab, you can share a digital camera or other device with those on your network or via the Web.
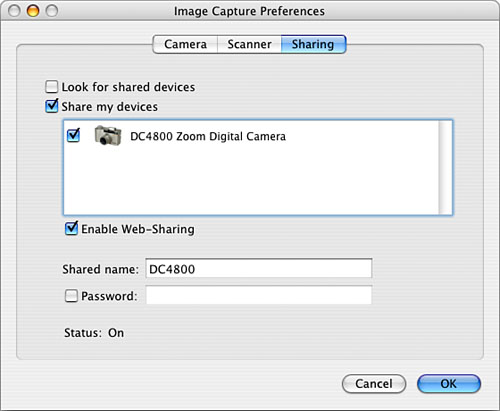
Check the "Share my devices" check box. In the pane just below that, you will see all the devices that are available for sharing, such as a digital camera or scanner.
Check the check box next to each device you want to share.
If you want to enable devices to be shared over the Web, check the Enable Web-Sharing check box.
Provide a name for the device in the Shared name box. This is the name people who access the device will see.
If you want to require a password to be entered to access the device, check the Password check box and enter a password in the Password field.
Click OK. The device will be shared.
CAUTION
For a device to be shared over a network, the computer to which it is connected must be on the same subnet as the computer trying to access it. For small networks, this is not an issue. However, if you are using a large network, make sure the machines are on the same subnet because sharing will not work otherwise.
Accessing a Shared Camera
There are two basic ways to access devices that have been shared: via a local network or over the Web. The method you use depends on how the device has been shared with you.
To access a device that has been shared with you over a network, use the following steps:
Open Image Capture; then select Image Capture, Preferences.
In the Preferences dialog box, click the Sharing tab.
Check the "Look for shared devices" check box.
Click OK.
Select Devices, Browse shared devices. The Browsing dialog box appears showing each device that has been shared with you.
Select the device you want to access and click OK.
Access images on the device.
You can also access a device that has been shared with you over the Web by doing the following:
Launch Safari.
NOTE
For Rendezvous devices to be available in Safari, you must turn on that preference in the Bookmarks pane of the Safari Preferences dialog box.
Select Bookmarks, Rendezvous, devicename, where devicename is the name of the device you want to access. Your Mac connects to the device and you see its contents in a Web page called "Digital Cameras on machinename", where machinename is the name of the Mac sharing the camera, assuming the device is a camera of course (see Figure 15.5).
Figure 15.5. This Web page shows the contents of a camera being shared over the Web.
 To learn how to configure Safari to access Rendezvous services, see "Browsing the Web with Safari," p. 388.
TIP
If more than one device is being shared with you, select the device you want to work with on the Camera pop-up menu.
Use the Browse arrows to view each page of content being provided by the device.
To download images to your Mac, select them and click Download.
Accessing a camera over the Web offers many cool features, including the following:
Click the List View button to view the page as a list instead of with icons.
To select all the images on the device, click Select All.
You can delete images from the shared device by selecting them and clicking Delete.
To take picture with the shared device, click Take Picture. The camera takes a picture. To see the new picture, refresh the Web page by selecting View, Reload Page (or by pressing
 -R).
-R).You can view a larger version of an image by double-clicking it. To return to the thumbnail views, click the Return button (it is an upward-pointing, curved arrow). You can browse through all the images at the large size by using the Browse arrows.
Using Device Sharing to Monitor an Area
If you want to feel like Big Brother, you can use a shared device to monitor an area remotely. You can set the remote device to capture an image periodically and display that image on a Web site. Here's how:
Set up the camera so it captures the image you want to be able to monitor, such as a doorway into a room or some other part of a room.
Share the camera over the Web.
Access the shared camera (see the previous section for details).
Click the Remote Monitor tab. The camera takes a picture and transfers it to the Web page; to see the results immediately, reload the page. Just below the tab is the time at which the image was last updated and the time at which it will be updated again.
NOTE
Images capture via Remote Monitoring are not stored on the camera; they are only displayed. You can capture an image and store it on a camera by clicking the Take Picture button.
The camera keeps taking pictures at the set interval and displaying them on the Web page. This enables you to see what is happening in an area over time.
TIP
By default, a new image is captured every 60 seconds. To change this, click the Preferences button located just under the Remote Monitor tab. Enter the interval at which you want images to be captured and click Set. Setting a shorter interval provides more active monitoring.


