Working with iMovie
The iMovie window contains five main areas, only four of which you can see at the same time (see Figure 17.1).
Figure 17.1. The iMovie window has several areas that perform different functions.
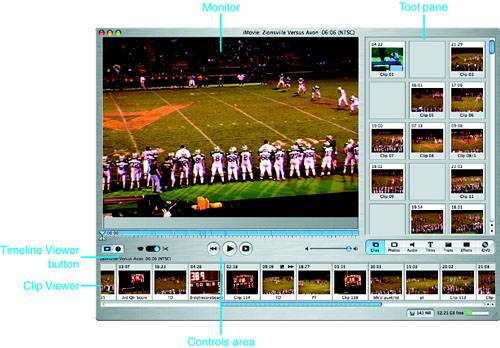
In the upper-left corner of the window is the Monitor. Here, you preview and edit your movie, as well as the clips from which you build that movie. In the upper-right is the iMovie Tool pane. At the bottom of the Tool pane are seven buttons, with each button opening a palette of tools in the pane. Just under the Monitor are the controls area that includes various buttons you use to control playback and editing functions. Underneath that area are the two viewers, the Clip Viewer and the Timeline Viewer (you can see only one viewer at a time). In the bottom-right corner of the window are the disk space tools you use to manage the disk space associated with your project.
iMovie has two basic modes in which you operate: Camera and Edit. The mode you are in is determined by the position of the Camera/Edit mode switch located in the Controls area (refer to Figure 17.1). When the switch is to the left (toward the camera icon), iMovie is in the Camera mode. In this mode, you work with a DV camera attached to your Mac to import video clips from which you will build your movie. When the switch is to the right (toward the scissors icon), iMovie is in the Edit mode and you can work with video clips to preview them, edit them, and so on. You will spend most of your iMovie time in Edit mode.


