Moving to Version 10.3 from Mac OS 9.x.x or Earlier
Moving up to Mac OS X from earlier versions offers many benefits (you will learn about many of them throughout this book), but all this gain requires some pain, that being the pain of installing and learning to use a brand-new operating system. This appendix helps you with the first part, whereas the rest of the book helps you with the second. Following a logical sequence of steps results in the best chance for you to install Mac OS X without any problems. The major steps you should take are the following:
Assess your Mac to ensure that it can handle Mac OS X.
Make sure that your Mac's firmware is up-to-date (if not, update it).
Prepare a Mac OS X volume on which to install the OS.
Run the Mac OS X Installer.
Configure the OS.
After you install Mac OS X, you should maintain the OS with any updates Apple provides to keep it running as well as possible.
Assessing Your Mac's Capability to Handle Mac OS X
To minimize problems you might experience installing or using Mac OS X, ensure that your Mac meets the following minimum requirements as stated by Apple:
One of the following? Power Mac G4, Power Mac G4 Cube, Power Mac G3 Blue & White, PowerBook G3 with built-in USB, PowerBook G4, iMac, eMac, or iBook.
CAUTION
Although most iMacs and iBooks can run Mac OS X, if you have one of the original versions of either model, you might have trouble installing the OS, or if you are able to install it, it might not run very well. The original iMacs and iBooks are not really powerful enough (especially in terms of RAM) for Mac OS X. For example, a 233MHz or 266MHz G3 processor might not be fast enough to provide satisfactory performance for you. These machines typically came with only 32MB or 64MB of RAM, which is not adequate for Mac OS X. If you have one of these older machines, I recommend that you get a new Mac to take full advantage of Mac OS X.
At least 128MB of RAM? At press time RAM was very inexpensive and providing 512MB of RAM could be done for only a few hundred dollars (less than $100 if you already have a couple hundred meg installed). Of course, your machine might not be able to take that much, but for all Macs, maximizing your Mac's RAM is one of the best investments you can make. Frankly, I don't think you will be pleased with the performance of a machine with Apple's minimum RAM installed; in my opinion, you should have at least 512MB of RAM, and preferably more, to get excellent performance.
A video card that has a Mac OS X?compatible driver? If you have an Apple-supplied video card, such as an ATI or NVIDIA graphics card (the standard cards in modern Macs, including the options on the Power Mac G4), you meet this requirement. If you have installed a different card, be sure you have a drive that is compatible with Mac OS X, version 10.3.
At least 2GB of free disk space? This is the minimum amount for just the OS. Because Mac OS X is designed to store all your documents and applications on the same volume on which the system is installed, you will need a lot more space on your Mac OS X startup volume than this. In fact, I recommend that you install it on partitions of 20GB or preferably even larger. This gives you plenty of room for your iTunes, iPhoto, and iMovie libraries, along with your applications and other documents.
If your Mac meets all these requirements, skip to the next section, "Updating Your Mac's Firmware."
If you don't have one of the Mac models listed, you are probably out of the Mac OS X game. For example, you can't even install Mac OS X on older Macs, such as those that use the 604 processor. If you have upgraded an older Mac's hardware so that it has a G3 or G4 processor, you might or might not be able to install Mac OS X. Installing a major system update on a system whose hardware has been upgraded is always a bit of a gamble. Some upgrades will handle the new OS okay, but others will balk at it. Before you try to install Mac OS X on an upgraded system, check with the manufacturer of that upgrade to see whether it is Mac OS X?compatible.
CAUTION
Apple does not provide support for Mac OS X on machines on which you have installed an upgrade card.
You will have a much better Mac OS X experience if you install it on hardware that is on Apple's compatibility list.
If you have less than 256MB of RAM, you might be able to install and run Mac OS X, but you aren't too likely to be happy with its performance. You might be able to run Mac OS X with as little as 64MB of RAM, but you won't be able to use the Classic environment with this amount of memory. You should upgrade your Mac with as much RAM as it can handle or as much as you can afford?more RAM is better! Mac OS X manages its RAM much better than previous versions of the OS did, but you still need to provide plenty for it to work with.
Your Mac is very likely to meet the video card requirement. All Macs come with at least one Apple-installed video card. Unless you have done something unusual, such as replacing the card that came with your Mac with another one, you won't have trouble with the video card requirement.
CAUTION
If you have multiple monitors attached to your Mac, you might need to remove any third-party video cards before you can install Mac OS X. If you leave the card installed and the Mac OS X installation is successful, the monitors connected to any third-party cards might not work. Until you install a Mac OS X?compatible driver for the video card, you aren't likely to be able to use any of its special features. I recommend that you remove third-party graphics cards that weren't installed by Apple before you install Mac OS X. After you have finished the installation, you can reinstall the additional cards.
Whether less than 2GB of free disk space will enable you to install Mac OS X is also a bit of a gamble. You might be able to get away with slightly less, but it isn't recommended. It depends on how much less you are trying to get away with. If you can free up at least 2GB on the volume on which you are going to install Mac OS X, you will be happier in the long run.
Because of the way Mac OS X is designed to store files (within user folders on the Mac OS X startup volume), you should have plenty of free hard drive space on the volume on which you will install Mac OS X. Mac OS X is designed so that you store all your documents and other files on the same volume as the system is installed on so you should have as much space on that drive as possible. (Don't worry?you aren't limited to storing documents on the same drive as the OS?you can store documents on any mounted volume, but not all Mac OS X's features will be available for other volumes.)
Updating Your Mac's Firmware
Your Mac must have access to some basic software for it to start up. For example, it needs to know where to look for system software it can use to start up. This software used to be permanently stored in hardware called read-only memory (ROM). This permanent ROM could not be updated, so what came with the Mac was as good as it could get. With modern Macs, the base software is stored in firmware, which is sort of a combination between software encoded in hardware and normal software. The advantage of this is that Apple can update the firmware on modern Macs to correct problems or improve performance.
NOTE
If your Mac's firmware needs to be updated for 10.3, the installation process warns you and you must quit the installation and upgrade your firmware before you can continue. Things will go more smoothly if you check and update your firmware (if needed) before installing the OS.
Before installing Mac OS X version 10.3, you should make sure your Mac's firmware is up-to-date. This is a simple task that might prevent problems later.
TIP
To keep your Mac in top condition, you should check for firmware updates every so often, whether you are upgrading the OS or not.
To update the firmware on your Mac, do the following steps:
Use a Web browser to go to Apple's software support page, which is located at www.apple.com/support/downloads.
To search for any firmware updates for your Mac, enter your Mac's model or processor and the word "firmware." For example, if you have a Power Mac G4, type Power Mac G4 and firmware. If you have an iMac, type iMac and firmware. The search will find all updates that meet your search criteria.
Find the most recent firmware update for your Mac and download it.
Double-click the updater to mount the disk image on your desktop.
Open the disk image.
If a text file is provided with the update, open the text file and read it. If the Update is provided as an installer, launch the installer. In either case, read the instructions to run the updater.
Follow the instructions to install the firmware update on your Mac.
Some firmware updates include a program that checks whether your Mac's firmware needs to be updated. If so, run the firmware installer. Typically, you launch the updater and then restart your machine while holding down the power button (until you hear a long tone). After the updater has finished, it restarts your Mac and will be using the updated firmware.
TIP
You can also check for firmware updates by using the Software Update control panel under Mac OS 9.
Preparing a Volume for Mac OS X
Because Mac OS X is such a radical change from previous versions of the Mac OS, it can also be a bit more complicated to install. Before you begin installing it, there is a fundamental decision you need to make about how you are going to install the new OS.
 To learn more about disk partitions, see "Initializing and Partitioning a Hard Drive," p. 786.
Choosing a Disk Configuration Option
Ideally, you should install Mac OS X on a separate clean volume from where your current Mac OS 9 or earlier system lives. This enables you to more cleanly start your Mac in either Mac OS X or in a previous version of the operating system. This is advantageous because you can return to the older operating system in the event that something you need has not been ported to Mac OS X yet (such as a hardware device for which there is not yet a Mac OS X driver). This is somewhat complicated if you don't already have a system that has multiple volumes on which to install different versions of the OS.
The other option, which is not as desirable, is to install Mac OS X on the same volume as the current version of the OS. The advantage to this is that you don't need to worry about having multiple volumes on your Mac. You can simply install Mac OS X over the current OS. When you do this, the Mac OS X Installer installs Mac OS X on the same volume on which you have the current version of the Mac OS installed. This will likely work fine, but things are cleaner and more organized if you install each version of the operating system on its own volume.
If you already have more than one volume or one disk available, you should definitely install Mac OS X on a separate partition than the one that contains the current OS. If you have only one partition and aren't able to create multiple partitions, you must install Mac OS X on that partition. If either of these situations is the case for you, skip ahead to the section titled "Install Mac OS X."
If you can partition one or more drives in your system, it is worth the effort to do so before installing Mac OS X.
Before you get into the details of preparing a disk, you need to understand the following terms:
Initialize? Before a disk can be used, it must be initialized. When a disk is initialized, the sectors on the disk are organized and the disk is prepared for use. All data on the disk is destroyed when the disk is initialized.
Partition? When a disk is partitioned, it is separated into different logical volumes that act as if they were different disks. Each partition is independent of the others, at least to a point. You can install a unique OS on each partition and boot from that partition. Although partitions appear to be independent, they are part of the same physical disk. Therefore, you can't initialize or format a partition. Those tasks can be done only on an entire disk. However, you can erase and reformat a partition without affecting other volumes, even if they are on the same physical disk.
Volume? A volume is an electronic construct that acts like a disk. A volume can be a disk, a partition on a disk, a network disk, a disk image, and so on. Anything that mounts on the desktop is a volume.
Using Mac OS 9 to Create Multiple Partitions on a Disk
Because this option enables you to start up your Mac in your current version of the Mac OS, you can always return to that version of the OS in the event that something you need does not work or does not work properly under Mac OS X. (This will most likely be necessary for any hardware devices for which you don't have Mac OS X?compatible drivers.)
CAUTION
This section assumes you are installing Mac OS X on a system running some variation of Mac OS 9. If you are using an older version of the OS, the steps will be similar, although the details might be slightly different.
NOTE
To use your Mac OS 9 installation for the Classic environment, you must install Mac OS 9.2.2.
When you partition a hard drive, you must initialize it, which means you destroy all the data on that disk. Before you partition a disk, make sure one of the following situations is true for you:
You have all the original CDs for your software and can store your data files on some type of removable disk (such as a Zip disk or CD-R).
You have a current backup of the disk you are going to partition.
Because you will erase the drive you are going to partition, you must rebuild it from scratch. The best way to do this is to have an effective backup system you can use to restore the contents and configuration of the drive. If you have to install the original software from CDs when you rebuild the drive's data, the process takes much longer.
NOTE
For information on backing up Mac OS 9 machines, see my book The Mac OS 9 Guide.
To partition your drive, do the following steps:
Capture the current data on the disk (use your backup system or locate all your CDs and data disks).
CAUTION
Don't blow through this step too quickly. Losing data is no fun.
Insert the CD containing the installer for the version of the Mac OS you are currently running. You should use your Mac OS 9.2 system software install or restore discs.
Restart your Mac, and as your Mac restarts, hold down the C key to boot from the Mac OS 9.2 CD-ROM.
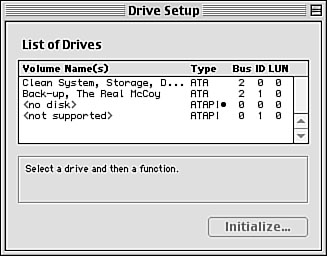
After your Mac boots up, open the Utilities folder on the CD-ROM and then launch Drive Setup. You will see the Drive Setup window (see Figure A.3). Drive Setup looks for all the drives available on your system; they are listed in the window. Note that you might see some drives you cannot initialize, such as the DVD-ROM drive. You can also see the bus and ID numbers of all the drives connected to your system.
Figure A.3. Use Drive Setup for the previous version of the Mac OS that you use to partition a drive for Mac OS X.

If you don't see a drive that is installed in your Mac in the Drive Setup window, see "An Installed Disk Does Not Appear in the Mac OS 9 Drive Setup Window" in the "Troubleshooting" section at the end of this appendix.
CAUTION
Some non-Apple drives are not compatible with Drive Setup. If you use a third-party drive, make sure that it is compatible with Drive Setup before you try to initialize it (you can launch Drive Setup and see whether it recognizes the drive, or you can check with the drive's manufacturer).
If Drive Setup is not compatible with your drive, you will need a third-party drive utility such as FWB's Hard Disk Toolkit.
Select the drive you want to initialize and partition. If it is ready to be initialized and partitioned, you see a message saying so in the bottom of the window. If not, the software tells you what the problem is (for example, you can't initialize a disk that contains the active system software).
CAUTION
Don't proceed unless you are sure that you have another copy of all the data on the disk you are going to partition.
Click Custom Setup to open the Custom Setup dialog box. You can see the disk's current name at the top of the window. Just under the Partitioning Scheme pop-up menu, you can see the capacity of the disk (see Figure A.4).
Figure A.4. You use this window to select the number and size of the partitions on a disk.
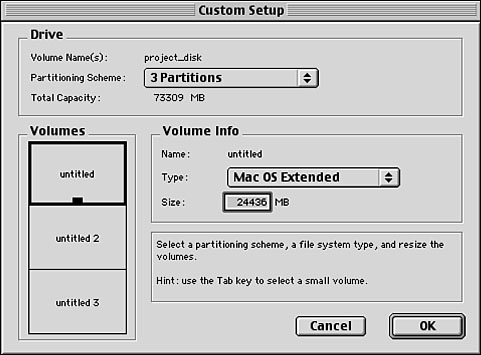
Choose the number of partitions you want on this disk from the Partitioning Scheme pop-up menu. In the Volumes area, you see a graphical representation of the volumes with the partitions applied.
Partition Guidelines
Although I can't tell you specifically how many partitions you should set up, I can give you some general guidelines. Unless you have a very specific purpose in mind or are working with a small disk, I wouldn't create any partitions smaller than 10GB, especially if you plan to install an OS or applications on it. You will need at least one partition for each version of the Mac OS in which you want to be able to independently start up.
If you plan on having one Mac OS 9 startup disk and one Mac OS X startup disk, you will need at least two partitions.
If you plan on using Mac OS X's disk organization to store all your data files and applications, be sure to create a large partition for it (preferably 20GB or larger).
Select the type of partition you want for the first partition from the Type pop-up menu. Unless you have a specific reason not to do so, select Mac OS Extended for all the partitions.
Enter the size for the first partition in the Size box or use the graphical representation of the volumes to adjust the size (drag the handle on the black box around the partition).
Continue selecting partition types and sizes until you have set up the total number of partitions you want on that disk (you have allocated the disk's entire capacity). You can have partitions with a different type on the same disk. In some cases, you might want to have a format that is more compatible with a specific purpose for the partition. For example, you might want to run Linux on a partition, in which case you should format that partition as a Unix disk.
You should have at least two Mac Extended (also known as HFS+) partitions, with one being 20GB or more (the one on which you will install Mac OS X).
When you are done, you see the completed dialog box and are ready to initialize the disk.
Click OK.
In the Initialize dialog box, click Initialize if you are sure you want to continue. You see the Drive Setup window again and can see the progress of the initialization and partitioning process. If the drive is large and requires a low-level format, this process takes a long time. If the disk is small or does not need a low-level format, the process is done fairly quickly. When it is complete, you see the partitions listed at the bottom of the Drive Setup window.
Quit Drive Setup to see the new volumes on your desktop.
Name the partitions you created. For example, name the partition on which you are going to install Mac OS X, Mac OS X. You might name the partition on which you are going to maintain Mac OS 9.2, Mac OS 9.2.
The volumes are now ready for your data. If you open them, you will see approximately the amount of free data you specified for the partition.
NOTE
You won't ever get exactly the size of the partition that you set; usually, it is just a tad smaller than what you asked the Mac to create. That occurs because the structure of the drive itself requires some data to store, thus reducing the amount of free space on that volume. Plus, there are some invisible files on every partition, and they take space to store.
Installing Mac OS 9.2
After you have created your partitions, install Mac OS 9.2 using the following steps:
Run the Mac OS 9.2 installer. If you haven't restarted your Mac since you partitioned your hard drive, you can run the installer from the CD that you used to run Drive Setup.
After the installation is complete, reinstall any third-party software (such as your Classic applications) on your Mac OS 9.2 partition.
Restart your Mac using the startup volume you created that contains Mac OS 9.2.
Configure Mac OS 9.2 so it meets your requirements (such as installing additional software).
After Mac OS 9.2 is configured properly, you are ready to install Mac OS X on another partition.
TIP
For help working with Mac OS 9, see my book The Mac OS 9 Guide.
Installing Mac OS X
After you have prepared a volume for Mac OS X, install it using the following steps:
Insert the first Mac OS X CD in your Mac, restart your Mac, and hold down the C key to restart from the CD.
The system goes through several checks that are different from the startup process under previous versions of the OS. Eventually, you will see it begin to prepare the installation process.
Follow the same steps as when you install the OS using the Erase and Install option, starting with step 2.
TIP
For best results, you should reformat the volume on which you are going to install Mac OS X using the HFS + with Journaling option.
To learn how to format a partition, see "Partitioning a Drive Before Installing Mac OS X," p. 959.
To learn how to install Mac OS X version 10.3 with the Erase and Install option, see "Installing Mac OS X Version 10.3 Using the Erase and Install Option," p. 957.


