Adding New Text Boxes
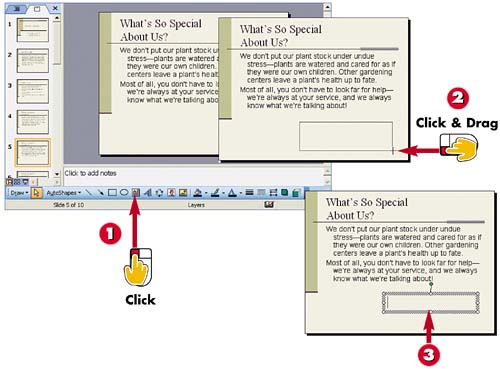

Click the Text Box button on the Drawing toolbar.

Click and drag the mouse on the slide where you want the text box to appear until the text box is the size you want.

Release the mouse button; the text box is created.
INTRODUCTION
If your slide layout does not supply the number of text boxes you need to present your slide text, you can add text objects. A text object is simply a box that contains text. Like other slide objects, a text object can be moved and resized.
TIP
Selecting a Text Box
To select an existing text box on a slide, click any border around the box. When selected, the box displays handles around the corners of the box. If you move the mouse over a handle of a selected box, a double-sided arrow appears, indicating you can drag the handle to resize the box. If you move the mouse over a border, a four-sided arrow appears, indicating you can move the box to reposition it on the slide.
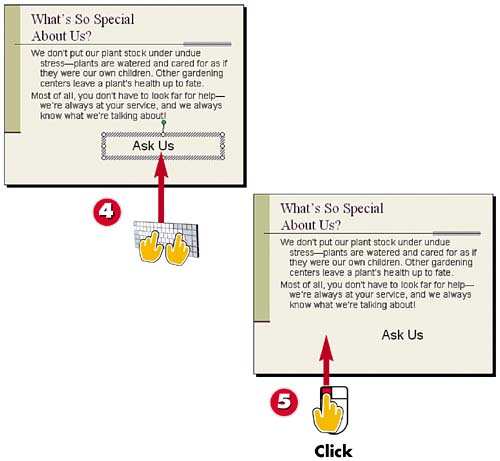

Type the text you want to include in the text box.

Click anywhere outside the text box to deselect the text object.
TIPFormatting Text You can apply formatting to a text box before or after you draw the box. Simply select from the tools available on the Formatting toolbar. See the remaining tasks in this section to learn more about formatting techniques. |
TIPMoving a Text Box You can move a text box to reposition it in the slide layout. First select the text box, then move the mouse pointer over any border or edge and drag the box to a new location on the slide. |
TIPDeleting Text Boxes You can delete text boxes you do not need in your slide layout, including text objects that came with the layout. Simply click any text box border to select the box, and then press the Delete key. PowerPoint immediately removes the box. |


