Quick Tour of the 'Cockpit'
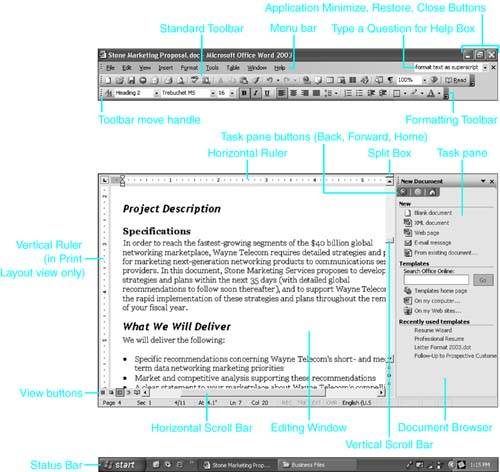
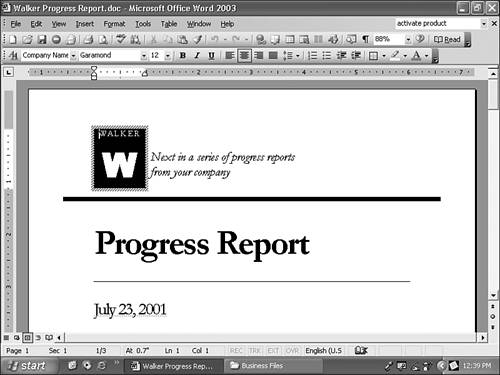
Typically, the easiest way to start Word is to click Start, All Programs, Microsoft Office, Microsoft Office Word 2003. Word opens with a new blank document ready for editing. In Figure 2.1, you can see the basic Word interface with each of its components marked.
Figure 2.1. The Word interface is replete with shortcuts for editing and navigation.
The next few sections take a closer look at each important element of the Word interface.
Using Word's Improved Task Panes
Task panes, first introduced in Word 2003, are designed to make Word easier to use by bringing together all the options available to perform a task, and placing them conveniently on the right side of Word's editing window. For example, the New Document task pane appears when you first open Word. This task pane shows your options for opening existing documents or creating a new one (refer to Figure 2.1).
Each option in a task pane appears as a blue hyperlink; when you move your mouse over the option, it appears underlined. To choose the option, click on it.
In some cases, clicking an option executes the option; for example, clicking on the name of a document opens that document. In other cases, clicking an option opens a related dialog box, where you can make appropriate choices. For example, if you click On My Computer in the New Documents task pane, Word displays the Open dialog box, which you can use to browse to and select the document of your choice.
Word offers many task panes. These include |
The new Getting Started task pane, which provides easy connections to Microsoft Office Online and allows you to open one of the documents you were working on most recently. (To view, display any task pane and click the Home icon.)
The Help task pane, which brings together all of Microsoft Word's online and offline help features (and is covered later in this chapter, in the "Getting Help" section).
The Clip Art task pane, which allows you to choose an image to insert in your document (to view, choose Insert, Picture, Clip Art.)
The Research task pane, which gives you access to all of Word's research tools, as well as translation tools that can translate single words among the languages installed on your computer file searches (to view, choose Tools, Research, or Tools, Language, Translate).
The Clipboard task pane, which allows you to paste any of multiple items you have cut or copied into the Clipboard.
The Basic File Search task pane, which controls file searches (to view, choose File, File Search).
The New Document task pane, which lets you specify which type of new document you want to create.
The Shared Workspace task pane, which lets you control the way you collaborate with others using SharePoint to work on the same documents.
The Document Updates task pane, which allows you to check for updates to your document that may have been made by collaborators using SharePoint.
The Protect Document task pane, which lets you control which types of edits and formatting others can make to your document.
The Styles and Formatting task pane, which allows you to control all the styles and formatting associated with text you've selected. (To view, choose Format, Styles and Formatting, or click the Styles and Formatting button on the Formatting toolbar.)
The Reveal Formatting task pane, which shows all the formatting associated with specific text. (To view, choose Format, Reveal Formatting.)
The Mail Merge task pane, which walks you through the process of building a mass mailing or an emailing. (To view, choose Tools, Letters and Mailings, Mail Merge.)
The XML Structure task pane, which allows you to apply new XML elements to a Word document saved in XML format, using an XML schema you have already created. (For more on working with XML, see Chapter 25, "Using Word to Develop XML Content and Use XML Applications."
To view any task pane, including the Clipboard task pane (which does not have its own menu command), choose View, Task Pane. A task pane appears; click the down arrow to the right of the task pane's name. Then, choose the task pane you want from the drop-down menu.
In Word 2003, you can also move among task panes you have already viewed: Use the Back and Forward buttons at the top of the task pane. You can also move to the Home task pane at any time, by clicking the Home button.
Using Word's Personalized Menus
As in any Windows application, you can choose a wide range of commands from menus. However, in Word there's a difference: If you want them, you can have Personalized Menus.
If you choose to work with Personalized Menus, when you first choose a menu Word displays an abbreviated list of commands. To see the complete list, point the mouse pointer to the double arrow at the bottom of the menu and wait a moment.
When Personalized Menus are enabled, if you choose a menu item that isn't on the "short" list, Word adds it to the short list the next time you display the menu. In this way, Word attempts to personalize itself for you, showing the commands you use while eliminating the clutter associated with those you don't use.
You can control whether Word uses Personalized Menus. Choose Tools, Customize; click the Options tab; and clear or check the Always Show Full Menus check box.
NOTE
Throughout this book, you'll find references to commands that don't appear on abbreviated Personalized Menus. If you are using Personalized Menus, and a command is mentioned that doesn't appear in your copy of Word, position your mouse pointer over the double arrow at the bottom of the menu, and the command will appear.
Moving Around Fast with the Scrollbars
As with most Windows applications, Word provides a vertical scrollbar that enables you to move throughout a document rapidly. To move to a specific location, click the scroll box and drag it up or down. As you drag the scroll box, Word displays a ScreenTip showing the page number to which you've scrolled. To move up or down by one screen, click anywhere in the vertical scrollbar above or below the scroll box.
TIP
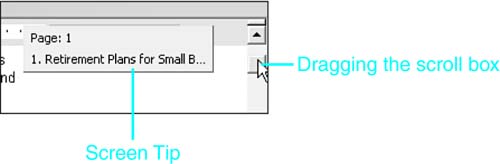
If you use Word heading styles to identify your document's headings, Word provides even more useful ScreenTips, displaying the headings as you move past them (see Figure 2.2). This way, you don't even need to know the page number you're looking for?just the subject matter.
Figure 2.2. As you scroll through a document that uses heading styles, Word displays a ScreenTip showing the names of the headings you pass.
Word also provides a horizontal scrollbar that enables you to move from left to right in a document. You'll find this most useful when you're working in documents wider than your editing window, such as documents formatted horizontally in landscape orientation.
If your document is only slightly wider than your window, you might find it more comfortable to display all your text at the same time, rather than scrolling horizontally back and forth. One way to do this is to choose Tools, Options, View, and check the Wrap to Window check box. Another option is to type a smaller number in the Zoom box on the Standard toolbar?perhaps 90% or 95% instead of 100%.
TIP
Another option is to set the Zoom control to Page Width. Word will then automatically display your page as large as it can be displayed while still fitting entirely in your editing window. To do so, click the down arrow next to the Zoom setting in the Standard toolbar, and choose Page Width from the drop-down list.
TIP
If you have a Microsoft IntelliMouse (or compatible mouse), you can also scroll through a document by rolling the scroll wheel between the left and right mouse buttons.
Document Browser: Browse Any Way You Want
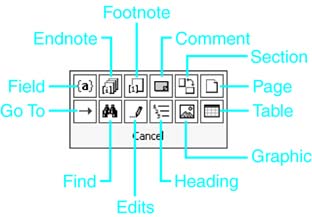
At the bottom of the vertical scrollbar is a powerful tool for moving around your document: Word's Document Browser (sometimes called Select Browse Object), shown in Figure 2.3. Document Browser enables you to jump quickly between document elements. You can choose from a wide range of document elements, including pages, footnotes, tables, drawings, and several others.
Figure 2.3. With Document Browser, it's easy to move to the preceding (or next) page.
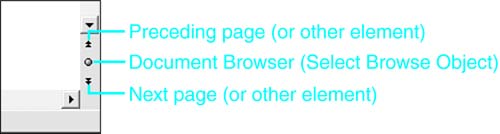
By default, Document Browser is set to work with pages. If you click the double up-arrow button, you move up one page, and if you click the double down-arrow button, you move down one page. However, you can use Document Browser to move among many other document elements as well. Click the Select Browse Object ball, and Word displays icons representing several document elements (see Figure 2.4).
Figure 2.4. When you click the Select Browse Object ball, Word enables you to choose the document element you want to browse.
After you choose the one you want, the double arrows turn blue, indicating that they no longer move to the next or preceding page but rather move to a different element in your document. They remain blue for the rest of your editing session or until you click the Page icon to browse by page again.
You can always check to see which element type the Document Browser is set to search for by using ScreenTips. Just position the mouse pointer on one of the double-arrow buttons until the ScreenTip opens. When you want to revert to browsing by page, click the Select Browse Object icon and choose Page.
TIP
What if it's not enough to view the next or preceding document element?you want to move ahead or back by several elements? Or what if you want to browse for an element that Select Browse Object doesn't control? Use Word's Go To dialog box: Press F5 to display it. Go To is covered in detail later in this chapter, in the section "Go To Practically Anything You Want."
Get the Best View of Your Document
There's more than one way to look at anything?especially your Word documents. Word lets you choose the right view for whatever purpose suits you at the moment, including editing speed, previewing, or document organization, to name a few. You can navigate and edit your document in any of these five Word views:
Normal view
Web Layout view
Print Layout view
Outline view
Reading Layout view
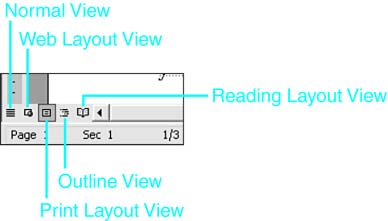
The fastest way to choose your view is to click a View button at the left of the horizontal scrollbar, near the bottom of the screen (see Figure 2.5).
Figure 2.5. To change views, click one of the buttons to the left of the horizontal scrollbar.
NOTE
A sixth way of viewing your Document, Document Map, allows you to view (and quickly move among) the headings of your document. Document Maps are covered later in this chapter, in the "Document Map" section.
Working in Normal View
Normal view is Word's default setting (refer to Figure 2.1). It represents a trade-off between accuracy and speed. In Normal view, you see your document much as it will appear when printed, with some significant exceptions. For example:
You can't use Word's drawing tools. (If you do, you've switched automatically into Print Layout view.)
If your document consists of multiple columns, Normal view displays a single column instead.
Headers and footers aren't displayed unless you choose View, Header and Footer (which also switches you into Print Layout view).
Page breaks appear as dotted lines. Page breaks you enter manually appear darker, and contain the words "Page Break." (Section breaks appear as dark double-dotted lines, with the words "Section Break.")
TIP
Occasionally, even Normal view is too slow. For example, you may be using a relatively slow computer to edit an extremely long, complex document. One option is to display the contents of your document in Draft Font. Because this hides all text formatting, Word runs noticeably faster. To do this, first make sure that you're in Normal or Outline view. Then select Tools, Options, View and check the Draft Font check box.
Working in Web Layout View
Web Layout view is designed to show how text will appear when viewed through a Web browser. For example, Web Layout view wraps text to the width of your screen, as a browser does, rather than allowing it to stretch beyond the screen's borders (see Figure 2.6).
Figure 2.6. Web Layout view enhances your document's appearance for onscreen viewing.
Working in Print Layout View
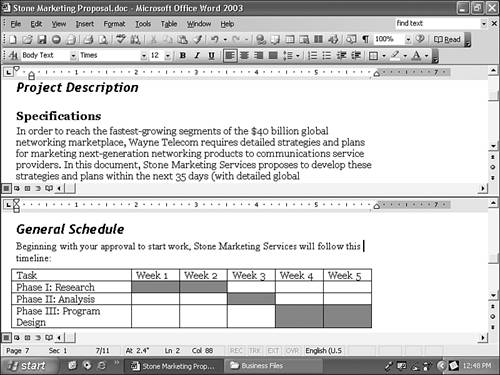
Print Layout view (see Figure 2.7) shows your document exactly as it will appear when you print it, with all headers, footers, images, columns, and other elements in place. The trade-off is that Print Layout view is slower because Word, Windows, and your computer must all work harder to continually display these elements accurately.
Figure 2.7. In this figure, the document is displayed in Print Layout view. Note that all elements are in their proper places, including text boxes and graphics.
TIP
If that Print Layout view runs too slowly, yet you need to see accurate page layouts, there is a compromise: Keep the layout but hide any images contained in the document. To do this, first make sure that you are in Print Layout view. Next, select Tools, Options, View. Check the Picture Placeholders check box and clear the Drawings check box.
Working in Outline View
Outline view (see Figure 2.8) displays the outline structure embedded in your document so that you can quickly see (and change) the way your document is organized.
Figure 2.8. In Outline view, you can see exactly how your document is structured and move around large chunks of your document with remarkable ease.
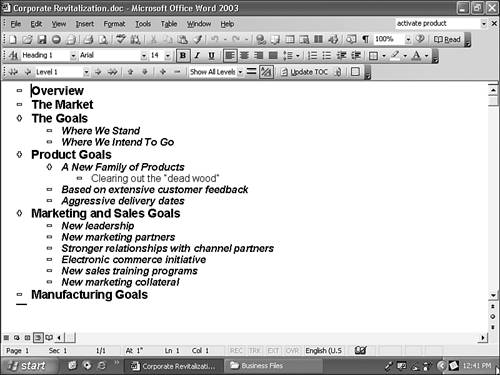
You won't see much of a difference between Outline view and other views unless you've used Word's Heading Styles or Outline Levels features to establish distinctions between levels of text. But if you do use these features, Outline view gives you exceptional control over your document that's available in no other way. (For a close look at what you can do in Outline view, see Chapter 18, "Outlining: Practical Techniques for Organizing Any Document.")
TIP
If you haven't used Heading Styles, you can often add them quickly using Word's AutoFormat feature, as discussed in Chapter 9, "Automating Your Documents."
Working in Reading Layout View
In Word 2003, Microsoft introduces Reading Layout view, a special view designed primarily for reading documents rather than editing them (see Figure 2.9). |
Figure 2.9. Reading Layout view is optimized for reading documents onscreen.
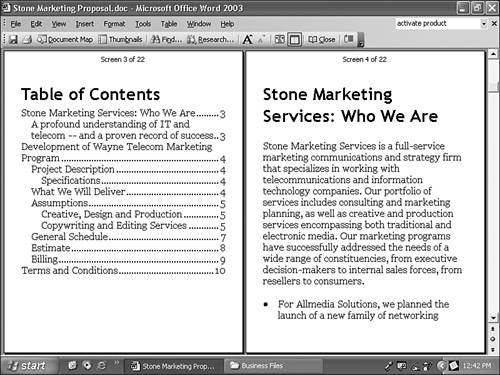
You can choose Reading Layout view by clicking the Reading Layout view button at the lower left of the editing window, or by clicking Read on the Standard toolbar, or choosing View, Reading Layout. When you display Reading Layout view, Word changes your page display in the following ways:
Text is enlarged significantly. (This affects only the onscreen display, not how the text will be printed.)
Depending on your video settings, two "screens" of text may be shown at once.
Word uses Microsoft's ClearType technology to slightly improve legibility.
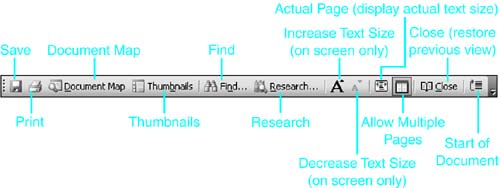
All toolbars are hidden except the Reading Layout Toolbar, which brings together the tools Microsoft expects you to use most often while reading a document (see Figure 2.10). (You can, however, restore any toolbar by choosing View, Toolbars and selecting the toolbar you want to appear.)
Figure 2.10. The Reading Layout toolbar brings together the tools you may use most often while reading a document onscreen.
Although Reading Layout view is optimized for reading, you can also edit and format text the same way you normally do. However, if you depend on toolbar buttons, you will have to redisplay those toolbars.
When you are finished working with Reading Layout view, click Close. Word will display the view you were using previously.
Document Map
If your document includes headings or custom styles that Word can use as mileposts throughout your document, you'll also find the Document Map valuable. To display the Document Map, choose View, Document Map.
With Document Map (see Figure 2.11), you can see both your document's text and a map of your document at the same time. Click an element on the map, and you move to that location?just as you would if you clicked on a hyperlink on a Web page.
Figure 2.11. Document Map enables you to quickly move to any location in your document.

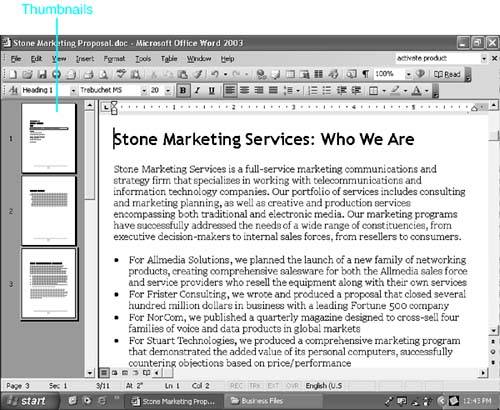
Working with Thumbnails
Word 2003 introduces thumbnails, which allow you to move among pages by clicking on a small image of the page displayed to the left of the editing window (see Figure 2.12). To display thumbnails (or hide thumbnails already displayed), choose View, Thumbnails. |
Figure 2.12. Thumbnails are small photos of each page appearing to the left of the editing window.
TIP
If you are working in Reading Layout view, you can also display or hide thumbnails by clicking the Thumbnails button on the Reading Layout toolbar.
Seeing More of Your Document
Some people find Word's interface just too much: All those buttons seem to get in the way of their work. If you're one of those people, you'll appreciate knowing that you can hide as much of the Word interface as you want. You can even hide all of it.
Hiding Some Interface Elements
Much of Word's interface can be hidden or displayed via the View menu. For example, selecting View, Ruler toggles Word's rulers on or off. Selecting View, Toolbars displays a cascaded list of all available Word toolbars; you can then clear the check marks associated with each toolbar you want to hide.
Other interface elements can be hidden using Word's Options dialog box. Choose Tools, Options to display this dialog box; then display the View tab (see Figure 2.13).
Figure 2.13. The View tab of the Options dialog box enables you to show or hide scrollbars and the status bar.

From here, clearing any or all of the Vertical Scroll Bar, Horizontal Scroll Bar, or Status Bar check boxes removes them from view in Word.
Working with a Blank Screen
If you want, you can hide Word's interface almost entirely. It's easy: Choose View, Full Screen. Your document editing window expands to cover the entire screen, and the Full Screen toolbar appears, containing one button: Close Full Screen (see Figure 2.14). You still have access to Word's menus: Point your mouse at the very top edge of the screen, and they will appear.
Figure 2.14. Displaying Word's Full Screen interface.
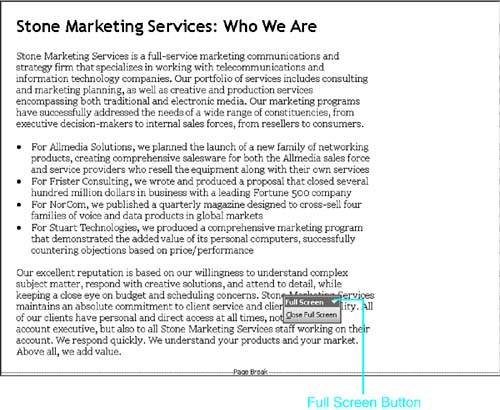
When you want to stop using Full Screen, click the Close Full Screen button.
TIP
If the Full Screen toolbar disappears, or if you inadvertently close it, you can press Esc to display Word's interface again. You can also move your mouse pointer to the top of the screen, displaying Word's row of menu commands, and then choose View, Full Screen again to toggle the Full Screen view off.
Zooming In on What You Want to See
By default, Word displays your text at full size in Normal view: 100%. However, you may occasionally want to change this. For example, to view the intricate details of a drawing, you might want to zoom in to 200% or more; or to see most or all of a page in Print Layout view, you might want to zoom out to 80% or less. Word makes this easy with the Zoom drop-down box in the Standard toolbar (see Figure 2.15).
Figure 2.15. Use the Zoom drop-down box to specify how much you want to enlarge or reduce your document onscreen.
NOTE
The Zoom drop-down list box displays different options depending on the view you've selected.
You can click the down arrow next to the Zoom drop-down box and choose from among Word's built-in ratios: 10%, 25%, 50%, 75%, 100%, 150%, 200%, and 500%, as well as Page Width, which ensures that all your text fits horizontally on your screen. (Page Width saves you the trouble of trying to figure out how much to reduce your document to see all its text.)
Sometimes you may want to specify an exact proportion not included on Word's drop-down list. For example, many people find their documents easier to edit if the type is enlarged to 110% or 120%. To specify an exact proportion, click inside the Zoom drop-down box and enter the value you want. Any whole digit between 10% and 500% works.
Changes you make in the Zoom drop-down box do not affect the way your document appears when printed or published online. They also do not affect how the document is displayed in other views; for example, if you change the 100% setting to 75% in Normal view, your document will still be displayed at 100% in Print Layout view.
Word uses the new setting you establish in any new documents you create. Word retains the Zoom settings that are associated with each view when you close a document. In other words, if you reopen a document that was displayed at 75% in Normal view during your preceding editing session, it will be displayed at 75% in Normal view now as well.
Gaining Finer Control over Zoom with the Zoom Dialog Box
You can gain even finer control over your Zoom settings. Choose View, Zoom to display the Zoom dialog box (see Figure 2.16).
Figure 2.16. Use the Zoom dialog box to gain finer control over zooming.
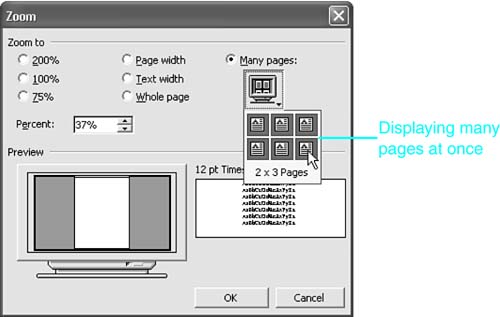
In addition to the standard settings accessible from the drop-down box, you can also zoom to Text width (which hides most of the left and right margins, allowing for slightly larger and more readable text than zooming to page width).
You can also choose Whole Page, which displays the entire page at once. And, if you are working in Print Layout view or Print Preview, you can display several pages at once. To do so, click the Many Pages button, and drag under it to display the number of pages you specify.
NOTE
Options available in the zoom dialog differ depending on the current view you have selected.
Tracking Your Progress with the Status Bar
Often, you'll want to know exactly where you are in your document, or on your page?especially if you're working in Normal view, where your location on the page isn't always apparent. You can always get this information?and more?from the Word status bar. You can find the status bar at the bottom of the Word screen (see Figure 2.17).
Figure 2.17. The status bar includes information about where you are in your document, as well as information about what mode you're using.
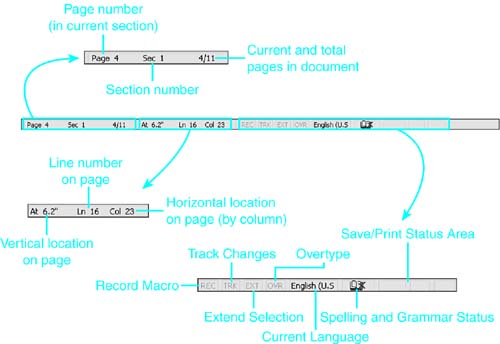
Tracking Where You Are
The location information section of the status bar tells you what page and section you're in and how many pages are in your entire document. If you have more than one section, and you've told Word to start numbering new sections with page 1, Word tells you both the correct page number within the section and the number of the page in the overall document. (See Chapter 5, "Controlling Page Features," to learn about document sections.)
Location information also tells you where you are on a given page. The information is provided vertically by inches and line numbers and horizontally by columns, with each character of text on the line counted as one column. (Don't confuse the columns Word uses for this column numbering with those it creates with multiple-column documents such as newsletters.)
TIP
Double-clicking on the Page, Section, or Current and Total Pages indicator displays the Go To tab of the Find dialog box, which you can use to navigate to another location in your document.
Tracking Your Current Mode
Most of the time, you'll work in Word's standard editing mode, but some tasks require you to be in another mode. For example, when you ask Word to track changes in your document, you're in Track Changes mode. Any active modes are displayed in the status bar; grayed-out modes are inactive:
Abbreviation | Description |
|---|---|
REC | A macro is currently being recorded. |
TRK | Revisions are currently being tracked. |
EXT | A text selection is currently being extended. |
OVR | Word is currently overtyping (replacing text as you type over it). OVR is not available when Tracked Changes is turned on. |
At the far right of the status bar, the Spelling and Grammar Status animated icon appears. When it resembles a pencil writing in a book, Word is busy displaying your current keystrokes. When you stop momentarily, the icon changes to display a large red x over the book, indicating that Word is checking your grammar and spelling.
 For more information about Word's automated spelling and grammar checker, see "Using Automatic Spelling and Grammar Checking," p. 254.
TIP
You can activate or deactivate any of these four modes by double-clicking on its icon in the status bar. (If the icon is grayed out, it is inactive; double-clicking on it activates it.)
Viewing Two Parts of the Document at the Same Time: The Split Box
Word's split box (see Figure 2.18) enables you to view and edit two parts of your document at the same time. For example, if you change one clause of a contract, you might want to view another clause at the same time, to see how it should be edited. Or if you're creating a cross-reference (as is covered in Chapter 22, "Using Footnotes, Bookmarks, and Cross-References"), you might want to view both the referenced text and the place where you're inserting the reference.
Figure 2.18. The split box appears above the vertical scrollbar at the right edge of the screen.
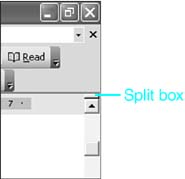
The split box is a tiny beveled rectangle placed above the vertical scrollbar. To split the screen with the split box, follow these steps:
Place your mouse pointer on the split box.
Click and drag the mouse pointer down to the location in the editing window where you want your screen to split. While you are dragging, a split pointer is visible.
Release the mouse button. The document is now displayed in two separate windows.
You can navigate and edit in either window (see Figure 2.19). Your edits appear in both windows because you are still working on only one document. In Word, each split box window contains its own ruler, scrollbars, Document Browser, and View buttons, each of which works independently.
Figure 2.19. Working with a document split into two windows.
When you no longer want a split screen, click and drag the split pointer above the top or below the bottom of the editing window. Your screen returns to normal.
NOTE
If you can't find the split box, make sure that Document Map is not displayed, and make sure that the vertical scroll box is displayed (choose Tools, Options, View; check Vertical Scroll Box; and choose OK).
Toolbars: Usually the Fastest Way to Get the Job Done
In Word, there's little you can't do by clicking a single button. In fact, sometimes the hardest part is finding the right button to click. If you're not sure what some of Word's button icons mean, position your mouse pointer over the icon, and a ScreenTip appears, displaying the button's name.
TIP
Occasionally, you might prefer to start using a keyboard shortcut in place of a toolbar button. To learn more of the keyboard shortcuts associated with Word toolbar buttons, tell Word to display the keyboard shortcut whenever it displays a ScreenTip.
To do so, select View, Toolbars, Customize and choose the Options tab. Make sure that Show ScreenTips on Toolbars is checked and that Show Shortcut Keys in ScreenTips is also checked.
Word comes with more than a dozen toolbars, each containing a series of buttons you can click to perform common tasks. For example, Word's Drawing toolbar contains a series of tools for drawing, coloring, and manipulating lines, shapes, and text. You can display most of Word's toolbars anytime you want, by selecting View, Toolbars. A cascaded list appears. Check the toolbar you want. Table 2.1 lists the toolbars you can display using View, Toolbars.
Toolbar Name | What It Does |
|---|---|
Standard | File management and editing |
Formatting | Font (character) and paragraph formatting |
AutoText | Insertion and management of boilerplate text |
Control Toolbox | Insertion and management of ActiveX controls |
Database | Control of Word database tables and external queries |
Drawing | Graphics, image management, text boxes, and text-based graphics (WordArt) |
Email editing tools | |
Forms | Electronic forms |
Frames | Creation of frames in Web pages |
Ink Comment | Tools for marking up documents with an electronic pen |
Mail Merge | Organizing and performing mail or email merges |
Outlining | Document outlining features |
Picture | Insertion and manipulation of clip art |
Reviewing | Tracking reviewers' changes |
Tables and Borders | Table and cell creation, formatting, manipulation, and sorting |
Task Pane | Displays Task Pane to the right of the editing window |
Visual Basic | Running and working with Visual Basic macros |
Web | Accessing Web resources; creating documents to be published on the Web |
Web Tools | Insertion of automated elements in Web forms |
Word Count | Displays word counts and allows you to quickly update them |
WordArt | Creation of graphics from text |
Other toolbars, such as Header and Footer, automatically appear when you're performing the tasks they're designed to assist, and they don't appear at any other time.
Another option, Customize, allows you to make changes to your toolbars' behavior and contents, and create new toolbars. Some toolbar customization tasks were covered earlier in this chapter, in the "Using Word's Personalized Menus" section. Most are covered in Chapter 31, "Customizing Word."
Displaying the Full Standard and Formatting Toolbars
Two toolbars are especially important: the Standard toolbar, which contains basic file management and editing tools, and the Formatting toolbar, which contains basic formatting tools.
If you rarely use some of these toolbar buttons, you might be willing to trade them for increased editing space. To combine the most common Standard and Formatting toolbars onto a single row, choose Tools, Customize and click Options. Then clear the Show Standard and Formatting Toolbars on Two Rows check box, and click Close.
NOTE
Most users prefer to display full toolbars. In addition, you'll find references to Standard and Formatting buttons throughout this book that appear on only the full toolbars.
A Closer Look at the Standard and Formatting Toolbars
As you've learned, Word clusters the most commonly used tasks on two Word toolbars: the Standard toolbar and the Formatting toolbar.
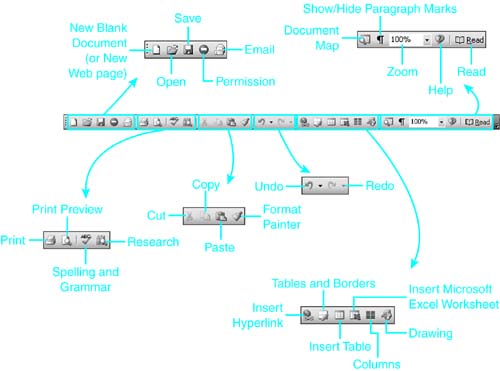
The Standard toolbar (see Figure 2.20) contains basic file management and editing tools, along with one-button shortcuts for common tasks, such as inserting tables, columns, or drawings.
Figure 2.20. The Standard toolbar organizes many of Word's most common file management and editing tools.
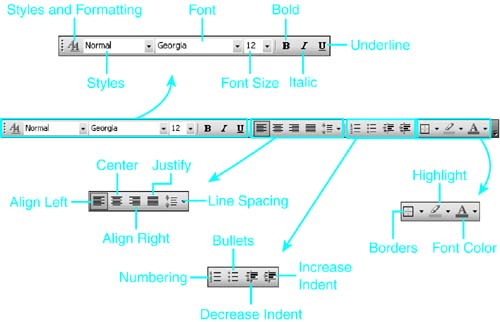
The Formatting toolbar (see Figure 2.21) contains shortcuts for formatting text, aligning paragraphs, inserting bullets and numbering, adjusting indentation, and adding borders and highlighting. Formatting is covered in detail in Chapter 4, "Quick and Effective Formatting Techniques."
Figure 2.21. The Formatting toolbar gives you one-button access to the most important elements of font and paragraph formatting.
TIP
If you often edit text in foreign languages, or if you create documents that utilize phonetics, you may want to display Word's Extended Formatting toolbar, which contains a set of tools for these applications.
You can't display the Extended Formatting toolbar through View, Toolbars, however. To display it, choose Tools, Customize; then click the Toolbars tab if it doesn't already appear. In the Toolbars scroll box, check the Extended Formatting check box and click Close.
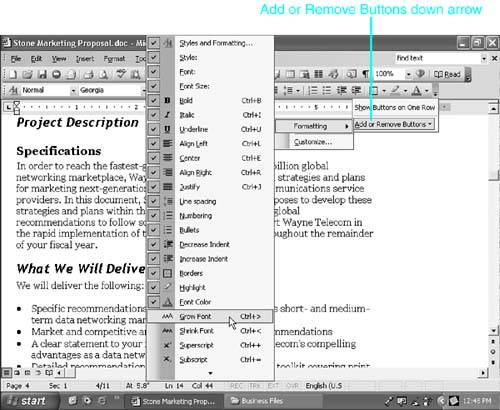
Adding Related Buttons to a Word Toolbar
If you wish that one of Word's toolbars had slightly different buttons, Word makes it easy to do something about it. Click the down arrow at the far right of any Word toolbar, click Add or Remove Buttons, and click the name of the toolbar from the cascading menu. An extensive list of buttons appears (see Figure 2.22). If you want to add a button that doesn't currently appear, click to place a check mark next to it. If you want to remove a button, click on it to clear its check mark.
Figure 2.22. Adding related buttons to a toolbar.
To learn how to create new toolbars, add other buttons to existing toolbars, and move buttons between toolbars, see "Customizing Toolbars and Menus," p. 1023.
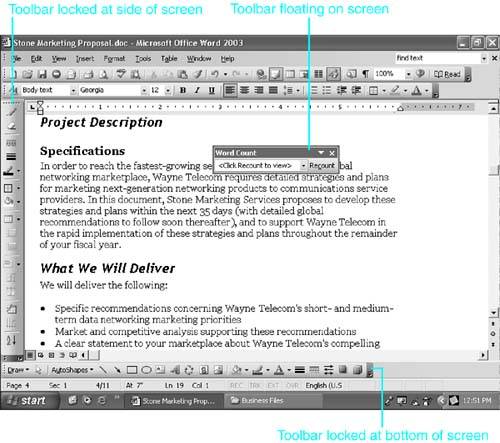
Moving Toolbars
You don't have to settle for where Word places your toolbars; you can drag them anywhere you want. You may especially want to move toolbars (and display extra toolbars) if you have a high-resolution monitor and a lot of space in your editing window.
If a toolbar is locked in place at the top of the screen, you can drag it by clicking and dragging the notch at the left edge of the toolbar, which is called a move handle. If the toolbar is floating in midscreen, you can drag it by its title bar.
If you drag a toolbar to the edge of the screen, it locks in place. If you drag a toolbar to the center of the screen, it floats. Examples are shown in Figure 2.23.
Figure 2.23. Locked and floating toolbars.
Using the Ruler
Word's ruler (see Figure 2.24) displays by default, providing an easy, "hands-on" way to control margins, indents, and tabs. You'll take a closer look at using the ruler to control indents and tabs in Chapter 3, "Essential Document Creation and Management Techniques," and margins in Chapter 4, "Quick and Effective Formatting Techniques."
Figure 2.24. You can control margins, indents, and tabs by clicking and dragging elements of the ruler.
![]()
Keyboard Shortcuts: Getting the Job Done Even Faster
So far, this chapter has focused primarily on shortcuts that involve clicking or dragging elements of the Word interface, such as toolbar buttons and scrollbars. But many people prefer to work from the keyboard whenever possible?and often, even confirmed mouse users are sure to find some of Word's 250-plus keyboard shortcuts more convenient than its corresponding mouse shortcuts.
Word's keyboard shortcuts fall into several categories, including navigation, file management, editing, selecting text, viewing the document, inserting document elements, formatting, proofing, outlining, and several more. You may find the keyboard shortcuts for navigating your document, as listed in Table 2.2, to be especially handy.
Task | Keyboard Shortcut |
|---|---|
Go to a specific location | Arrow keys |
Display the Go To window | F5 or Ctrl+G |
Go to previous insertion point | Shift+F5 or Alt+Ctrl+Z |
Beginning of document | Ctrl+Home |
End of document | Ctrl+End |
Top of window | Ctrl+Page Up |
Bottom of window | Ctrl+Page Down |
Next screen | Page Down |
Previous screen | Page Up |
Next page | Alt+Ctrl+Page Down |
Previous page | Alt+Ctrl+Page Up |
Next paragraph | Ctrl+down arrow |
Previous paragraph | Ctrl+up arrow |
Next window | Ctrl+F6 |
Previous window | Ctrl+Shift+F6 |
Open Document Browser | Alt+Ctrl+Home |
Beginning of column | Alt+Page Up |
End of column | Alt+Page Down |
Beginning of line | Home |
End of line | End |
Next line | Down arrow |
Previous line | Up arrow |
Left one word | Ctrl+left arrow |
Right one word | Ctrl+right arrow |
TIP
If you press Shift before pressing most of the cursor movement keyboard shortcuts listed in Table 2.2, Word selects the text between your current insertion point and where the shortcut takes you. For example, if you press Shift+down arrow, Word selects all the text going down one line.
Displaying Commonly Used Function Keys
Word's Function Key Display enables you to see the most important function keys and click them onscreen. The Function Key Display works much like a toolbar; you can see it in Figure 2.25. You can't view it the same way as you view a toolbar, however. To view it, choose Tools, Customize and click the Toolbars tab if it doesn't already appear. In the Toolbars scroll box, check the Function Key Display check box; then click Close.
Figure 2.25. Click on any button in the Function Key Display to perform the action.
After the Function Key Display is open, you can close it by clicking the close box in the upper-right corner. If the Function Key Display is locked at a corner of the screen, drag it to the middle so that it floats; then click the Close box.
Using Shortcut Menus
Word also provides shortcut menus that bring together many of the options you're most likely to need while editing your document.
Different choices appear in Word's shortcut menus depending on what you're doing. For example, if you've selected text, Word's shortcut menus include choices for cutting, copying, pasting, or formatting that text. On the other hand, if you're working within a table, you find options to insert rows, delete cells, and format table borders.
To view a shortcut menu, right-click on the text or graphic you are working with. You can see a typical shortcut menu in Figure 2.26.
Figure 2.26. The shortcut menu that appears when you right-click ordinary text.