Basic Editing
To enter text in a new or existing document, just start typing in the editing window. If the text doesn't appear, make sure that Word is the active application by clicking anywhere in the Word window.
A blinking vertical line, the insertion point, is displayed in your document at the location where your text will appear. As you type, your words are placed to the left of the insertion point as the insertion point moves to the right. After you've added content, you can move the insertion point by clicking elsewhere in the editing window.
Selecting Text
In Word, you can manipulate text in virtually any way imaginable?but before you do any of that, you have to select it. You can select text in several ways. If you're new to Word, you might try each method to see which seems most comfortable. If you're an experienced Word user, you already select text dozens of times a day. Now might be a good time to see whether you can do it more efficiently.
Mouse Shortcuts
The most basic way to select text is with the mouse, as follows:
Click the left mouse button when the pointer is where you want your selection to start.
Keep the left mouse button pressed down while you drag the mouse to where you want the selection to end.
Release the mouse button.
You can drag the mouse in any direction. If you drag it across, you select text on the same line. If you drag it up or down, you can select many lines.
Selecting text this way is simple, and it's especially convenient if the text you're selecting doesn't fit simple boundaries, such as adjacent parts of two paragraphs or several consecutive words. However, if you are selecting a specific word, line, sentence, or paragraph, or the entire document, other alternatives might be quicker.
To select the current word, double-click in it; to select the current paragraph, triple-click in it. To select the current line, click at the left edge of the screen, outside your margin. (You know you are in the right place when your mouse pointer faces your text.) You can then extend your selection to multiple lines by dragging the mouse pointer up and down.
Keyboard Shortcuts
Often, the easiest way to select a precise block of text is with a keyboard shortcut. Table 3.1 lists several convenient keyboard shortcuts for selecting text.
Extend Selection | Keyboard Shortcut |
|---|---|
Entire document | Ctrl+A |
To beginning of document | Ctrl+Shift+Home |
To end of document | Ctrl+Shift+End |
To top of window | Ctrl+Shift+Page Up |
To bottom of window | Ctrl+Shift+Page Down |
Down one page | Shift+Page Down |
Up one page | Shift+Page Up |
Down one paragraph | Ctrl+Shift+down arrow |
Up one paragraph | Ctrl+Shift+up arrow |
Current sentence | F8, F8, F8 |
Up one line | Shift+up arrow |
Down one line | Shift+down arrow |
To beginning of line | Shift+Home |
To end of line | Shift+End |
Left one word | Ctrl+Shift+left arrow |
Right one word | Ctrl+Shift+right arrow |
Current word | F8, F8 |
Left one character | Shift+left arrow |
Right one character | Shift+right arrow |
In addition, the keyboard shortcut F8 begins extending a selection; you can then continue extending the selection with the mouse, or any other way you choose. You can tell Word to stop extending your selection by double-clicking EXT on the status bar, or by pressing Esc.
TIP
If you need to select large blocks of text in a document that contains heading styles or outline numbering, do so in Outline view. There, double-clicking a heading selects all the contents subordinate to it; you can then cut, copy, or paste all those contents at once. See Chapter 18, "Outlining: Practical Techniques for Organizing Any Document," for more tips on cutting and pasting in Outline view.
Cut, Copy, and Paste
The heart of word processing?what first made it superior to the typewriter 25 years ago?is the ease with which you can cut, copy, and paste text. Using Word, you can move text around at will, until you're satisfied with its content and organization.
To cut, copy, or paste text (or any other document element, such as a graphic), first select it. Then, right-click and choose Cut, Copy, or Paste from the shortcut menu. Or, if you prefer, use any of the mouse, menu, or keyboard shortcuts shown in Table 3.2.
Action | Via Menu | Via Keyboard | Via Standard Toolbar |
|---|---|---|---|
Cut | Edit, Cut | Ctrl+X |
|
Copy | Edit, Copy | Ctrl+C |
|
Paste | Edit, Paste | Ctrl+V |
|
You can cut, copy, or paste within the same Word document, among open Word documents, or among multiple Windows programs. For example, you can copy worksheet data from an Excel report and paste it into an executive summary created in Word.
 For more information on sharing information between Word and Excel, see "Integrating Excel and Word," p. 962.
Working with Multiple Clipboard Items Through the Office Clipboard Task Pane
Ever need to collect several blocks of text and deposit them all in the same place? Most people cut one block of text, go to the new location, paste it, and then go looking for the next block of text to paste. Word 2003 provides an easier solution: the Clipboard task pane.
When you first copy text (or anything else), Word 2003 works as it always has: It stores the information in the Office Clipboard waiting for you to paste it somewhere. However, if there's already text in the Office Clipboard, and you copy more text into the Clipboard, Word 2003 copies that into the Office Clipboard separately.
The Office Clipboard can contain up to 24 elements, including text, images, and elements from other Office 2003 applications, such as Excel and PowerPoint. If you attempt to copy a 25th item, Word displays a message warning you that it will delete the oldest (the one that was copied into the Clipboard first) of the 24 items currently stored in the Clipboard.
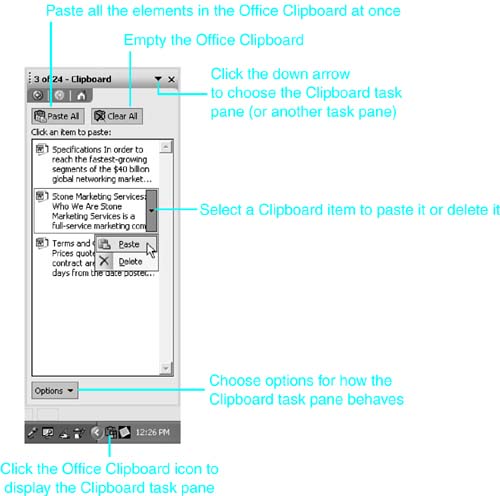
When you're ready to paste multiple items into the Office Clipboard, display the Clipboard task pane. To do so, click the Office Clipboard icon in the Windows taskbar (see Figure 3.3), or choose Edit, Office Clipboard. If another task pane is already open, click the down arrow at the top of the task pane, and choose Clipboard from the drop-down menu.
Figure 3.3. The Clipboard task pane.
In Word 2003, you can also open the Clipboard task pane by pressing Ctrl+C twice.
You can use Word's usual Copy and Cut commands and buttons to place material in the Clipboard. Then, scroll through the items in the Office Clipboard. When you find one you want to paste, click on it. If you want to paste all the elements in your Office Clipboard at once, click the Paste All button.
You have several options for controlling the behavior of the Office Clipboard task pane and managing its contents:
To delete a single item in the Office Clipboard, click on the down arrow next to that item and choose Delete from the menu that appears.
To delete all the items in the Office Clipboard, click the Clear All button.
To automatically display the Clipboard task pane whenever you copy or cut anything, click Options, and select Show Office Clipboard Automatically from the menu that appears.
To instruct Word to store multiple items in the Office Clipboard even when the Clipboard task pane isn't displayed, click Options, and select Collect Without Showing Office Clipboard from the menu that appears.
Using the Paste Options Button
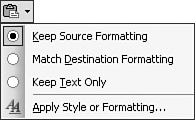
When you paste text into a Word 2003 document, a Paste Options button appears (see Figure 3.4). Clicking this button gives you control over how the text you are pasting will be formatted. The options available vary depending on what you are pasting, and where you are pasting it. But if you are pasting one block of text into another, your options are typically these:
Keep Source Formatting tells Word to format the text exactly as it was formatted in the document you pasted it from.
Match Destination Formatting tells Word to format the text to match surrounding text in the location where you pasted it.
Keep Text Only clears all manual formatting and styles from the text, displaying it in the style Word uses as its default, Normal. Unless you've made changes, this means that your text will be formatted as 12-point Times New Roman, with no italics, boldface, or other character formatting.
Apply Style or Formatting displays the Styles and Formatting task pane, where you can choose the formatting or style you want to use. (See Chapter 4 for more information on this feature.)
Figure 3.4. Clicking the Paste Options button gives you options for how your pasted text will be formatted.
Click and Type: Editing Anywhere on the Page
Word's Click and Type feature allows you to start entering text anywhere on a page, regardless of whether any other text exists nearby. To use Click and Type, make sure that you're working in Print Layout view (choose View, Print Layout). Then, double-click where you want to enter text and start typing.
Word sets a tab at that location. If you start typing beyond the end of the text already in your document, Word adds paragraph marks between the text that was already there and the new location.
NOTE
If Click and Type isn't working in Print Layout view, choose Tools, Options; click the Edit tab; and check the Enable Click and Type check box.
TIP
If you keep typing past the right margin, Word starts the next line at the left margin. If you want all your text to be lined up under the beginning of the first line you created, select the paragraph and press Ctrl+Shift+T. This creates a hanging indent at the location where you double-clicked to start typing.
You can also create hanging indents with Word's ruler. To learn how, see "Indenting with the Ruler," p. 129.
Drag-and-Drop: When to Use It
In the real world, if you want to move something, you don't cut it and paste it somewhere else. You pick it up and put it down where you want it. You can do the same thing with Word's drag-and-drop feature. Select the text you want to move. Then left-click inside the area you've highlighted and drag the text to the insertion point where you want it to appear.
In Word, you can also move text by highlighting it and click and dragging it with the right mouse button. When you right-click and drag the text to a new location, Word displays a shortcut menu asking whether you want to move, copy, link, or hyperlink the text (see Figure 3.5). For copying text, you might find this quicker than using the Copy toolbar button, and it's an especially handy way to create hyperlinks.
Figure 3.5. The shortcut menu that appears when you right-click to drag and drop text.

NOTE
The Link Here option creates a link to the original text using Windows object linking and embedding (OLE). Word inserts a field at the Link Here location. If you update the text in the original location, Word automatically updates the same text in the linked location (though it may take a few moments in a large document).
Using Word's Undo and Redo Capabilities
With all this cutting, pasting, dragging, and dropping, it's easy to make a mistake. Word's Undo feature reverses the effects of an action and returns your document to the way it was before you performed it.
Word Undo stores not one, but 100 or more actions, so you have more time to realize you've made a mistake. There are several ways to invoke Undo. The keyboard shortcut Ctrl+Z and the menu selection Edit, Undo will each undo your last action. So does the Undo button on the Standard toolbar. However, if you want to undo several actions at the same time, you must use the toolbar button:
Click the down arrow next to the Undo toolbar button. A list of your most recent actions appears.
Scroll to and select the action you want to undo. Word will undo that action, as well as all subsequent actions. (You can't pick and choose: You have to undo all of them.)
Certain types of changes take quite a bit of memory to store. One example is finding and replacing blocks of text that occur repeatedly through a large document. In some cases, Word warns you that it cannot store Undo information if you go through with a requested change. If you're sure that you won't need to undo this or any prior actions, you can go ahead. After you've made the change, Word again starts tracking new changes that can be undone.
CAUTION
One important thing Undo doesn't undo is a file save. When you save over a previous file, the old file is gone for good. In addition, Word undoes only those actions that change the contents of a document. It doesn't, for example, undo a switch to Print Layout view or retrieve a document that you just sent via email.


