Finding the File You're Seeking
Until now, it's been assumed that you know the name and location of the file you want to open. But that's not always the case. How often have you scratched your head and wondered, Where did I put that file? What did I call it? For those times, Word 2003 provides extraordinarily powerful Search features.
NOTE
In older versions of Word, the feature that allowed you to search for files was called Find. It has been renamed Search to distinguish it from Word's Find and Replace features for locating text within an open document.
The Search features are accessible in two separate ways:
You can work in the File Search dialog box. To get there, choose File, Open; then choose Search from the Tools menu.
You can use Word's Basic and Advanced File Search task panes. To access them, choose File, File Search.
Whichever approach you choose, Search works exactly the same. Both the dialog box and the task panes offer two approaches to searching:
Basic File Searching, designed to simplify searching for specific text
Advanced File Searching, which allows you to create complex searches based on a broad range of criteria
Both approaches to searching share common tools for specifying where to search and what types of documents to search for.
The following sections cover Basic File Searches, introduce the common tools available in both Basic and Advanced File Searches, and show you how to make the most of Advanced File Searches. But first, a word about Office 2003's Fast Search capabilities.
Understanding Fast Search
If you have accumulated hundreds or thousands of documents, it can take Word a good deal of time to search them. To streamline the process, Word can build an index of the words in each document and search the index instead of the documents themselves. This is called Fast Searching.
Fast Searching is generally turned on by default. To check whether it is turned on, choose File, File Search. The Basic File Search task pane appears (see Figure 3.18).
Figure 3.18. The Basic File Search task pane.
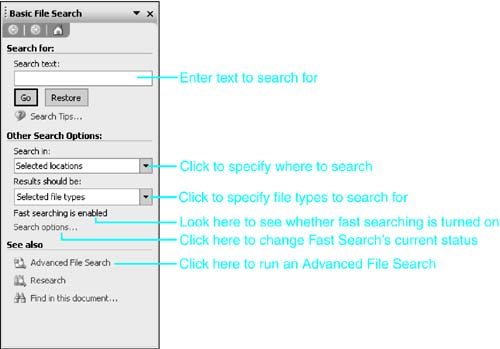
To turn Fast Search on or off, click Search Options. The Indexing Service Settings dialog box appears. To turn on the indexing service that makes Fast Search work, click Yes, Enable Indexing Service and Run When My Computer Is Idle. To turn it off, click No, Do Not Enable Indexing Service. Click OK.
Performing a Basic File Search for Specific Text
As mentioned earlier, basic searches make it easy to search for documents containing specific text. Basic File Searches also search the full contents of each file's Properties dialog box, including information such as the file's author and subject.
To run a Basic File Search from the Basic File Search task pane, choose File, File Search. The Basic File Search task pane appears (refer to Figure 3.18).
If you prefer to work in a larger dialog box, choose File, Open; then click the Tools button and choose Search. The Basic tab of the File Search dialog box appears (see Figure 3.19).
Figure 3.19. The Basic tab of the File Search dialog box.
Whether you're working in the task pane or the dialog box, the remaining steps are the same:
Enter the text you're looking for in the Search Text box.
TIP
You can make a Basic File Search more powerful by using wildcards. Word supports two wildcards:
* (the asterisk character) represents any group of one or more characters. For example, S*artz finds both Schwartz and Swartz.
? (the question mark) represents a single character. For example, gr?p would find grip, but not grasp.
Specify where you want to search by clicking the down arrow in the Search In drop-down box. A list of file locations appears. You can expand an item to include its subfolders by clicking the plus sign. Check the boxes corresponding to where you want to search; clear the boxes corresponding to locations you don't want to search.
TIP
By default, Word searches My Computer?in other words, all the folders on your computer. However, many people store all their Word files in the My Documents folder or a few other folders or subfolders. Don't search your entire computer if all your files are in a few locations?specify those locations, and you'll get done far more quickly.
NOTE
You can also search one or more of your Network Places. However, searching networks can be inherently slow due to bandwidth constraints, and there's no guarantee that every location on the network contains a Fast Search index.
Specify types of files to search for. By default, Word searches all files created in any Office 2003 application; all Web pages; and all email messages, appointments, contacts, tasks, and notes created in Outlook. To narrow or widen the search, click the down arrow in the Results Should Be drop-down box. A list of file types appears. You can expand an item to include subcategories by clicking the plus sign; for example, if you click the + sign next to Office files, check boxes appear for Word Files, Excel Files, PowerPoint Files, Access Files, Data Connection Files, and Document Imaging Files. Check the boxes corresponding to file types you want to search; clear the boxes corresponding to file types you don't want to search.
When you're ready to search, click Go if you are using the Basic File Search task pane (or Search if you are using the File Search dialog box).
Word builds a list of all the files it finds. Figure 3.20 shows search results in the Search Results task pane; Figure 3.21 shows search results in the File Search dialog box.
Figure 3.20. In the Search Results task pane, Word displays a list of all the files it finds.
Figure 3.21. In the File Search dialog box, Word displays a list of all the files it finds.
You now have several options:
To open a file from the Basic File Search task pane, click on the file. To open the file from the Basic tab of the File Search dialog box, double-click on it; then click Open in the Open dialog box.
TIP
Unfortunately, you can't open several found files at the same time (though the Search Results pane remains open as you open files one at a time).
You can, however, open multiple files at once using the file search feature built into Windows itself. To use the Windows file search, choose Start, Search, For Files or Folders (in Windows XP this is called All Files and Folders). Create your search query and click Search. When Windows returns a list of found files, press Ctrl and select each file you want to open, right-click, and choose Open. All the files will open.
To create a new file with the same contents as the existing file, click the down arrow to the right of the filename and choose New From This File from the drop-down list.
To copy a hyperlink to the file into the Office Clipboard, from where you can paste it into any document, click the down arrow and choose Copy Link to Clipboard.
To view the file's Properties dialog box, click the down arrow and choose Properties.
If the file is a Web page, to view it in your default browser, choose Open in Browser.
NOTE
In older versions of Word, if you wanted Word to find documents containing all related forms of Word you specified, you had to check a Match All Word Forms check box. Word 2003 finds all word forms automatically?whether you want it to or not.
NOTE
One feature unfortunately removed from Word's file search feature is the capability to save a search for future use. However, when you display the Search task pane, it shows the last query you performed.
Advanced File Search: Specifying Properties to Search For
Word enables you to refine your search, creating Advanced File Searches that use an extraordinary collection of document properties and attributes. Examples of properties you'll use often are
Filename
Text or property (searches for specific text in the document, as well as text in the Properties dialog box)
Last modified (date the file was most recently edited)
However, when necessary, you can search by many other properties. For example, imagine that you're reviewing the past year's work and you want to know which projects took the longest to complete. You might use Search to find all Word files that had a "total editing time" of more than 20 hours. Or, if you're looking for reports that contain embedded audio comments, you could search for documents in which the "Number of multimedia clips" is at least 1.
To perform an Advanced File Search from the Advanced File Search task pane, choose File, File Search and click Advanced File Search (see Figure 3.22).
Figure 3.22. Creating an Advanced File Search from the Advanced File Search task pane.
To perform an Advanced File Search from the File Search dialog box, choose File, Open; click Tools; choose Search; and click the Advanced tab (see Figure 3.23).
Figure 3.23. Creating an Advanced File Search from the File Search dialog box.
Whether you work from the task pane or the dialog box, Advanced File Search works the same way. Using the Property, Condition, and Value boxes, you first establish criteria for your search, one at a time. For example, you might add the criterion that the file must have been created within the past seven days, or that it must contain the word "Stevenson."
NOTE
As described in the "Performing a Basic File Search for Specific Text" section earlier in this chapter, you can also specify the following:
Locations where Word should search, via the Search In drop-down box
File types to search for, via the Results Should Be drop-down box
TIP
You can specify text to search for in the Basic tab (or Basic File Search task pane) and then switch to Advanced File Search. The text you specified will be included in the search.
After you set a criterion, click Add to include it in the list of criteria Word is to consider. When you've listed the appropriate criteria to narrow your file list, click Search. Word searches for the files, displaying the results.
You add criteria using the Property and Condition drop-down boxes and the Value text box. Choose a property from the drop-down list of properties and document elements for which Word can search.
Depending on the property, Word may display a list of available choices in the Condition drop-down box. For example, if you're searching for documents based on the number of pages they contain, your condition choices will include arithmetical conditions, such as equals and more than. After you've set the condition, you need to specify a value.
If you want to search for all files containing specific text, you can choose Text or Property from the Property drop-down box and enter the text in the Value text box. You can narrow searches by requiring that documents include multiple blocks of text, by specifying each block of text as a separate criterion. Because this can be confusing, an example is shown in Figure 3.24.
Figure 3.24. An example of searching for specific text.
TIP
To search for a phrase (multiple adjacent words), surround the phrase with quotation marks.
To search for files by the dates they were last modified, click the Property drop-down list box and select Last Modified. In the Condition drop-down list, choose one of the following options: Today, Last Week, This Week, Last Month, This Month, or Any Time.
Here are two examples of how the criteria you set in the Find Files That Match These Criteria window correspond to what Word actually searches for.
If you set the criterion Comments Include the Word Smith, Word searches the properties associated with every document, returning all files that contain the word "Smith" in the Comments property. (The Comments box may be found in the Summary tab of the Properties dialog box.)
If you set the criterion Last Saved By Is Not Walker, Word searches for the Last Saved By property, which you can find in the Statistics tab of the Properties dialog box. If the name stored there does not include "Walker," Word includes the file in its listings. (Note that Word bases Last Saved By information on the name stored in the User Information tab of the Tools, Options dialog box.)
 For more information on using document properties to track your documents, see "Using Document Properties to Simplify Document Management," p. 1122.
Before you finalize a search criterion, you need to take one more step, which relates to the breadth of the search you want. In some cases, you are designing criterion to find many files; for example, you might want to take a look at all the work you did for a specific client last month. In such cases, you may want each criterion to add more files to the list that Word provides. In other cases, you may be looking for one specific file. Then, you'll want to design your searches as narrowly as possible, ideally to return only that one file.
To create a broader search, click the Or button. Word then returns files that meet either this criterion or the other criteria you include. To create a narrower search, click the And button. Then, Word displays only those files that meet this criterion as well as the others.
When you're satisfied with one search criterion, click Add, and Word places it under the other criteria. You can then add other criteria until you're satisfied. Then, click Search, and Word displays the files you've requested.
If Word's Search feature isn't locating the files you expect, see "What to Do If Advanced File Search Doesn't Locate What You Need," in the "Troubleshooting" section of this chapter. |


