Retrieving Your Documents
You can retrieve and open any saved document by clicking the Open button on the Standard toolbar, using the keyboard shortcut Ctrl+O, or choosing File, Open. Each of these steps opens the Open dialog box, shown in Figure 3.16.
Figure 3.16. You can retrieve any file from the Open dialog box.
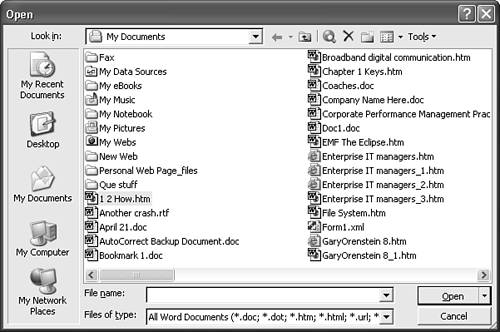
After the dialog box is open, browse the drives and folders as you've already learned how to do. Select the file you want to open and click Open.
TIP
In particular, keep in mind that you can click the My Recent Documents icon to view a list of all the files you've worked on, in chronological order, starting with the most recent. The My Recent Documents folder stores shortcuts to the files. If you've worked on the same file several times, the shortcut takes you to the latest version.
CAUTION
The My Recent Documents folder may be a security risk; other users can explore it to see which files you've worked on. The My Recent Documents folder even records the names of encrypted files you've worked on (though a password is still required to open those files).
To empty the contents of the My Recent Documents folder, click My Recent Documents in the Open dialog box to display its contents; then choose Tools, Clear Document History.
By default, Word's Open dialog box displays only files Word is designed to edit. In Word 2003, these include .doc files, .dot (document template) files, .htm and .html Web pages, .mht and .mhtml Web archive files, .xml XML files, .url files (links to Internet addresses), .rtf (Rich Text Format) files, and .txt (text only) files.
If you can't find a file where you expect it to be, it may be there but have a different extension. To find out, click in the Files of Type drop-down box and select All Files (*.*). Word now displays all files in the current folder.
If you know the extension of the file you want to open, you can choose to display only files of a specific type. If the file uses an extension Word recognizes, such as .wps for Microsoft Works files, you can select the extension from the Files of Type drop-down box. Otherwise, enter the extension in the File Name drop-down box, using the * wildcard. For example, to display all files with the extension .rpt, enter *.rpt.
You can open many files at the same time. Display the Open dialog box and browse to the folder you want. Press and hold Ctrl while you click each file you want to open. When your files are all selected, click Open.
If you want to open several files listed consecutively in the same folder, press and hold Shift; then choose the first and last files you want. Word automatically selects all the files in between as well.
TIP
Increasingly, the files you want may be found on the World Wide Web. Using Microsoft Internet Explorer, you can look for a file on the Web from inside the Open dialog box.
Click the Search the Web button; Internet Explorer opens. If you are already connected to the Internet, Internet Explorer displays a Microsoft-owned Web page where you can specify a search and the search engine you want to use. If you are not already connected, and must connect via dial-up, the Dial-Up Networking window appears; you can use it to connect. After you're connected, Internet Explorer displays Microsoft's search page.
Next, click Search, and the Web search engine you've chosen returns a list of pages containing the information you want.
Using the Most Recently Used File List
Sometimes, you don't have to go anywhere near the Open dialog box; there are faster ways to find what you need.
If you've used the file recently, it may appear on the most recently used file list that appears at the bottom of the File menu. The same list appears at the bottom of the Getting Started task pane.
By default, Word keeps track of the last four files you use; you can reopen one of these files by selecting it from the File menu.
You might want Word to keep track of more than four files (Word can track up to nine). To change the number of files Word tracks, choose Tools, Options and click the General tab. In the Recently Used File List scroll box, select the number of files you want to track, from 0 to 9. Click OK. Word begins tracking the new number of files. (Of course, Word doesn't immediately display additional files you opened earlier; it hasn't been tracking them.)
Using the Windows Recent Documents List
Windows keeps track of the last 15 documents you've used. This includes all files you may have used: Excel worksheets, compressed Zip files, text files, or anything else. If you primarily use Word, you may find that all the Word files you've worked with for the past few days are automatically being tracked by your operating system. To open one, click Start on the taskbar; then click Documents (or My Recent Documents, in Windows XP). The list of files appears. Click the one you want to open.
Opening a File as Read-Only or as a Copy
Normally, when you find the file you want, you simply click Open to open and work in it. However, Word gives you some additional one-click options. To see these choices in the Open dialog box, right-click on the down arrow next to the Open button (see Figure 3.17).
Open Read-Only. Word opens the file but prevents you from making changes to it.
Open as Copy. Word creates a new copy of the file and opens the copy. Word starts the filename with the words Copy of. (In other words, if the original file was called STONE.DOC, the copy is named Copy of STONE.DOC.) Open as Copy does not work with Web pages.
Open in Browser. This option works only if you've selected an HTML or HTM file. Choosing Open in Browser displays the file in Internet Explorer (or whatever browser you've registered as your primary browser) instead of in Word. If you're using Internet Explorer, you can later edit the document in Word by clicking the arrow next to the Edit button on the Internet Explorer Standard Buttons toolbar and choosing Edit with Microsoft Word from the drop-down box.
Open with Transform. This option works only if you've selected an XML file. Choosing Open with Transform opens the Choose an XML Transform dialog box; here, you can select an XSL or XSLT file that will apply appropriate formatting to your XML file.
Open and Repair. Word attempts to open a damaged file and make repairs.
Figure 3.17. Choosing how you want to open a file.