Using Word's Program and File Recovery Features
Word 2003 and Office 2003 include features designed to make them more resilient, and more capable of fixing both themselves and damaged document files.
These features cannot solve every problem you encounter with Word 2003; however, they should assist with many, if not most, of them?and, especially, help avoid much of the lost work and inefficiency that results from crashes and damaged files.
In the following sections, we introduce the Word 2003 program and file recovery features that will be most important to day-to-day users.
Recovering Documents with the Document Recovery Task Pane
If Word 2003 crashes, it displays a dialog box that gives you options for what to do next. By default, Word restarts and attempts to recover your work; if you don't want this to happen, clear the Recover My Work and Restart Microsoft Word check box.
If you have an Internet connection, you can also send Microsoft an error report that summarizes the technical aspects of the crash. To see what the report contains, click the Click Here link. Microsoft says it will treat the report as confidential and anonymous.
If you want to send the report, click Send Error Report. Word transfers the report, keeping you updated as to its status.
When the error report has been submitted, if Microsoft has information about how to prevent the problem, a dialog box appears containing a More Information link. If you click More Information, a Web page appears containing information on the problem and how it might be prevented or worked around.
If you prefer not to send an error report to Microsoft, click Don't Send. Word closes. Unless you specified otherwise, Word then restarts, displaying the Document Recovery task pane (see Figure 3.14).
Figure 3.14. From the Document Recovery task pane, you can attempt to recover files that may have been damaged when Word crashed.
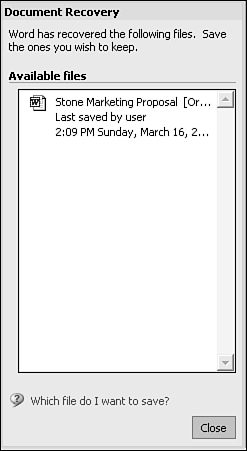
To view a file, click on it, or click on the right arrow next to it and choose View from the drop-down menu. To save a file with a new name, click the down arrow to its right, and choose Save As from the drop-down menu. (If you choose Save As but use the original filename, Word overwrites the existing version of the file.) It makes sense to resave your file immediately, in case there's still a problem with Word that might cause it to crash again, and risk the possibility that the crash might even prevent Word from recovering your data next time.
In some cases, the Document Recovery task pane contains more than one version of the file. If a version is marked [Recovered], it contains recent edits you never saved. If a version is marked [Original], it contains the last saved version of the file.
You can review each document and then decide which to save or, possibly, save both, by saving one under a different name.
To close a file without saving it, click Close. Word displays a dialog box asking you to confirm whether you want to abandon the file. If the file was marked [Recovered], this damaged version of the file is lost.
Using AutoRecover to Recover Information from Damaged Files
By default, Word stores AutoRecover information about your document every 10 minutes. Word uses this AutoRecover to attempt to restore your files in the event of a system crash or power failure.
It's important to understand that AutoRecover information isn't a substitute for saving your file regularly; in fact, Microsoft changed the name of this feature from Automatic Save to emphasize this. You should still save regularly, for two reasons. First, if you save regularly, your saved file may contain more up-to-date information than the AutoRecover file. Second, AutoRecover files aren't foolproof; they can't always be used to generate reliable, complete files.
If you're concerned about the stability of your system, you can tell Word to create AutoRecover files more often. Conversely, if you find that Word slows down to create AutoRecover files too frequently, you can tell Word to create them less often. The schedule Word uses to create AutoRecover files is set in the Save tab of the Options dialog box. To change how often AutoRecover saves a file, choose Tools, Options and click the Save tab. Then, in the Save AutoRecover Info Every scroll box, enter a new setting from 1 to 120 minutes.
NOTE
By default, AutoRecover files are stored in the \Application Data\Microsoft\Word subfolder of your Windows folder, a subfolder of your profile folder. You can change this through the File Locations tab of the Tools, Options dialog box. If you do change it, however, use a local folder on your own computer, rather than a location on a network server, to maximize reliability.
Creating Automatic Backups
If you want, every time you save your file, Word can rename the previously saved version with the .bak extension, ensuring that you always have a fairly recent backup of your work. This, too, is controlled from the Save tab of the Options dialog box. Check the Always Create Backup Copy check box.
When you use this feature, Word disables Fast Saves, so your saves will be somewhat slower, especially if you are working with long documents.
NOTE
Fast Saves are fast for the same reason it's faster to throw your clothes on the chair rather than hang them in the closet. With Fast Saves, Word doesn't actually put the changes where they belong; it simply makes a list of the changes that will be integrated the next time Word saves normally. (In fact, if you open a Fast Saved file in a text editor such as Notepad, you may well see text you thought you deleted.) When the list of changes gets very long, Word does a normal save to put things back in order.
CAUTION
If you're using Fast Saves, turn it off before you save a Word file that will be exported to another program. Other software may not understand Word's Fast Saves "to-do lists."
Also be aware that because Fast Save may not immediately delete information from your document that you think you've deleted, it can be a security risk.
To turn off Fast Saves, choose Tools, Options and click the Save tab; then clear the Allow Fast Saves check box.
Saving Local Backups
If you typically save to a network drive or a removable disk such as a Zip disk, you can tell Word to automatically save a duplicate copy of your file on your local hard disk. To do so, choose Tools, Options and click the Save tab; then check the Make Local Copy of Files Stored on Network or Removable Drives check box.
Microsoft Office Application Recovery
If Word stops responding, Office 2003 includes a tool you can use to try to kick start Word: Microsoft Office Application Recovery. To run it, choose Start, Programs, Microsoft Office Tools, Microsoft Office Application Recovery. The Microsoft Office Application Recovery dialog box appears (see Figure 3.15).
Figure 3.15. Using Microsoft Office Application Recovery, you can attempt to get an unresponsive Word to start working again, or simply exit Word.
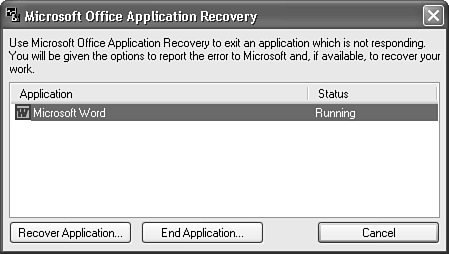
Any Office 2003 application that Windows reports as frozen is listed in this dialog box. To attempt to start Word running again, select Word from the list and click Recover Application. To close Word, click End Application.
If Microsoft Office Application Recovery cannot recover Word, try closing it instead, using the End Application command. If you can't close it through the Application Recovery applet, press Ctrl+Alt+Delete. Select Microsoft Word from the Windows Task Manager, and choose End Task.
Using Office Safe Mode
Over the years, Word users have sometimes encountered startup problems?and these startup problems have often been caused by errant add-ins or extensions, or damaged templates. Word 2003 and Office 2003 contain their own Safe Mode that allows Word to start, while disabling a component causing a problem.
In Automated Safe Mode, when Word encounters a problem that prevents startup, it displays a message identifying the component that appears to be causing the problem and offers you an opportunity to disable that component. If you disable the component, Word typically starts. Of course, you won't have access to the capabilities of that component.
To view a list of the components Word has currently disabled, choose Help, About Microsoft Word and click the Disabled Items button.
If any components are listed in the Disabled Items dialog box, you can select one and click Enable to manually enable it. In certain cases, the component may then work properly. However, if you reenable an item that Word has trouble with loading at startup, the item may be automatically disabled again the next time you start Word.
Keep in mind that Safe Mode disables certain Word features. Most notably, your interface and AutoCorrect customizations aren't loaded, and you can't save new or changed templates. For a more detailed list of Safe Mode restrictions, search the Help system for "Safe Mode."
NOTE
If a component is disabled, visit the component provider's Web site to see whether a fix, workaround, or new version is available.
TIP
You can start any Office application in Safe Mode manually. Press the Ctrl button while you're starting Word. (Microsoft calls this User-Initiated Safe Mode.)


