Comparing, Selecting, and Copying Formatted Text
Word 2003 offers powerful new techniques for comparing the formatting of two blocks of copy, selecting all the text formatted in a specific manner, and copying formatting from one block of text to another. In the next sections, we'll cover these techniques. |
Comparing the Formatting of One Text Selection to Another
Occasionally, you may want to compare the formatting of one text selection to another, to identify an inconsistency or a problem. You can use the Reveal Formatting task pane to do so, like this:
Select Format, Reveal Formatting to display the Reveal Formatting task pane.
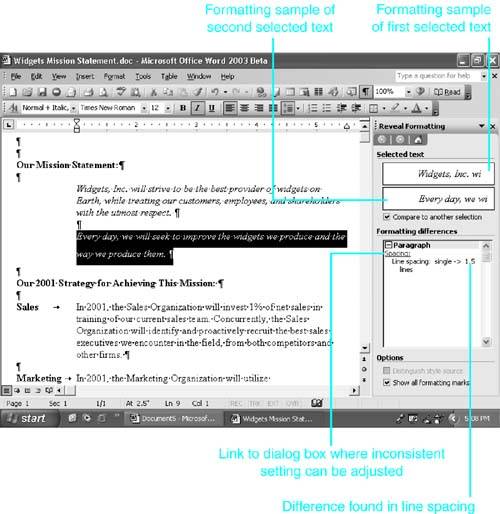
Select the first text element you want to compare.
In the Reveal Formatting task pane, check the Compare to Another Selection check box.
Select the second text element you want to compare.
Word displays the differences in formatting, organized by category. For example, in Figure 4.25, Word has found that one block of text uses single line spacing, whereas the other uses 1.5 line spacing. If you click the Spacing hyperlink, Word displays the Format, Paragraph dialog box, displaying the tab that contains spacing controls.
Figure 4.25. Comparing formatting between two blocks of text.
Copying Formatting Using the Styles and Formatting Task pane
Imagine that you've worked really hard to format a block of text just the way you want it. Let's say that it's formatted with the New Century Schoolbook font, 24-point italic, centered, and bordered with a box. Perhaps you've even added an effect, such as embossing.
Now imagine that you've created several equally complex formats throughout your document?and you want to apply the same formats in new locations. You could create a style?and if you plan to reuse the format repeatedly, you probably should. But in this case, maybe you don't care about saving the formatting for posterity; maybe you just want a quick, easy way to apply the formats once or twice more.
To simplify this, Word provides the new Styles and Formatting task pane. This task pane makes it easy to reapply any combination of formatting you have already used in your document?direct formatting, as discussed in this chapter, as well as styles, discussed in Chapter 10.
 For more on using the Styles and Formatting task pane with styles, see "Changing Styles Using the Styles and Formatting Task Pane," p. 345.
To apply direct formatting with the Styles and Formatting task pane, follow these steps:
Select the text you want to reformat.
Click the Styles and Formatting button on the Formatting toolbar, or choose Format, Styles and Formatting. Word displays the Styles and Formatting task pane (see Figure 4.26).
Figure 4.26. The Styles and Formatting task pane.
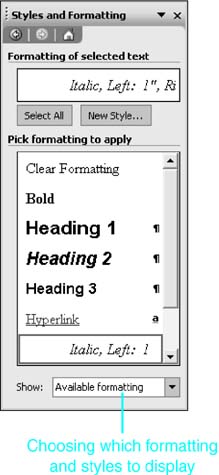
In the Pick Formatting to Apply scroll box, choose the formatting you want to apply. Word displays actual samples of each type of formatting available in the document.
TIP
To see a detailed description of a format, hover your mouse pointer over it; a ScreenTip appears containing detailed formatting and/or style attributes.
If Word's list of formats is too long or confusing and you know you have already used the format you want to apply, choose Formatting in Use from the Show drop-down box. Word hides styles that are available but have not yet been used in the document.
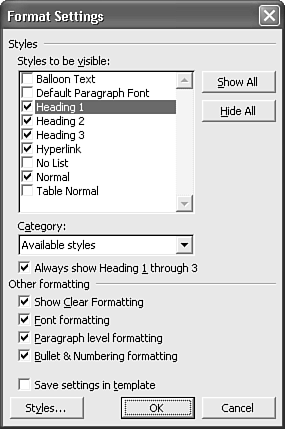
If you want to choose a format that isn't already in the document, choose All Styles. If you want to control exactly which styles appear in the list, choose Custom, and place check boxes next to the styles you want to make visible (see Figure 4.27).
Figure 4.27. The Format Settings dialog box.
Selecting All Text with Similar Formatting
The Styles and Formatting task pane also makes it easy to identify all text in a document that shares the same formatting. To do so, follow these steps:
Select one block of text that contains formatting you want to change.
Open the Styles and Formatting task pane. The formatting associated with your block of text is already selected with a blue box surrounding it.
Click the down arrow next to the selected format and choose Select All Instance(s), as shown in Figure 4.28. Word selects all locations in your document that use the same formatting.
Figure 4.28. Selecting all instances of a format, using the Styles and Formatting task pane.

Copying Formatting to Multiple Locations at Once
To build a more consistent document, you'll often want to change the formatting of multiple text selections at once. The Styles and Formatting task pane makes this easy. First, follow the steps described in the preceding section to select all blocks of text containing the formatting you want to change.
After you've done so, you can choose a different format or style from the Pick Formatting to Apply list. Or, if you prefer, you can
Clear all formatting and styles from the text you've selected by choosing Delete from the shortcut menu. This reformats all selected text in the Normal Style?typically, 12-point Times New Roman.
Change the formatting associated with all the selected text by choosing Modify from the shortcut menu. The Modify Style dialog box appears (see Figure 4.29).
Figure 4.29. The Modify Style dialog box provides a single set of controls for adjusting a wide range of formatting elements and style behaviors.
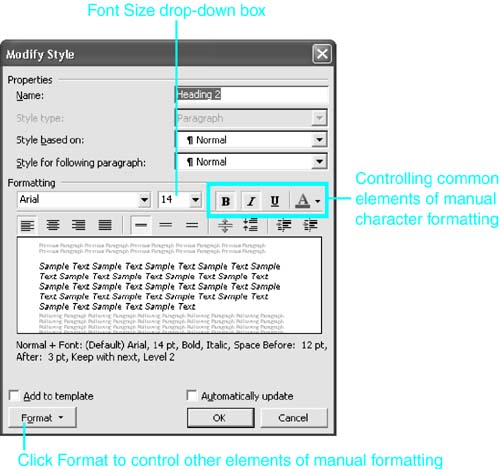
From here, you can control a wide range of formatting elements and style behaviors. For example, if you want to reformat all selected text as 14-point, you can choose 14-point text from the Font Size drop-down box in the Modify Style dialog box. When you're finished working with Modify Style, click OK.
You can also eliminate styles and formatting from a block of text by selecting it and choosing Clear Formatting from the Pick Formatting to Apply scroll box in the Styles and Formatting task pane. Word applies the Normal style to the text and removes any manual formatting.
To learn more about the Modify Style dialog box, see "Changing Styles," p. 345.
Using Format Painter to Copy Formats
If you simply want to reapply direct formatting from one location to another, and you already know where to find the formatting you want in your document, you don't need to use the Styles and Formatting task pane. You can use Format Painter.
To use Format Painter, first select the text with the formats you want to copy. Then click the Format Painter button on the Standard toolbar. Select the text to which you want to apply the formats. You can select text anywhere in the same document or in other documents to apply the copied formats to. |
The first time you release the mouse pointer, the formats are applied to the text you selected. That means some ways of selecting text work with the mouse pointer, and others don't. For example, you can drag your mouse pointer across text to select it for format painting. However, if you click in a new location intending to select text with a keyboard shortcut, you're too late; you've already let go of the mouse pointer, and the text you select afterward won't be reformatted.
TIP
In the preceding example, you applied a set of text formats once. What if you want to apply them several times in a row? Double-click the Format Painter button. Then select the blocks of text you want to format paint, one at a time. When you're finished, press Esc or click the Format Painter button again.
Format Painter copies all font formatting, including bold, italic, underlining, effects, character spacing, and animation. If you copy the formatting from an entire paragraph (including the paragraph mark at the end), it copies all paragraph formatting and paragraph styles as well.


