Working with Paragraph Formatting
So far, you've worked with only font formatting?formatting that affects individual characters. Next, you'll learn about formatting that Word can apply to paragraphs. In Word, paragraph formatting includes the following:
Paragraph alignment
Outline levels
Indentation
Spacing between lines
Spacing before and after paragraphs
Line and page breaks
Tabs
The following sections review all these aspects of formatting, except for outline levels.
 To learn more about working with outline levels, see "Applying Outline Levels to Specific Text," p. 635.
First, however, it's important to understand what Word interprets as a paragraph, and where Word stores the information it uses to format paragraphs.
How Word Stores Paragraph Formatting
Word considers a paragraph to be any block of text that ends with a paragraph mark (±). In fact, Word actually stores the paragraph formatting with the paragraph mark. If you understand this, you can avoid many problems that arise in paragraph formatting. The fact that Word stores paragraph formatting with the paragraph mark has several implications:
You can copy paragraph formatting to a new location by copying the paragraph mark (or any part of the paragraph that includes the mark).
You might inadvertently copy paragraph formatting that you don't want if you copy the paragraph mark by mistake. If you want to copy a paragraph to a new location but keep the existing formatting of the surrounding text, don't copy the paragraph mark.
If you finish a paragraph and start a new paragraph by pressing Enter, your new paragraph shares the same paragraph formatting (and styles) as the previous one. This is because pressing Enter creates a paragraph mark that stores the same formatting as the previous paragraph.
If you delete text that includes a paragraph mark, any remaining text from that paragraph is reformatted to match the formatting and styles in the following paragraph.
Of course, to work with paragraph marks, it helps to see them. Click the Show/Hide Paragraph Marks button on the Standard toolbar, and they all appear.
TIP
Or, with the Reveal Formatting task pane open, display paragraph marks by checking the Show All Formatting Marks check box.
Some other things appear, too: tab markers and dots that correspond to spaces between the words in your document. Seeing all this can be helpful, but many people find it distracting.
If all you want to see is paragraph marks, adjust the following settings in Tools, Options, View:
Clear the All check box.
Check the Paragraph Marks check box.
Clear any other check boxes in the Formatting Marks area.
TIP
Because paragraph marks are so fraught with meaning, you might occasionally want to jump text to the next line without entering the mark. You can use Shift+Enter for this purpose; Word adds a line break but not a paragraph mark. (Line breaks are sometimes called soft returns.)
Line breaks have many uses. For example, if you have an automatically numbered list, you might want to enter more text under a numbered item without having Word automatically enter the next number. If you use a line break rather than a paragraph mark, you can. Then, when you're ready to move on to the next item in your numbered sequence, press Enter to generate a paragraph mark, and Word continues automatic numbering as if nothing unusual had happened.
To learn more about automatic numbering, see "Using Bullets and Numbered Lists," later in this chapter.
Paragraph Alignment
The first aspect of paragraph formatting to understand is paragraph alignment. Word offers four types of paragraph alignment: Align Left, Center, Align Right, and Justify.
Align Left, Word's default setting, starts every line at the left margin but doesn't reach all the way to the right margin (except on rare occasions when the word fits precisely without tweaking). When a word comes along that is too long to be squeezed onto the first line, Word jumps it onto the next line, leaving the previous line unfinished. Align Left is sometimes called flush left or ragged right.
Align Right, of course, works the opposite way: It squeezes all text toward the right margin. Center keeps text anchored in the middle of the page, so it usually leaves room at both margins when it jumps to the next line. Justify stretches text from the left to right margin edges.
TIP
Word justifies text by inserting extra space between words. If you choose to justify text, consider using Word's hyphenation controls (choose Tools, Language, Hyphenation) to make sure that no text is stretched too much to be read easily. One way to do so is to manually hyphenate long words that appear immediately following lines that are too spread out:
Select a word to manually hyphenate.
Choose Tools, Language, Hyphenation.
Click Manual.
Click the insertion point at the location where you want the word hyphenated. (Word may suggest natural locations at syllable breaks.)
Click Yes.
Table 4.3 lists the toolbar buttons and keyboard shortcuts for each alignment option and explains when each option is most widely used.
Task | Keyboard Shortcut | Toolbar Button | Uses |
|---|---|---|---|
Align Left | Ctrl+L |
| Most informal documents |
Center | Ctrl+E |
| Some headings and short copy blocks |
Align Right | Ctrl+R |
| Occasional artistic/design uses |
Justify | Ctrl+J |
| Some traditional books, magazines, reports, and formal business documents |
Indenting Text
Word also provides total control over the way you indent your paragraphs. You can create the following four kinds of indents:
Left indents. Adjust the left edge of every line in a paragraph.
Right indents. Adjust the right edge of every line in a paragraph.
Hanging indents. Leave the first line alone but move every line under it.
First line indents. Move only the first line in a paragraph.
You can see examples of all four kinds of indents (left, right, hanging, and first line) in Figure 4.11.
Figure 4.11. Left, right, hanging, and first line indents.
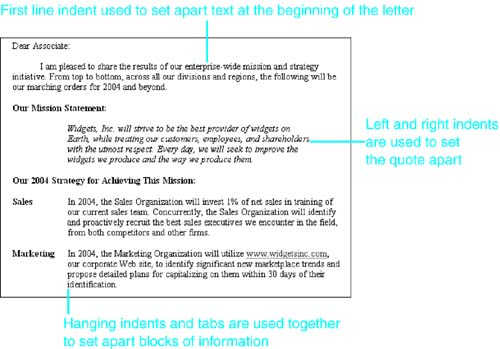
Left and right indents are often used together to indent blocks of text such as quotations. Hanging indents are often used in numbered and bulleted lists; in fact, Word automatically adds them when you create lists using the Numbering or Bullets buttons on the Standard toolbar.
Word also provides four ways to create indents: via the Formatting toolbar, keyboard shortcuts, the ruler, and the Formatting toolbar. Each approach has advantages, depending on your work style and what you're trying to accomplish.
Indenting with Keyboard Shortcuts
Word provides quick and easy keyboard shortcuts for working with indents. These keyboard shortcuts are listed in Table 4.4.
Task | Keyboard Shortcut |
|---|---|
Indent | Ctrl+M |
Decrease Indent | Ctrl+Shift+M |
Hanging Indent | Ctrl+T |
Decrease Hanging Indent | Ctrl+Shift+T |
NOTE
To create a traditional paragraph indent of 0.5" in which the first line is indented and the others are not indented, select one or more paragraphs and press Ctrl+M; then press Ctrl+Shift+T.
The size of the indent created by toolbar buttons or keyboard shortcuts is based on Word's default tab settings, which are 0.5" unless you change them. If you change the defaults, you also change any new indents you create afterward using the toolbar or keyboard shortcuts.
NOTE
You can change the default tab settings through the Format, Tabs dialog box. To learn more about using this dialog box, see "Setting Tabs," later in this chapter.
Indenting with the Ruler
If you're visually oriented, you may want to use Word's ruler to control indents?much as you might have controlled tabs on a typewriter many years ago.
Word displays the horizontal ruler by default. If you don't see it, choose View, Ruler. In Figure 4.12, you can take a closer look at the ruler and its indent settings.
Figure 4.12. The ruler contains separate indent markers for first line indent, hanging indent, left indent, and right indent.
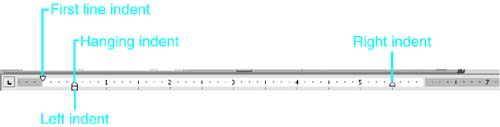
Notice that 0" on Word's horizontal ruler corresponds to wherever you have the left margin set. (By default, this means it is 1.25" from the left edge of an 8.5" sheet of paper. The right margin is 1.25" from the right edge. Accordingly, a default document has 6 inches between margins.) Indents you create with the ruler start at the margin and work inward or outward from there.
To create a new indent using the ruler, first click in the paragraph you want to change, or select multiple paragraphs. Then drag the upper indent marker to where you want it and release the mouse button.
TIP
If you want all the paragraphs in your document to start with a 0.5" indent automatically, change your Normal style to include a 0.5" first line indent.
For more information on creating styles, see "Creating and Changing Styles," p. 339.
Creating Precise Indents in the Paragraph Dialog Box
You can also create paragraph indents in the Paragraph dialog box. Given that there are so many other easy ways to create indents, when would you bother? You would want to use the dialog box in these instances:
You need a precise indent that you can't reliably set from the ruler. In the Paragraph dialog box, you can set indents to a precision of 1/100 of an inch. The ruler only works to 1/16 of an inch?and then only if your eyes are very good!
You want to set other paragraph formats, such as line spacing, at the same time.
To set an indent from the Paragraph dialog box, follow these steps:
Right-click on the paragraph you've selected and choose Paragraph from the shortcut menu.
Click the Indents and Spacing tab (see Figure 4.13).
Figure 4.13. The Indents and Spacing tab controls paragraph alignment, indentation, and spacing, including line spacing.

Set any left or right indent from the Left or Right scroll box.
If you want to set either a paragraph or a hanging indent, choose the indent you want from the Special drop-down box. Word displays the default indent, 0.5" ; if you want to change the setting, enter the new one in the By scroll box.
When you're finished, click OK.
TIP
Indents normally extend from the margin toward the center of your page. However, you can also set indents that extend toward the edge of the page. These are called outdents, and they can be quite useful. For example, you can use outdents to place headings or icons in the margins of your documents.
To set an outdent, enter a negative value (such as ?0.5" ) in the Left or Right scroll box of the Indents and Spacing tab. Or drag one of the ruler's indent markers into the dark gray area outside your current margin.
Setting Paragraph Spacing
As with indents, Word gives you extensive control over paragraph spacing. Using keyboard shortcuts, you can instantly set single-spaced (Ctrl+1), double-spaced (Ctrl+2), and 1.5-line-spaced (Ctrl+5) paragraphs.
Word also provides control over paragraph spacing through the Line Spacing button on the Formatting toolbar. To change the spacing of text, first select the paragraphs you want to adjust. Next, click the down arrow next to the Line Spacing button (see Figure 4.14) and choose the spacing you want.
Figure 4.14. Setting paragraph spacing using the Line Spacing button on the Formatting toolbar.
If you want finer control than you can get from this list, choose More to open the Indents and Spacing tab of the Paragraph dialog box. From here you can specify line spacing to a precision of 1/10 of a point. You can even set exact spacing that Word applies before or after each paragraph.
Word line spacing can be controlled from the Line Spacing scroll box. By default, Word uses single line spacing. This means Word keeps track of the font size you're using and adjusts line spacing so that there's just enough room between lines for comfortable reading. In body text, 1/72 inch is added between the characters that reach down farthest from one line (descenders such as p and q) and those that reach up farthest from the next (ascenders such as b and k). Of course, the larger the text, the more space Word adds to keep single-spaced lines readable.
In addition to single spacing, 1.5 line spacing, and double spacing, Word provides several other line spacing options:
At Least. This spacing sets a minimum space from one line to the next, but it enables Word to increase spacing if it encounters larger font sizes or graphics that wouldn't fit in the minimum space.
Exactly. This spacing tells Word exactly what spacing to use no matter what text or graphics it encounters. If text or a graphic is too large, portions of it may be cut off. You might use Exactly if you're creating a form or another document that must fit on a single page no matter what.
Multiple. This spacing enables you to specify any multiple of Word's single spacing (which, as mentioned previously, can vary depending on the font size you are using). For example, to triple?space, you set the multiple to 3. You can choose any multiple spacing increment from 0 to 132 lines, in increments of 1/100 of a line. You're unlikely to use settings quite this fine, but Multiple does provide welcome control over document size and appearance.
TIP
If you need to shrink your document by just one page, try Word's Shrink to Fit feature. Click the Print Preview toolbar button; then click the Shrink to Fit toolbar button on the Print Preview toolbar.
To learn more about reducing document size using the Shrink to Fit button, see "Shrinking Your Document Automatically," p. 220.
If you include a large text character in a single-, double-, or multiple-spaced line of text, Word accommodates it by increasing line spacing for that line only. If you would prefer that Word cut off the top of the character (or nearly cut off) rather than using uneven line spacing, select the paragraph and use the Exactly setting.
Adding Extra Space Before and After Paragraphs
You've just learned how to set spacing between lines in your document (or within selected paragraphs). You can also add extra space between paragraphs, as shown here:
Right-click inside the first paragraph and choose Paragraph from the shortcut menu.
Choose the Indents and Spacing tab.
Enter a new value in the Before or After scroll box. (You'll generally use one or the other, not both.)
Click OK.
This is far superior to using the old-fashioned technique of pressing Enter twice at the end of each paragraph. First, you have more precise control. If you only want to add a half-line of space between each paragraph, it's easy to do so. Second, it's easier to change the spacing between paragraphs. If your document is running slightly long, and you decide you want to cut the space after paragraphs from 8 points to 6, select the entire document, display the Indents and Spacing tab, enter the new setting, and click OK?that's all there is to it.
TIP
It's best to include the setting for spacing after paragraph in a style so that you can easily change it and include it automatically in new paragraphs you create.
To learn how to change paragraph formats in a style, see "Creating Paragraph Styles Easily with Style by Example," p. 339.
TIP
To add a full line of space before one or more selected paragraphs, use the keyboard shortcut Ctrl+0 (zero).
Setting Tabs
If you ever learned how to use a typewriter, you know what tabs are?stopping points along a horizontal line of text that you can use to align text or numbers.
In the early days of word processing, tabs were the state-of-the-art way to create row-and-column tables of information. Now, in Word, tables offer a much easier, more powerful way to create these row-and-column matrices.
To learn more about working with tables, see Chapter 12, "Structuring and Organizing Information with Tables," p. 387.
But even now, for some tasks, nothing beats tabs. In particular, tabs are the best way to
Add a dot leader that connects text at the left margin with text at the right margin, as you might use in a table of contents
Align a row of numbers that contain varying decimal places
Center text over a precise horizontal location on your page
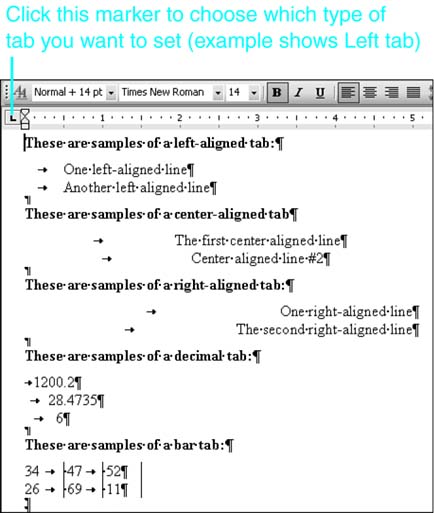
Word provides five kinds of tabs, as described in the following list and shown in Figure 4.15. (The icons shown next to each paragraph are the ones Word inserts in your ruler to reflect each kind of tab.)
Figure 4.15. Samples of left, center, right, decimal, and bar tabs.
These are the various types of Word tabs:
Left tabs.
 After you enter a left tab, additional text begins at the tab stop and continues to its right.
Center tabs.
 After you enter a center tab, additional text moves to the left and right, remaining centered on the location where the tab stop appears.
Right tabs.
 After you enter a right tab, additional text begins at the tab stop and continues to its left. The more text you enter, the closer to the left margin the text moves.
Decimal tabs.
 After you enter a decimal tab, rows of numbers that you enter all align on the decimal point, regardless of how many integer and decimal places they contain.
Bar tabs.
 With these auspiciously named tabs, you have a quick and easy way to draw a vertical line extending through as many horizontal lines of text as you want.
Word automatically places a default left-aligned tab stop at every 0.5" , without displaying these tabs in the ruler. (You'll notice this if you keep pressing the Tab key in a blank document: Word moves the insertion point 0.5" to the right each time you do so.)
However, you may need tabs in different locations than these. If so, you can create tabs in two ways:
Using the ruler, which is typically the quickest way to get the job done
Using the Tabs dialog box, which offers more precision and gives you access to advanced features such as tab leaders and bar tabs
Many Word users don't realize that tab settings may vary between paragraphs.
Whether you use the ruler or the Tabs dialog box, the tab stops you create apply to only the paragraphs you have selected. If you don't select a paragraph, they apply to the current paragraph and any paragraphs you add immediately following it by pressing Enter and continuing to type.
To add a tab setting that applies to the entire document, press Ctrl+A to select the entire document, and then add the tab(s) using either the ruler or the Tabs dialog box. Other tab stops you created are still present. However, it's possible that some text affected by tabs you've placed in the document will move to reflect the new tab stops you've added.
For instance, imagine that you have a paragraph of text that contains two tabs, set at 1.25" and 4.25" . You now add a new document-wide tab stop at 3.75" . That 3.75" tab stop is now the second tab stop Word finds in the paragraph we're discussing?so the second tab's location in that paragraph moves from 4.25" to 3.75" .
Creating Tabs with the Ruler
To set a tab with the ruler, click inside the ruler?either in the middle of the ruler where the numbers appear or anywhere along the gray line at the bottom of the ruler. Word inserts a left-aligned tab marker.
If you want to create a different type of tab, follow these steps:
Click the tab marker to the left of the ruler (refer to Figure 4.15). By default, the tab marker is set to create a left tab. If you do not want a left tab, keep clicking to display the tab you want. The icons change in the following order: first center tab, then right tab, then decimal tab, and then bar tab.
TIP
If you keep clicking, the tab marker offers two indent options, first line indent and hanging indent, before cycling back to left tab.
After you choose the right kind of tab, click the ruler where you want the tab to be set.
TIP
To see tabs in your document, click Show/Hide Paragraph Marks. The tabs appear as right arrow marks.
After you place a tab on the ruler, you can move it by dragging it to the left or right. In the paragraphs you've selected, any text affected by the tab moves to the left or right as well.
Creating Tabs and Leaders Using the Tabs Dialog Box
You can tabs from the Tabs dialog box (see Figure 4.16). To view this dialog box, choose Format, Tabs. Or, if you're already working with paragraph formatting, you can click the Tabs button at the lower left of the Paragraph dialog box. Or double-click any tab you've already set on the ruler.
Figure 4.16. The Tabs dialog box controls tab stops, tab alignment, and leaders.
If you have manually set any tabs that apply to the currently selected paragraph(s), they appear in the Tab Stop Position text box. To set a new tab, follow these steps:
Enter the location where you want the tab to appear in the Tab Stop Position text box.
In the Alignment area, choose the type of tab you want: Left, Center, Right, Decimal, or Bar.
If you want to use a tab leader, select it from the Leader area. You can choose a dot leader, dash leader, or solid line leader.
Click Set.
Repeat steps 1?4 for any additional tabs you want to set.
Click OK.
Changing Default Tab Stops
As you may recall, Word provides default tab stops every 0.5" and uses these tab stops to determine how far to indent text when you click the Increase Indent/Decrease Indent buttons on the Formatting toolbar (or use the equivalent keyboard shortcuts).
You might want to change the default tab stop locations. For example, your document's design might call for indents and tabs at 0.75" increments. To change the default tab stops, choose Format, Tabs; enter a new value in the Default Tab Stops scroll box; and click OK.
Removing Tabs
You may at some point want to remove a tab you have created manually. To clear all the tab settings in a specific part of your document (or in the entire document), select the text or the entire document; choose Format, Tabs; choose Clear All; and click OK.
To clear a specific tab setting, select all the paragraphs that contain the tab setting you want to clear and drag the tab setting off the bottom of the ruler so that it disappears.
Unfortunately, Word doesn't provide an easy way to know where a tab setting begins and ends in your document. As a result, you may find eliminating tab settings to be a trial-and-error process. Here are some tips that help a little:
If all the text you've selected contains the tab setting, the tab setting appears in solid black on your ruler.
If some of the text you've selected contains the tab setting, the tab setting appears in gray on your ruler. Dragging the tab setting off the ruler deletes it for those paragraphs you've selected.
If you've selected a large number of paragraphs that start before you applied the tab setting and end after the tab setting is no longer present, you don't see the tab setting on your ruler?even though it is still present in some of the paragraphs you've selected.
NOTE
If you remove a tab setting that text in your document depends on, the tabs in your text revert to Word's default tab settings. If this changes your document in ways you don't like, click Undo to restore the tab setting you had before.
If Word's tabs start acting strangely, see "What to Do If Your Tabs Don't Work as You Expect," in "Troubleshooting" at the end of this chapter. |


