Using Word's Page Setup Features
You've created a document. But before you print it, you want to make sure that all your margins and other page settings are correct. You can control the following aspects of page formatting from the Page Setup dialog box:
Change margins (including setting up a document for binding)
Set the size and orientation of your paper
Choose the tray from which your printer is to print
Divide your document into sections
Add line numbers
Control the vertical alignment of text on the page
Each of these elements can be controlled for your entire document, or for individual sections you've created. To view the Page Setup dialog box, choose File, Page Setup.
NOTE
Much of what is discussed in the remainder of this chapter applies only to documents that you print, not to Web or other online documents. Specifically, these features and the settings related to them do not have any effect or meaning in documents saved as Web pages, and you will not see the effects of changing them in Web Page view: margins, headers and footers, page numbers, page borders, paper size, paper orientation, sections and section breaks, vertical alignment of text on pages, and line numbering.
Of course, the paper size, orientation, and printer paper tray settings do matter if you print your Web pages. See Chapter 24, "Using Word to Develop Web Content," for more detail on what Word features do work with Web pages and how to best use them.
Word's default page settings appear in Table 5.1. In subsequent sections of this chapter, you'll learn how to change these settings, both for new documents and for only the current document.
NOTE
These default settings apply if you haven't already made changes or customizations to the Normal template.
Feature | Setting |
|---|---|
Top and bottom margins | 1" |
Left and right margins | 1.25" |
Header and footer margins | .5" |
Paper size | Letter (8.5"x11") |
Paper | Orientation Portrait |
Paper source | Printer-dependent |
Section starts | On a new page |
Headers and footers | The same throughout your document |
Vertical alignment | Top |
Line numbers | Off |
Working with Sections
By default, any change made to the options shown in Table 5.1 applies to your entire document. If this isn't what you want, you can use sections to apply any setting you establish in the Page Setup dialog box to only specific portions of your document.
Sections give you a way to establish different settings for different parts of the same document. For example, suppose that your document is formatted (like most documents) in Portrait mode?the pages are taller than they are wide. What if you need to insert a page containing a table that appears sideways? You can make that page a separate section. Splitting a document into sections enables you to customize the following formats for any part of a document:
Column formatting
Footnote and endnote appearance and location
Headers and footers
Page and line numbering
Paper size and orientation
Often, Word automatically creates sections for you when necessary. For example, if you use Word's columns feature to make your document two columns wide from "This Point Forward," Word inserts a section break at your insertion point. Later in this chapter, when you learn to change margins, you'll see another example of how Word can automatically insert section breaks when needed.
 For more information about creating documents with more than one column, see "Working with Multiple Columns," p. 182.
To learn another way to control the behavior of section breaks after you insert them, see "Specifying Where to Start a Section," p. 172.
Often, however, you need to insert section breaks and assign settings to them manually.
Creating a Section
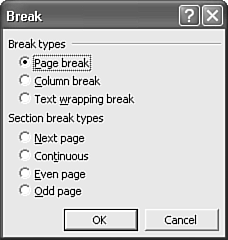
You can divide a document into sections at any time by choosing Insert, Break and creating the section in the Break dialog box (see Figure 5.1).
Figure 5.1. Use the Break dialog box to start a new section in your document.
TIP
Notice that you can insert a manual page break from this dialog box. You may find it easier, however, to place the insertion point wherever you want the new page to begin and press Ctrl+Enter.
After you select the type of break you want to use, Word inserts the break immediately before the insertion point.
NOTE
The section break is inserted at your insertion point, but (as with anything you insert at the insertion point) it moves the insertion point forward. In other words, after you insert the break, text you type appears after the break unless you move the insertion point elsewhere.
Selecting a Type of Section Break
You can create several types of section breaks. In Draft mode or Normal view onscreen, they look similar, but their differences are apparent in Print Layout view or when you print the document:
A Next Page section break starts the new section at the top of the next page in your document. Both onscreen and when you print, Word starts a new page at the section break.
A Continuous section break starts the new section at the insertion point. Onscreen in Normal view, you see a section break, but in Print Layout and Web views and when you print, the break is transparent.
An Even Page section break starts the new section on the next even-numbered page. If the section break falls on an even-numbered page, Word leaves the next odd-numbered page blank.
An Odd Page section break starts the new section on the next odd-numbered page. Similar to the Even Page section break, if the section break falls on an odd-numbered page, Word leaves the next even-numbered page blank. This is commonly required in books, which often start all new chapters on a right-hand page.
You see section breaks in your document automatically in Normal view. To see them in Print Layout view, click the Show/Hide Paragraph Marks button on the Standard toolbar, or click the Show All Formatting Marks check box on the Reveal Formatting side pane. Figure 5.2 shows a Next Page section break displayed in Normal view.
Figure 5.2. In Normal view, section breaks appear in your document as double-dotted lines.
![]()
After you insert a section break, you have two sections that contain the same page formatting. To change the formatting in one section, place the insertion point anywhere within that section and make your format changes using the Page Setup dialog box. Page Setup formatting changes such as changing the paper orientation from portrait to landscape to accommodate a wide table in the section then apply just to the section unless you change the Apply To setting to Whole Document.
Copying a Section's Formatting
In the same way that paragraph marks store all the formatting for a paragraph, the section break mark that appears after a section stores all the section formatting for that section. After you establish formatting for a section, you may want to copy that formatting to another section, and you can do so easily by copying the section break mark. Simply select the section break and click the Copy button. Then, move the insertion point to the end of the text you want to format and click the Paste button. You get a new section break that includes all the same formatting as the one you copied.
TIP
You can search for section breaks. Open the Find dialog box and, if necessary, click the More button to display the additional Find options. Then, click the Special button and choose Section Break.
Deleting a Section Break
You can delete a section break the same way you delete any text. For example, you can place the insertion point on the section break and press the Delete key.
Before deleting a section break, remember that a section break mark stores all the formatting for the section preceding the break mark. If you delete a section break, the text before the break mark merges with the text after the break mark and assumes the formatting characteristics of the section after the break mark.
NOTE
Word provides no easy way to change a section break after you have inserted it. This is unfortunate because if you delete a section break, you lose any differences in page formatting that you have applied separately in each section.
There is, however, a workaround.
If you inadvertently create the wrong type of section break, insert a correct section break immediately after the incorrect one. Then, select them both. Choose File, Page Setup and click the Layout tab. In the Section Start drop-down box, choose the type of break you want?for example, New Page or Continuous. Click OK. You now have two identical section breaks in your document. Delete the first one. The result: one section break containing the formatting you need.
Changing Margins
Margins measure the amount of space that appears on a page between the edge of the page and the text. Margin space surrounds the text of your document. Margin settings initially apply to your entire document, but you can establish different margin settings for different portions of your document. You can change margins using the following two techniques:
Using the ruler
Using the Page Setup dialog box
Changing Margins Using the Ruler
Use the ruler to change margins if
You like to get immediate, interactive visual feedback about your margin settings
You have the good hand-eye coordination needed to establish precise margin settings with the ruler
You want to change margin settings for your entire document
To change margins using the ruler, follow these steps:
Open the View menu and make sure that you see a check mark next to Ruler. If you don't, choose Ruler.
Choose View, Print Layout.
Slide the mouse pointer into the ruler at the edge where you want to change the margin (see Figure 5.3). If Word's triangular indent markers appear at the left edge of the ruler (where the white area meets the gray area), position the mouse pointer between the triangular indent markers.
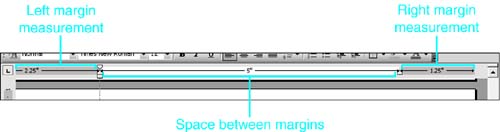
Figure 5.3. Drag a left margin to the right to make the margin larger and to the left to make the margin smaller.

When the mouse pointer changes to a two-headed arrow, click and drag the mouse. Drag a side margin to the left or right; drag a top or bottom margin up or down. When you release the mouse pointer, the new margin is applied.
The ruler can show current measurements, making it a precise tool. Press Alt while you drag the mouse pointer, and the measurements appear, as shown in Figure 5.4.
Figure 5.4. If you press Alt while you drag the mouse pointer, Word displays measurements as you move.
TIP
If the vertical ruler doesn't appear in Print Layout view, choose Tools, Options; click the View tab; and check the Vertical Ruler (Print View Only) check box.
Changing Margins Using the Page Setup Dialog Box
You also can use the Page Setup dialog box to change the margins in your document. Use the Page Setup dialog box to change margins when you need very precise margin settings or when you want the change to affect only part of your document.
NOTE
If you have not divided your document into sections before opening the Page Setup dialog box, you can choose This Point Forward in the Apply To drop-down box on any tab, and Word inserts a section break at your insertion point?applying all your section formatting changes only after the section break.
If you select text before opening the dialog box, you see Whole Document and Selected Text as the choices in the Apply To list box. If your document already has at least one section break in it, you also see Selected Sections in the list. If you don't select text, you see Whole Document and This Point Forward as the choices in the list box. If you choose Selected Text while making Page Setup choices, Word automatically creates sections in your document.
Place the insertion point at the location where you want the new margins to begin. If you want to change the margins for a certain portion of your document even if you have not divided your document into sections, select the text you want affected by the new margins.
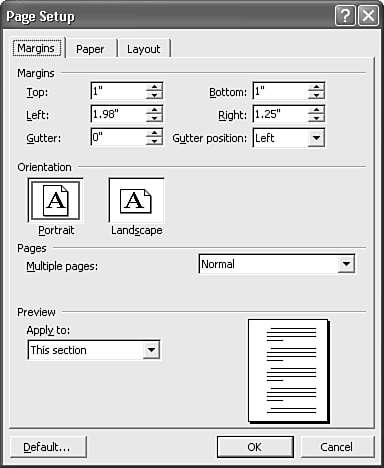
Choose File, Page Setup. The Page Setup dialog box appears (see Figure 5.5). Use the Top, Bottom, Left, and Right boxes to increase or decrease margins. If you selected text and want the settings to apply to selected text only, choose Selected Text from the Apply To drop-down list box. If you didn't select text and you want the settings to apply to the rest of your document, choose This Point Forward instead. You can also, of course, stick with the default option of applying the margins to the entire document.
Figure 5.5. Change margins from the Margins tab of the Page Setup dialog box.
If you find yourself inadvertently indenting paragraphs instead of changing page margins, see "How to Avoid Accidentally Changing Paragraph Marks Instead of Margins," in the "Troubleshooting" section of this chapter. |
Using Landscape Mode to Print Wide Pages
The Margins tab of the Page Setup dialog box includes an option that controls the orientation of documents sent to the printer. To understand the difference between portrait and landscape orientation, consider the text on an 8 1/2x11-inch page:
When you choose Portrait orientation, the text flows across the 8 1/2-inch side of the page between the left and right margins, and the page is taller than it is wide.
When you choose Landscape orientation, the text flows across the 11-inch side of the page between the left and right margins and the page is wider than it is tall.
Landscape mode is useful for financial reports with wide lists of numbers, and it also adds visual interest to proposal documents, newsletters, and many other documents. To switch a document from Portrait to Landscape mode, choose File, Page Setup and click the Margins tab. Then click the Landscape button and click OK.
Creating Gutters for Bound Books and Documents
Suppose you're producing a report that will be bound or stapled. You probably want to leave extra space on the left margin of each page to accommodate the binding. Or, if you're producing a book or booklet that will be printed on both sides of every sheet and then bound together, you'll probably want to leave extra space on both the inside margins, near the binding.
Page Setup's Margins tab provides a separate setting, Gutter, for these purposes. When you enter a number in the Gutter scroll box, Word adds that value to the left side of your page, in addition to your left margin.
If you prefer, you can place the gutter on the top of the page instead of at the left. (This is common in documents oriented in Landscape mode.) To do so, choose Top from the Gutter Position drop-down box. But occasionally you may want to create gutters for a binding that appears at the top of a sheet.
Setting Multiple Pages Options
With Word 2002, Microsoft significantly improved Word's support for printing multiple-page documents such as books and folded brochures. The first step in preparing such documents is to specify a setting from the Multiple Pages drop-down box in the Margins tab of the Page Setup dialog box.
Setting Mirrored Margins
Word 2003 brings together settings for controlling the behavior of multiple pages. You can choose any four from the Multiple Pages drop-down box on the Margins tab of the Page Setup dialog box.
For example, if you plan to print on both the front and the back sides of each page, choose Mirror Margins from the Multiple Pages drop-down box. When you check this box, Word automatically sets up your document so that it uses facing pages. If you fold and staple your document, when you open it, you'll see two pages: an even numbered page on the left and a consecutive odd numbered page on the right. Word displays a thumbnail sketch of both pages. Figure 5.6 shows an example of mirror margins.
Figure 5.6. You can use mirrored margins to set up your document to print with facing pages.
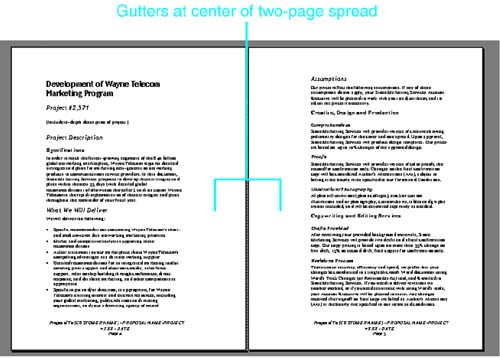
NOTE
As shown in Figure 5.6, you may have to add gutter space to account for binding.
NOTE
If you plan to bind your document and print on only one side of each page, you'll still want to leave extra space at the left margin for binding. In this case, don't select Mirror Margins from the Multiple Pages option, but do set a Gutter size.
Placing Two Pages on the Same Sheet
Word now provides a way to print two half-sheet landscape pages on the same sheet, as shown in Figure 5.7. To print two pages on a sheet choose File, Page Setup and click the Margins tab. Choose 2 Pages Per Sheet from the Multiple Pages drop-down box.
Figure 5.7. Placing two horizontal pages on the same sheet.
When you print two pages to a sheet, Word reduces the size of each page by 50%. For example, on an 8 1/2x11-inch sheet printed in Portrait mode, each page will be 5 1/2x8 1/2 inches. Page 1 and Page 2 will print on the same sheet, Page 3 and Page 4 will print on the next sheet, and so forth.
Using Book Fold to Print Folios, Booklets, and Pamphlets
The 2 Pages Per Sheet option is ideal if you're distributing informal documents. However, more complex documents, such as books, require pages to be arranged differently to be professionally printed correctly.
For example, in an eight-page booklet, page 8 and page 1 need to be on the same side of the same sheet; similarly, page 7 and page 2 need to be adjacent. When the printed document is folded and bound, the pages then appear in the correct order for reading.
In the printing trade, the organization of pages for printing is called imposition, and the specific arrangement of pages is commonly called printer spreads, to distinguish from reader spreads, which represent the order in which the reader wants to see pages.
Word enables you to organize pages for printing as booklets or books. To use this capability, choose Book Fold from the Multiple Pages drop-down box.
NOTE
Because Book Fold significantly affects the formatting of your pages, if possible, try to establish this setting when you start working with your document. If you establish it after entering all your text, formatting, page, and section breaks, you will have to check your document carefully?and often make adjustments.
After you've done so, a new drop-down box appears: Sheets per Booklet. Here, you can specify how many sheets will be printed together. The printer's term for this is signature. For example, many books are printed in signatures of 32 pages. In other words, the books are printed in 32-page sections, and then bound together.
NOTE
Book Fold requires your pages to be oriented in Landscape mode; if they aren't, Word switches that setting as well.
Of course, the specific arrangement of pages Word applies depends on the size of the signature. A simple example: On an 8-page signature, the front of the first sheet contains pages 1 and 8, whereas on a 32-page signature, it contains pages 1 and 32. Figure 5.8 presents a simple example of the difference between reader spreads and printer spreads (Book Fold) in an eight-page document or signature.
Figure 5.8. Reader spreads (left) and printer spreads (right).

For shorter documents printed in-house, you may be able to leave the default setting, All?in which case, Word prints all the pages in your document as a single signature. For longer documents, and documents that will ultimately be printed by a professional printing shop, consult with your printer to determine the appropriate setting. It also makes sense to provide your printer with a test set of pages to ensure that they are, in fact, organized correctly.
In some cases, your printer wants to print from a PostScript file rather than a Word document. For information on creating a PostScript file from a Word document, see "Creating a Print File from Which You Can Print Later," p. 202.
NOTE
For Book Fold documents you are printing yourself, remember to print on both sides of the paper. If your printer can do this automatically, specify that it does so. (Choose File, Print and click Properties to display the settings associated with your printer driver.)
If your printer cannot physically print on both sides of the page at once, use Word's Manual Duplex printing feature. (Choose File, Print; check the Manual Duplex check box; and click OK to print. Word prints all the pages on one side and then prompts you to turn over the sheets of paper and feed them into your printer again for printing on the reverse sides.)
Permanently Changing Default Page Setup
Suppose, for example, that you prefer 1-inch rather than 1.25-inch left and right margins for all your documents. With every new document, you find yourself manually changing the margin settings. Why not change Word's defaults instead?
Choose File, Page Setup to open the Page Setup dialog box. Select the settings you want to apply to every document and then click the Default button in the lower-left corner of the dialog box. Word displays the dialog box shown in Figure 5.9.
Figure 5.9. When you click the Default button in the Page Setup dialog box, Word displays a confirmation dialog box.
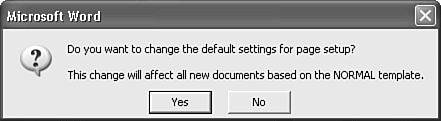
Choose Yes to accept your changes or No to reject them. Keep the following in mind:
You are changing defaults for a specific template?the one on which the current document is based.
When you change defaults, you change them for new documents you create based on the selected template, not for existing documents. If you want to change the settings of existing documents, you must edit each of them individually.
Setting Paper Size and Source
You can set the size and source of paper from the Paper tab of the Page Setup dialog box (see Figure 5.10). If the Page Setup dialog box isn't open, choose File, Page Setup and click the Paper tab.
Figure 5.10. You set paper size and source from the Paper tab of the Page Setup dialog box.
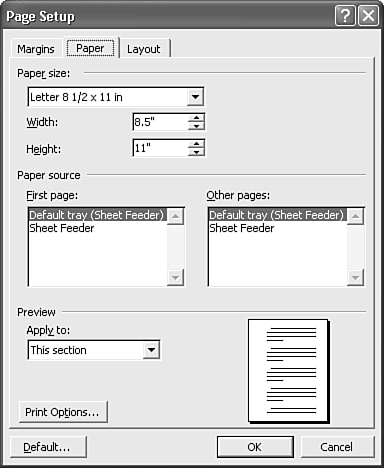
Choosing a Paper Size
Word 2003 provides several paper sizes; these may vary depending on the printer you use. The following list shows some of the more common paper types Word supports:
Letter (8 1/2"x11")
Legal (8 1/2"x14")
Executive (7 1/4"x10 1/2")
A4 (210x297mm)
A5 (148x210mm)
A6 Index card (105x148mm)
#10 Envelope (4 1/8"x9 1/2")
DL Envelope (110x220mm)
C5 Envelope (176x250mm)
Monarch Envelope (7.5"x3.88")
Photo Paper (4"x6", 100x150mm, and 200x300mm)
You can also choose Custom Size and enter your own dimensions in the Width and Height scroll boxes below the Paper Size drop-down list.
NOTE
As you know, the United States uses 8 1/2x11-inch paper by default. Most other countries, however, use A4 as the standard paper size. If you need to print a document on 8 1/2x11-inch paper that was originally formatted for A4 paper, Word can help you convert the document and still retain most, but not all, of the document's layout. From the Paper tab of the Page Setup dialog box, click Print Options; check in the Allow A4/Letter Paper Resizing check box; and click OK.
Choosing Your Paper Source
You can also determine the paper tray from which your printer prints by using the Page Setup dialog box. Display the Paper tab in the Page Setup dialog box, if it isn't already open (refer to Figure 5.10).
NOTE
Many shared network printers have these settings locked down by the network server; users can't change such settings in Word.
If your document has only one section, the choices you make in the Paper Source area of the Paper tab apply to the entire document. If your document has multiple sections, the choices you make here apply to the section your insertion point is in, or the sections you have selected before opening the dialog box.
You can specify different paper sources for the First Page of each section and for the Other Pages. This feature is particularly useful when using letterhead for the first page of a document and second sheets for the subsequent pages. You can store the letterhead in one paper tray, and second sheets in another, and then set your Paper Source settings to match.
The paper tray choices contained in the First Page and Other Pages scroll boxes depend on the printer you have installed. Not all printers are created equal. For example, some printers have two paper trays, typically called Upper and Lower. Other printers have special trays for envelopes. Still other printers may have a multipurpose tray that fills several different roles.
TIP
In Chapter 6, "Printing and Faxing in Word," you'll learn how to print envelopes and documents together. Because Word creates a separate section for the envelopes, you can use Paper Source settings to instruct Word to print the envelopes from a separate tray.
If your document contains one section, your Paper Source settings apply to the entire document. If you prefer, however, you can apply new settings only to portions of your document that follow the insertion point. To do so, choose This Point Forward from the Apply To drop-down box. Word then inserts a section break at your insertion point and applies your First Page and Other Page settings only to the new section that follows the insertion point.
If your document contains multiple sections, Apply To gives you three choices about where you apply your First Page and Other Page paper source settings. You can apply them to
The section your insertion point is in (This Section or Selected Sections if you have selected text first).
The remainder of your document, from the insertion point on (This Point Forward). Word inserts a new section break at the insertion point and applies the paper source settings to all text that follows, including any text in additional sections that follow your insertion point.
The entire document (Whole Document).
Controlling Your Document's Layout
The Layout tab of the Page Setup dialog box (see Figure 5.11) brings together various features that apply to entire pages. Perhaps you need to align your page vertically so that the text is centered from top to bottom. Or you may want to number the lines of your document so that proofreaders can refer to line numbers in their comments. You control these settings here.
Figure 5.11. Working in the Layout tab of the Page Setup dialog box.
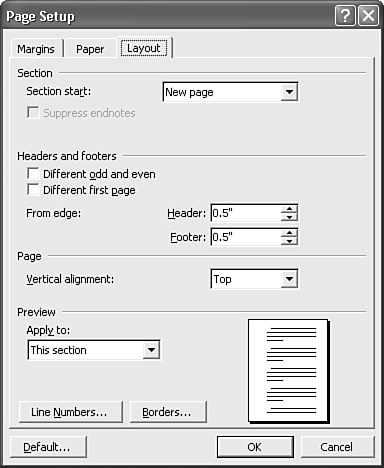
Specifying Where to Start a Section
If your document has multiple sections, Section Start gives you a second chance to specify where Word starts each section you've selected. For example, if you originally inserted a continuous section break, you can change that setting to New Page here. (Word's default setting for section breaks is New Page: Where you insert a new section, Word starts a new page.)
Setting Vertical Alignment of Text on Page
When you're creating a multipage document, such as a legal brief or a report, you ordinarily want the text to align vertically at the top of the page. Suppose, however, that you're creating a short letter or a cover page for a report. You may prefer to align text vertically in the center of the page.
Rather than struggling to center the title manually, let Word do it for you. Choose File, Page Setup and click the Layout tab. Then click the Vertical Alignment drop-down list box, choose Center, and then click OK.
TIP
You can also justify text from top to bottom on a page, which means stretching the space between lines to reach the top and bottom margins.
This works only if you have sufficient text on a page; otherwise, Word gives up and places the text at the top of the page.
Using Line Numbering
Line numbering is handy for various reasons. For example, it gives reviewers something to refer to when making comments on a document?and it can be essential in many legal documents.
To turn on line numbering, choose File, Page Setup and click the Layout tab. Click the Line Numbers button and place a check in the Add Line Numbering check box of the Line Numbers dialog box (see Figure 5.12).
Figure 5.12. You can number your document's lines continuously or you can restart at the beginning of each page or section.
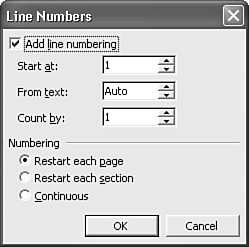
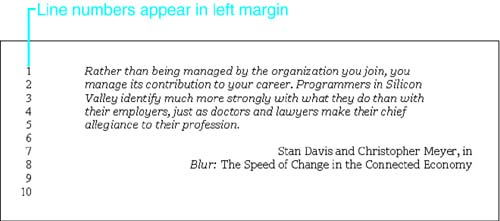
Numbers appear in the left margin in Print Layout view, when you print, or when you preview the document (see Figure 5.13). You can control the initial number and the increments of the numbering. Use the From Text box to control the space between the numbers and the text.
Figure 5.13. Line numbering makes reviewers' lives easier.
To remove line numbering, reopen the Line Numbers dialog box and clear the Add Line Numbering check box.
NOTE
From the Layout tab of the Page Setup dialog box, you can also access Word's page bordering controls. Click Borders to display the Borders and Shading dialog box.
Borders and shading are covered later in this chapter in the "Using Borders and Shading" section.


