Working with Multiple Columns
One of the hallmarks of newsletters and other desktop-published documents is the use of multiple newspaper-style columns, in which text snakes from the bottom of one column to the top of the next column.
Word gives you extensive control over columns. You can create uneven columns, specifying exact widths for each and the amount of whitespace that appears between the columns. You also can add a new column to existing columns. If columns are turned on for more than one page, Word can flow text from the bottom of the last column on one page to the top of the first column of the next page.
To help you refine your layouts, Word can also draw vertical lines between each column?although you can't control the placement or formatting of those lines.
TIP
If you need to set up a column layout for part of a page, where specific text, graphics, or other elements must remain in a rigid location and not move as you edit them, use Word tables (see Chapter 12, "Structuring and Organizing Information with Tables").
Creating Multiple Columns the Easy Way
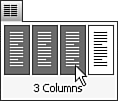
If you want to create multiple columns of the same width, click on the Columns toolbar button. (If you want to create multiple columns for only part of the document, select the text you want to split into columns and then choose the Columns toolbar button.)
When you choose Columns, a box appears, displaying four columns. Click on the box and drag across until the number of columns you want is highlighted (see Figure 5.20). Then release the mouse button. Word applies the columns either to your entire document or, if you have selected text, to only that text. Word also displays your document in Print Layout view so that the columns are immediately visible. You can, however, switch back to Normal (or another) view and work there, if you choose.
Figure 5.20. Selecting columns from the Standard toolbar.
If you're creating multiple columns for only a selected portion of your document, Word inserts section breaks before and after the text you've selected.
NOTE
Although the Columns button displays four columns when you open it, you can use it to create up to six columns. Just click on the rightmost column (number four) and drag to the right.
TIP
The Columns button is handy for making quick headings that span multiple columns. Select the text that you want to spread across your columns, click the Columns button, and select only 1 column.
Getting More Control Through the Columns Dialog Box
You may want more control than the Columns button can give you. You might want columns of different widths, for example. You might want to change the exact spacing between individual columns or add a line between columns. To do any of these things, choose Format, Columns from the menu. The Columns dialog box opens (see Figure 5.21).
Figure 5.21. Working in the Columns dialog box.
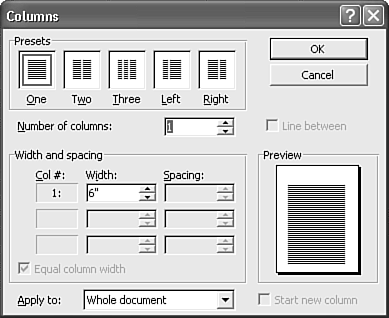
Columns comes with five preset column formats: basic One column, Two-column, and Three-column formats, as well as two-column formats in which the Left or Right column is smaller.
The width of your columns depends on your left and right margins; the wider the margins, the narrower the columns will be. If you choose one of the unequal width presets, Left or Right, the "named" column is set to a little less than one-half the width of the other column. For example, on a page with 1-inch left and right margins and two columns, selecting the Left preset makes the left column 1.83" and the right column 4.17" with a 0.5" space between; selecting the Right preset switches the widths of the columns.
The gutter between your columns is controlled by the Spacing measurement. Generally, it's a good idea to keep your spacing between 0.25" and 0.5". (Word's default setting is 0.5".) You might want to use a larger measurement if you are also using the Line Between check box to place a vertical line between each column, or if you intend to use the empty space for figures.
You also can specify the number of columns directly, using the Number of Columns spin box. Word won't create columns narrower than 0.5", so if you're using Word's default formatting of 1.25" left and right margins on an 8.5" page, you can specify up to 12 columns?realistically, less, because you inevitably need at least a little space between the columns for readability.
NOTE
Left-aligned text can often remain readable with slightly narrower space between columns than justified text.
Check Line Between to tell Word to place a line between each column.
NOTE
Word does not add space between columns to compensate when you add a line between columns. If your space between columns is narrower than 0.5", check to make sure that the line you've added does not overlap the text to its right.
In the Apply To box, choose whether you want your column settings to apply to This Section, to the Whole Document, or from This Point Forward. If you choose This Point Forward, Word inserts a section break at your insertion point unless you're already at the start of a new section.
If you've selected text before opening the Columns dialog box, your choices here are Selected Text or Whole Document, if the document has only one section; the choices are Selected Text or Selected Sections if the document has more than one section.
As already mentioned, if you create columns for selected text, section breaks are added before and after the text. As you make changes, Word shows their effects in the Preview box of the Columns dialog box.
NOTE
Columns of unequal width?your first column being narrower than your others, for example?are used to add more visual variety to a large-format publication, such as a newsletter. There are no hard-and-fast rules for sizing your columns, other than to be sure that your text can still be read easily. If many of the lines in your column end in hyphenated or broken words, your column is too narrow.
Changing Column Widths with the Ruler
After you've created columns, you can adjust column width and the space between columns by hand, using the ruler.
If all your columns are of the same width, you can use the ruler to increase or decrease the width of all the columns (and thus the space between columns) at the same time. If you start out with columns that are all the same width, you'll end up with columns that are all the same width.
If your columns are of different widths, you can use the ruler to change the width of each column individually. In this case, as you widen or narrow a column, the space between that column and the next increases or decreases to compensate.
NOTE
Changing column widths with the ruler does not affect overall page margins.
To change column widths with the ruler, make sure that you're in Print Layout view, and that the ruler is visible (choose View, Ruler). If all the column widths are equal, click and drag the column marker on the ruler (see Figure 5.22) to make adjustments?a ScreenTip tells you whether you're working with the left or right margin of the column.
Figure 5.22. The ruler can be used to adjust column widths quickly.

If the column widths are unequal, you can drag the Left or Right Margin markers to adjust the column widths; the width of the gutter between the columns increases or decreases, as you would expect. If the column widths are unequal, though, you have one additional column marker available, called Move Column. If you click and drag on the Move Column marker, the width of the gutter stays the same, whereas the widths of the columns to the left and right of the gutter get adjusted.
TIP
If you hold down the Alt key as you drag a column marker, Word shows you precise measurements for column and gutter widths in the ruler area.
TIP
After you've moved your columns to a new place, you can use the Undo/Redo buttons to toggle between two different widths for your columns. It's a quick way to compare two choices.
NOTE
You can't drag one column marker into the space reserved for another column. If you need to widen a column beyond the space currently available for it, you must first narrow an adjacent column to make more room for it.
Getting More Control Over Individual Column Widths
You can set precise column widths in the Columns dialog box (refer to Figure 5.21). Choose Format, Columns to display the dialog box. If your current settings are for columns of equal width, clear the Equal Column Width check box. This enables you to work on any column listed in the Width and Spacing area.
For each column, set the Width and the Spacing. (You can move from one box to the next by pressing Tab.) If you have more than three columns, a scrollbar appears to the left of the Col # list. Use it to scroll to the columns you want to set.
Starting a New Column
Sometimes, as you edit your document, you'll realize you need to change the number of columns that appear from your insertion point onward. For example, your document might consist of only one column for the first several pages, but you now need to enter material that should be formatted in three columns. There are two ways to change the number of columns in a document from the insertion point onward:
Select Format, Columns; apply the column settings to This Point Forward; and check the Start New Column box that appears at the bottom right of the dialog box.
Insert a column break by choosing Insert, Break (refer to Figure 5.1). Then in the Break dialog box click the Column Break option in the Break Types section and click OK.
TIP
If you're having trouble seeing where to insert column breaks, you can see?and edit?the whole page at the same time by clicking the arrow next to the Zoom control and selecting Whole Page.
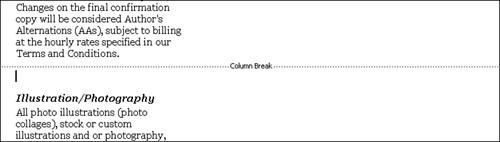
Removing Column Breaks
You remove column breaks just as you would remove a manual page break. The easiest way to see the break is to switch to Normal view (see Figure 5.23) by choosing View, Normal. Then select the Column Break line and press Delete to remove it.
Figure 5.23. Viewing a column break in Normal view.
Making Your Columns Even
Sometimes you want to balance your columns so that the text is spread evenly over all your columns. This choice can be made for aesthetic or practical reasons.
It's not always easy to balance your columns and at the same time stay consistent with your paragraph pagination settings. For example, if you've specified that two paragraphs must stay together (Keep with Next), you limit Word's capability to move lines around to even things out.
Word does provide an easy solution, however: Use a continuous section break at the point where you want the column to end. Word will then end the section wherever necessary to balance the columns. Follow these steps:
Create your columns, if you have not already done so.
If necessary, switch to Print Layout view by choosing View, Print Layout.
At the end of the text that you want to balance, click to place the insertion point.
Choose Insert, Break.
From the Break dialog box, select a Continuous section break.
Click OK to close the dialog box.


