Other Useful Print Settings
In addition to the print settings you've already seen, Word enables you to control several additional settings through the Print tab of the Print Options dialog box. You can display this dialog box by choosing File, Print, and clicking Options, or by choosing Tools, Options, Print (see Figure 6.2).
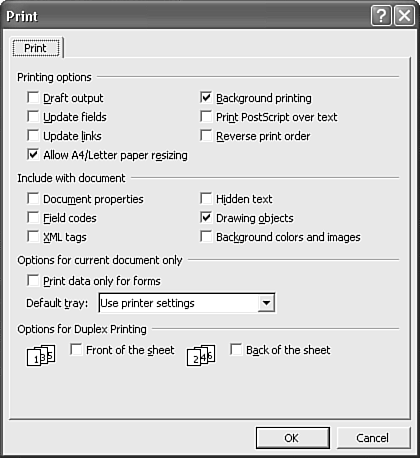
Figure 6.2. Use this dialog box to set special printing options.
Controlling Print Options
Among the options Word allows you to control from the Print tab of the Print (or Options) dialog box are the following:
Draft Output. Occasionally, you may want to print a document with extensive graphics and formatting, but you don't need to see the graphics or formatting right now?only the text. If so, you can often print more quickly by checking this box; Word prints your document with minimal formatting and no graphics.
Update Fields, and Update Links. If your document contains fields, checking Update Fields tells Word to update those fields before you print the document. This way, the document is entirely up to date whenever you print it. Similarly, checking Update Links tells Word to update any links to other documents before printing.
CAUTION
Although you'll often want to update fields and links before you print, sometimes you shouldn't. For instance, to accurately track a project (or for legal reasons), you may need to print a memo precisely as it appeared several months ago, with old dates and old numbers. Before you print such a document, clear the Update Fields and Update Links check boxes.
Allow A4/Letter Paper Resizing. Word permits you to switch automatically between the standard 8 1/2"x11" paper size used in the United States and the slightly longer, narrower "A4" size used in most countries. To enable this automatic switching feature, check the Allow A4/Letter Paper Resizing check box. With this box checked, Word adjusts page layout and margins automatically to compensate for changes in paper size when the document is about to be printed. These changes are not stored permanently and do not affect the document as it appears onscreen. In the future, if you instruct Word to print the document at 8 1/2"x11" again, Word will do so.
TIP
If you only want to adjust to A4 paper size for the document you're currently printing, display the Print dialog box and choose A4 210x297 mm (or Letter 8 1/2x11) from the Scale to Paper Size drop-down box.
Background Printing. By default, Word prints "in the background." This means that you can go back to work in your document more quickly, but you may find that your print job runs more slowly. If you find that Word prints too slowly, try clearing this check box.
CAUTION
The downside of disabling background printing is that Word doesn't allow you to start working in the file again until it has sent all pages to your printer (or more precisely, to Windows's print spooling file).
Print PostScript over Text. Sometimes you need to accommodate watermarks or other surprinted text created in Word for the Macintosh. The Print PostScript over Text option enables PostScript code that may have been placed in a Macintosh Word document to be printed above text, not beneath it.
Reverse Print Order. Occasionally, you may need to reverse the order in which your printer outputs your pages. For instance, you might have a printer that stacks pages in reverse order (the completed pages are ordered with the last page first and first page last). Many inkjet printers generate face-up output in reverse order. Many laser printers also have a face-up reverse output tray that is used to print on heavier paper stock or envelopes. To get output on those printers in the correct order, check this box.
CAUTION
Note that some of these printers, most notably Hewlett-Packard inkjet printers, allow you to change print order outside of Word, using the printer driver built into Windows. If you choose reverse printing in both Word and through the Windows printer driver, the two settings cancel each other out.
Controlling What to Include with Your Document When Printing
Word provides six options for controlling what elements of your document print. Check the corresponding check box to include each element in your printed document.
Document Properties. Prints a page of information about your document, such as file size, filename, and author information.
Field Codes. Prints the field codes in your document, instead of the results generated by those field codes.
XML Tags. Prints all XML markup within an XML document. This feature is new in Word 2003, the first version of Word with extensive XML support.
Hidden Text. Prints all text marked as hidden.
Drawing Objects. Checked by default, this instructs Word to print all drawings in your document.
Background Colors and Images. Prints background colors, patterns, or images that would otherwise be ignored by Word. This feature is new in Word 2003.
Another option, Print Data Only for Forms, allows you to print a quick record of the responses to a filled-out form, without printing the form itself.
 For more information about creating and filling in forms, see Chapter 28, "Creating Forms," p. 933.
Changing Paper Sources
In Chapter 5, "Controlling Page Features," you learned that you can choose the size of paper to use in your printer by opening the Page Setup dialog box (choose File, Page Setup) and choosing the Paper Size tab. You also learned that if your printer is equipped with more than one paper tray, you can change the paper tray from the Paper Source tab of the Page Setup dialog box.
If you want Word (and only Word) to use a print tray different from the default setting, you can select a different one from the Print dialog box. In the Print dialog box, open the Default Tray list box and select the tray containing the paper to which you want Word to print.
CAUTION
When you choose a paper tray from the Print dialog box, you are setting a new default paper tray that remains in effect for all Word documents (not just the current document). When you change the paper tray from the Page Setup dialog box, you affect only the current document.
NOTE
The paper source settings in the Page Setup dialog box (select File, Page Setup) supersede any paper tray settings in the Print dialog box. In other words, if the paper tray settings are different in the Page Setup dialog box than in the Print Options dialog box, Word uses the settings in the Page Setup dialog box.


