Printing Labels
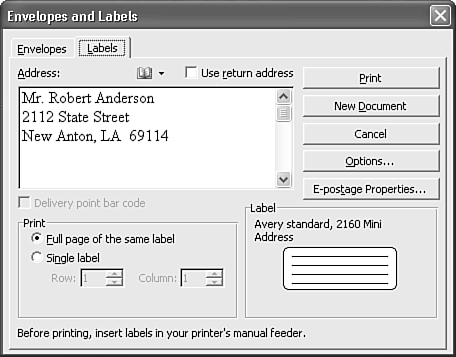
You also can print a label?or a sheet of labels?using either your delivery address or your return address. To do so, choose Tools, Letters and Mailings, Envelopes and Labels, and click the Labels tab, as shown in Figure 6.13.
Figure 6.13. The Labels tab, showing an address borrowed from a letter.

Word follows the same rules for finding an address to include on your labels as it did for finding the address for envelopes. If you entered a specific name and address in the Envelopes tab, Word places it in the Labels tab as well. Again, you can edit it if you want. And, as with envelopes, you can click the Address Book button to insert names from your Microsoft Outlook or other address book.
NOTE
By default, Word assumes that you want to use the delivery address in your letter. If you prefer to use your return address, check the Use Return Address check box. You cannot print both the delivery and the return addresses on the same label.
TIP
You're not limited to entering an address in the Address box. If you need a full page of identical shipping labels that say "FRAGILE," you can create these as well.
You can also use Word's mail merge features, covered in Chapter 17, "Using Mail Merge Effectively," to create sets of labels for different recipients, or sets of labels based on databases?for example, a set of folder labels based on a list of clients.
By default, Word expects to print a full page of identical copies of the text in the label. Therefore, the Full Page of the Same Label button is selected. You can, however, click Single Label to print only one label. You might use this option to create a shipping label for a large envelope or package, to create a large return address label, or to allow you to reuse most of a sheet of labels in the event you need to print only one.
CAUTION
Many label sheets cannot be run through a laser printer twice.
If you've dealt with partially used label sheets before, you know that printing a single label means choosing a specific location of the sheet to print to. So, when you choose to create just one label, Word wants to know which of the label locations on your sheet it should print on. For example, you might want to print on the second label in the third column of labels. Use the Row or Column scroll boxes to specify the row and/or column number on which you want to print.
Specifying Label Printing Options
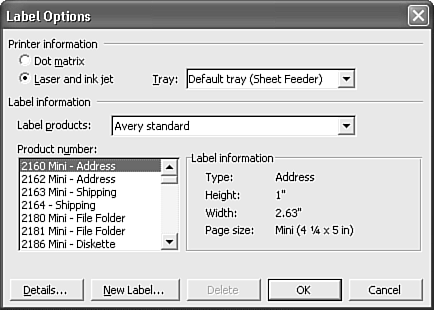
Word assumes that you feed your labels manually. To tell it otherwise, click the Options button. The Label Options dialog box opens (see Figure 6.14). Select another paper source from the Tray drop-down list in the Printer Information area of the dialog box.
Figure 6.14. Selecting your label and its print destination.

NOTE
If the Label Options dialog box specifies manual feed, but the Print tab of the Options dialog box specifies automatic feed, the setting in the Print tab overrides the setting here.
NOTE
It's always a good idea to spot-check your labels by printing at least some of them on regular paper and placing that on top of the label sheet to ensure that the labels are printing within the correct areas. Labels aren't cheap, and if your printer fails to print within the correct label margins, your sheet is wasted.
Word supports an extraordinary variety of labels, including labels sold both in the U.S. and in global markets. The Label Products drop-down box in the Label Options dialog box (refer to Figure 6.14) contains 14 groups of laser and inkjet labels from around the world:
Avery standard (the default U.S. setting)
AOne
APLI
Avery A4 and A5 sizes
Devauzet
ERO
Formtec
Herma
Hisago
Kokuyo
MACO/Wilson Jones Standard
Pimaco
Rank Xerox
Zweckform
Additional categories are available for dot-matrix printers, notably the CoStar LabelWriter. To see which label to use, see the packaging your labels came in.
The labels Word supports (or can be customized to support) include far more than just address labels: You can create disk, videotape, and CD-ROM labels; file folder labels; name badge labels; postage labels; tent cards; portfolio labels; and much more. To choose a label, select the manufacturer and product category from the Label Products drop-down box; then select the specific type of label from the Product Number scroll box. There, Word provides not only product numbers, but brief descriptions of each label as well.
Creating a Custom Label
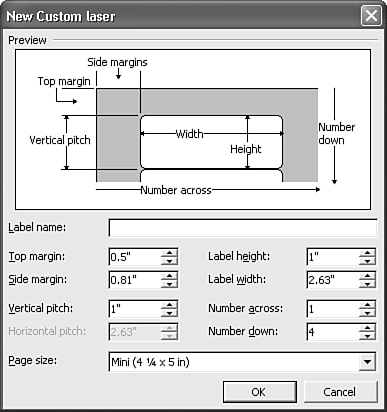
If none of Word's hundreds of built-in label definitions matches yours?hard as that is to imagine?you can build your own label. In the Label Options dialog box, click New Label or click in the Label Information area. The New Custom Laser dialog box opens, as shown in Figure 6.15. (If you have specified dot matrix as your printer type, this dialog box is titled New Custom Dot Matrix, and the picture of the label is somewhat different.)
Figure 6.15. Creating a custom label for a laser or inkjet printer.

To create a custom label size, follow these steps:
Type a name for the label in the Label Name drop-down box.
Select the Page Size from the drop-down list at the bottom of the dialog box.
Set the Number Across. This tells Word how many labels are positioned between the left and right margins of the sheet.
Set the Number Down. This tells Word how many labels are positioned between the top and bottom margins of the sheet.
Set the Label Height. Notice that Word automatically changes the Vertical Pitch setting. (Vertical pitch is the distance from the top of one label to the top of the next label.)
Set the Label Width. Notice that Word automatically changes the Horizontal Pitch setting. (Horizontal pitch is the distance from the left edge of one label to the left edge of the label in the next column.)
Adjust the Top Margin and Side Margin settings, if necessary.
Click OK to return to the Label Options dialog box. Your custom label is selected in the Product Number scroll box.
Click OK to return to the Envelopes and Labels dialog box.
Click Print or New Document, depending on whether you want to send the labels to the printer immediately.
Although you can create labels of virtually any size, you must print them on one of Word's standard paper sizes, such as 8 1/2"x11".
Creating a File of Labels for Later Printing
You may not want to print your labels immediately. For example, the computer you are using right now may not be attached to a printer that can print your labels; or the labels you need may be in the supply cabinet at the office while you're at home. You can create a file consisting of labels for later printing.
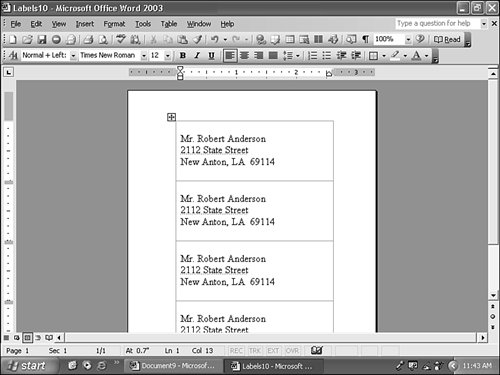
To do so, include the text you want to appear in your label (for example, add a name and address, as discussed in earlier sections). Establish the label settings you want (for example, choose whether you want to print a full page of the same label, or just one label). Then, click New Document. Word creates and displays a new document consisting of the labels you have created (see Figure 6.16). Be sure to save the file Word creates.
Figure 6.16. A file containing new labels for later printing.

NOTE
You can edit this file manually, just as you can edit any other file. For example, you can manually replace duplicate copies of the same label with different names and addresses, or copy the entire page of labels to create a document consisting of several pages.


