Sending a Fax from Word
Microsoft Word 2003 gives you two options for faxing documents. You can fax using your own fax modem, with either the fax software built into Windows or your own third-party software, such as WinFax Pro. |
Alternatively, if you don't have a fax modem (or prefer not to use it), you can use an Internet-based fax service. With an Internet-based fax service, you email your file to a service provider via Microsoft Outlook. The Internet fax service handles the faxing on your behalf and charges you based on either a monthly subscription or per-page rate.
The following sections cover both.
Faxing a Document with Your Fax Modem
To fax a document with your fax modem, first complete and save your document. Then, follow these steps:
Choose File, Send To, Recipient Using a Fax Modem. The Word Fax Wizard opens.
Click Next. Word's Document to Fax window opens (see Figure 6.22).
Figure 6.22. Choosing which document to fax.

Choose the document you want to fax; you can select any open document.
Click Next. The Fax Software window opens (see Figure 6.23).
Figure 6.23. Choosing which software you want to use to send your fax.

Specify which fax software you want to use. Most users will choose the built-in Microsoft Fax service available through Windows 2000 and Windows XP. If you choose Microsoft Fax, the Recipients, Cover Sheet, and Sender boxes of Word's Fax Wizard disappear.
NOTE
Microsoft Fax Service is installed by default in Windows 2000 and in Windows XP Professional. It is not installed by default in Windows XP Home, but it can be installed separately from the Windows XP Home CD-ROM.
NOTE
If you choose third-party software instead, such as Symantec's WinFax Pro, click Next and proceed to specify recipients, cover sheet, and sender information within Word's Fax Wizard.
Click Next. The Finish screen appears.
Click Finish. Windows's Send Fax Wizard opens.
Click Next. The Recipient and Dialing Information dialog box opens (see Figure 6.24).
Figure 6.24. Setting recipient and dialing information through the Fax Wizard.
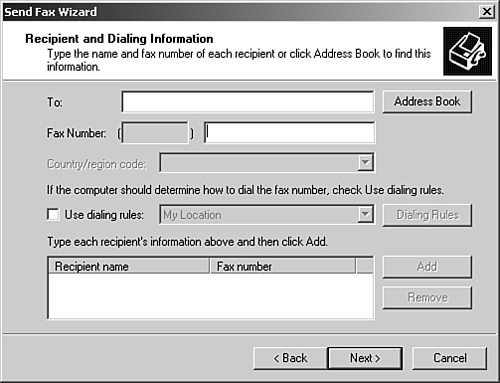
Enter names and fax numbers in the To and Fax Number boxes, or retrieve them from Microsoft Outlook by clicking the Address Book button and choosing them from the Address Book dialog box. If you enter the fax numbers manually, always include the full phone number, including the area code and the country code prefix ("1" for U.S. numbers) wherever necessary.
Click Next. The Adding a Cover Page window appears (see Figure 6.25).
Figure 6.25. Choosing one of Word's standard fax cover sheets.
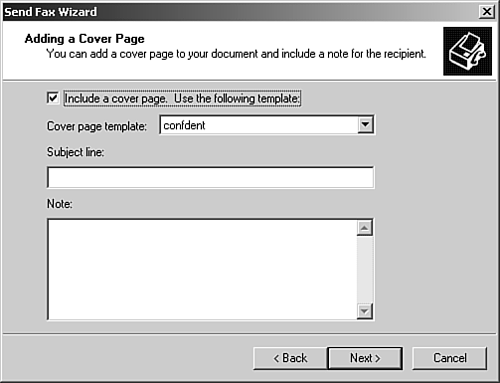
Choose the style of cover sheet you want to use. If you don't want a cover page, clear the Include a Cover Page check box.
Enter a Subject Line and any Note you want to appear on your cover page.
Click Next. The Scheduling Transmission window appears.
Specify when you want the fax sent; if you want to send it now, leave the Now button selected. If you want to associate a billing code with your fax, enter it in the Billing Code text box.
Click Next.
Click Finish.
Using the Venali Internet Fax Service
Currently, one fax service is integrated with Microsoft Word 2003: Venali Internet Fax Service. This is a subscription service with base prices that range from $4.95 a month for low-volume outbound service to $19.95 per month for higher-volume inbound/outbound service. |
To sign up for Venali Internet Fax Service, visit www.venali.com/signup/msoffice/signup/select_package.aspx and follow the instructions there. After you've signed up, follow these instructions to send a fax:
Save the Word document you want to fax.
Choose File, Send To, Recipient Using Internet Fax Service. Word converts your document to a TIFF file for delivery as a fax. Outlook's Sent with Microsoft Office 2003 Fax Service window opens (see Figure 6.26).
Figure 6.26. Outlook's Sent with Microsoft Office 2003 Fax Service dialog box.
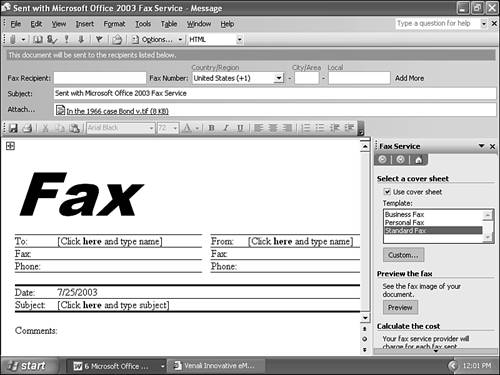
In the Fax Recipient line, enter your recipient's name.
In the Fax Number box, select the country/region prefix associated with your fax destination. If you are using Word within the U.S., and faxing within the U.S., you can leave the default setting of United States (+1).
In the City/Area box, enter your recipient's area code.
In the Local box, enter your recipient's local fax number.
If you want to add another recipient, click Add More. A new recipient's line appears; repeat steps 3?6.
Edit the Subject line as you like.
If you want to change your cover sheet, choose a different cover sheet from the Fax Service task pane. (If your fax cover sheet isn't listed, click Custom, and select any Word template.) You can also send your fax with no cover sheet, by clearing the Use Cover Sheet check box.
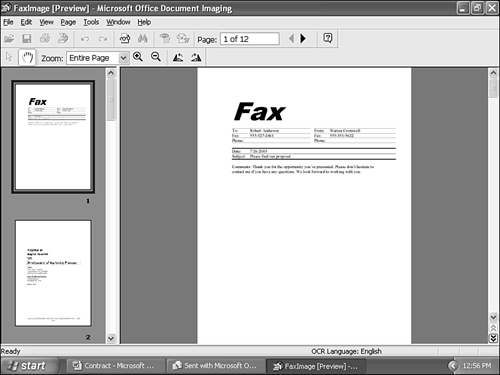
If you want to preview your fax, click Preview; Microsoft Office Document Imaging will appear (see Figure 6.27), displaying the preview. Close it when you're finished previewing the fax.
Figure 6.27. Previewing your fax with Microsoft Office Document Imaging.
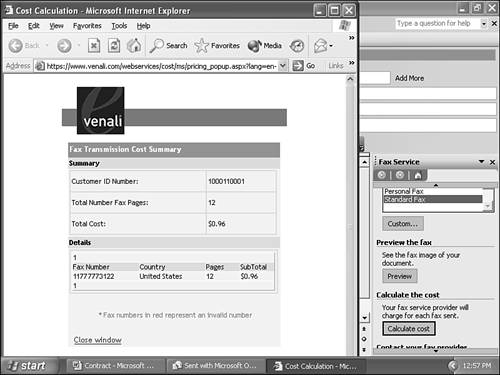
If you want to know how much your fax service provider will charge for your fax, click Calculate Cost. Microsoft Internet Explorer will appear, displaying a summary of the charges you will incur for sending this fax (see Figure 6.28).
Figure 6.28. Calculating the cost of sending your fax.
Click Send. If you are asked whether to convert the file from Word document format to an image format, click Yes.


