Specifying What to Print
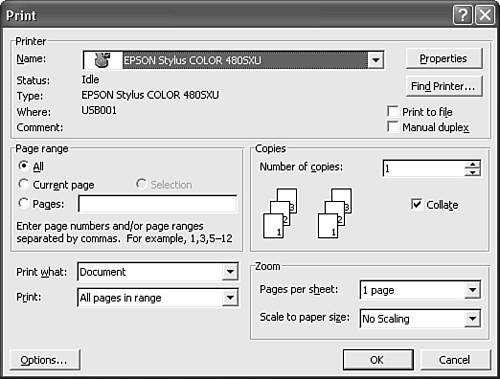
Suppose that you don't simply want to print one copy of your entire document. Perhaps you want to use a different printer, print several copies of the document, or print only part of a document. You can control these and other aspects of printing from the Print dialog box (see Figure 6.1). To open this box, choose File, Print.
Figure 6.1. From the Print dialog box, you can specify special printing options.
The following sections cover options found in the Print dialog box.
Choosing Which Pages to Print
Rather than having Word print every page of your document (as it does by default), you can use the Print dialog box to control which pages or parts of your document are printed. You can
Print the page your insertion point (text cursor) is in by choosing Current Page from the Page Range area of the dialog box
Highlight specific portions of text and print that text by clicking the Selection button
Select specific pages to print by entering the page numbers in the text box next to the Pages button
If you specify individual pages, Word understands hyphens and commas, as in the following examples:
1?3 | Prints pages 1 through 3 |
1,2,6 | Prints pages 1, 2, and 6 |
1?3,5,8 | Prints pages 1 through 3 and pages 5 and 8 |
p1s2?p2s4 | Starts printing with page 1 of section 2 and prints all pages through page 2 of section 4 |
 For more information about sections, see Chapter 5, "Controlling Page Features," p. 157.
Printing Odd or Even Pages
If you want to print only odd or even pages, you can make this choice from the Print drop-down list box in the Print dialog box. Choose Odd Pages or Even Pages rather than the default setting, All Pages in Range.
Some people have traditionally used this feature to print on both sides of paper even if their printers do not provide this capability. However, as is covered in the "Printing on Both Sides of Your Paper" section of this chapter, Word offers a Manual Duplex printing feature that can accomplish the same task more elegantly.
Controlling Number of Copies and Collation
You can use the Number of Copies spin box to specify the number of copies you want to print. Either click the spin-box arrows or type the number of copies you want to print.
TIP
The Number of Copies spin box is set to 1 by default, so you can simply type a new number and click OK (or press Enter) to immediately print several copies.
By default, Word automatically collates multiple copies of your document by sending the document to the printer, waiting a moment, and then sending it again. This way, you get output arranged in page order. Because you usually want your document to print in page order, what could be wrong with that?
Only one thing?it may take longer. Printers typically process each page in your document separately. When the second copy of a collated document starts printing, none of the processing from the earlier pages remains in memory. The processing must be done over again. This repetitive processing can create significant bottlenecks in your print queue if your documents contain extensive graphics or formatting.
Laser printers can, however, print several consecutive copies of the same page without reprocessing them. So if you're willing to manually collate your document?or if you're lucky enough to have someone around to help?you might get your print job done sooner by disabling Word's collating function. To do so, clear the Collate check box.
Printing on Both Sides of Your Paper
A few printers are designed to print on both sides of the paper at once, allowing you to print documents such as books with all pages in consecutive order. Most printers, however, can only print on one side at a time. You can still perform duplex printing on these printers, using Word's Manual Duplex printing feature.
To use Manual Duplex printing, check the Manual Duplex printing check box. Then, wait until your printer prints all the odd-numbered pages in your document. Word displays a dialog box asking you to remove the printout and place it back in your printer's input bin. Click OK. Word prints the remaining pages.
When you place the printout back in your printer's input bin, be careful to follow your printer's directions to make sure that your pages will not print upside down, or on the wrong side (in which case you'd be printing on the same side twice).
CAUTION
Printing on both sides of the paper by running the paper through twice can cause some printers to jam. Check your printer's manual to make sure that this isn't a problem for your printer.
CAUTION
This feature does not always work well with printers that use their own spooler software for background printing?for instance, many inkjet printers. Word hands off all the "fronts" to the inkjet printer's spooler, and, assuming that the pages have actually been printed, prompts the user to turn all the sheets over?often, long before the sheets are actually ready to be turned over. Worse, when this prompt appears, you can do nothing in Word until you click OK to indicate that you actually have turned over the sheets.
If you encounter this problem, revert to printing even pages and then printing odd pages separately, as you might have done in earlier versions of Word.
NOTE
You may occasionally need to reverse the order in which your printer prints duplex pages (for example, print from back to front). From the Print dialog box, click Options; then check the Front of the Sheet check box, the Back of the Sheet check box, or both.
Printing Several Pages on a Sheet
You can print more than one page on a single sheet of paper. There are many applications for this. For example, this makes it easier to print a booklet with staples in the center. It also makes it easier to provide compact handouts of outlines and other document elements, much as presenters have long done with PowerPoint presentation handouts.
For more information about creating booklets and other documents that are printed several pages to a sheet, see Chapter 5, "Controlling Page Features," p. 157.
To print several pages on a sheet, choose an option from the Pages Per Sheet drop-down box of the Print dialog box: 1 page, 2 pages, 4 pages, 6 pages, 8 pages, or 16 pages. Click OK when you're ready to print.
Depending on the number of pages you choose, the size of your original document, and your other printer settings, Word arranges the pages on the sheet to fit as many as possible. For instance, if you choose four pages, Word prints the pages right side up, one in each of the sheet's four corners. However, if you print eight pages, Word prints the pages sideways on the sheet, in two rows of four pages apiece.
CAUTION
You can't combine paper saving techniques. For example, you can print drafts on both sides of the paper, or print several pages on one side of a sheet, but you can't do both.
CAUTION
Be careful that you don't create drafts with text that is illegibly small. Although two pages on a sheet may be barely readable, printing several pages on a sheet tends to be useful primarily for providing a quick sense of layout.
Scaling a Document to a Different Paper Size
Those who work in international environments know that different regions use different standards for paper sizes. Word makes it easier to deal with these differences by simplifying the process of switching between the many paper sizes.
To scale a document so that it prints well at another paper size, display the Print dialog box. Then choose the paper size you want from the Scale to Paper Size drop-down box. In addition to U.S. letter size (8 1/2"x11"), Word provides many other options. The following options are likely to be most useful to typical users:
Legal
Executive
A4 and A5 (European/ISO standard)
#10 Envelope
DL, C6, or 132x220mm Envelope (European/ISO standard)
Monarch Envelope
Index Card (A6, 5x8" or 8x10" sizes)
NOTE
Word can scale printing to many sizes that were once unsupported. These include three standard Photo Paper sizes, as well as A3, B3, SuperA3, US B 11x17", and Half Letter (5.5x8.5") sizes.
Printing Accompanying Information About Your Document
You can print information about your document other than its text. Using the Print What list box, you can print any of the following information about your document:
The document's properties (see Chapter 34, "Managing Word More Effectively")
Document Showing Markup, the document with all comments and revision marks displayed (see Chapter 26, "Managing Document Collaboration and Revisions")
List of Markup, a list that includes all comments and revision marks but not the entire document
Styles you used within the document and the formatting you defined for them (see Chapter 10, "Streamlining Your Formatting with Styles")
AutoText entries (for example, boilerplate text or graphics; see Chapter 9, "Automating Your Documents")
Custom keyboard shortcuts you defined within this document or for the template attached to the document (see Chapter 31, "Customizing Word")
Because the controls for printing specific document elements are scattered throughout Word, Table 6.1 lists all the document-related elements you can print and specifies the command or commands used to print them. In some cases, you must display information in your document before you can print it; these cases are listed in the fourth column of the table.
Element | Included with Document | Prints Separately | Must Be Displayed Before Printing | Notes |
|---|---|---|---|---|
Document Markup | X | X | Can be printed with document or separately | |
AutoText Entries | X | |||
Envelopes | Covered later in this chapter | |||
Field Codes | X | X | ||
Hidden Text | X | X | ||
Shortcut Key Assignments | X | |||
Styles | X | |||
Properties | X | |||
Outlines | Display in Outline view before printing |


