Managing Styles
Before you start accumulating new and changed styles, give a little thought to how you'll manage them. Managing styles involves the following:
Deciding which styles should be placed in templates, and organizing those styles in the templates associated with specific kinds of work
Naming styles so that you and your colleagues understand their purpose
Occasionally moving styles or deleting styles you no longer use
You can perform some management tasks in the Style dialog boxes you've already studied. For other tasks, such as moving styles between templates, you use the Organizer, described later in this chapter.
How to Choose Style Names
Spend a few moments thinking about how to name your styles. Keep the following tips in mind:
Name your styles based on their function, not their appearance. Don't name a style Arial 48 Bold; what if you decide to change its appearance someday? Rather, name it based on how you expect to use it?for example, Front Page Headline. (This is one of the key disadvantages of simply using Word 2003's list of formats instead of styles?and one reason most sophisticated users will continue to work with styles instead.)
Keep your style names as consistent as possible. Imagine that you use a set of styles for only projects involving Omega Corp. Consider starting each style name with O. That way, they'll all be listed together?and you'll be less likely to inadvertently use them in projects that don't involve Omega.
The catch with using descriptive style names is that they could also become quite wordy. This can become problematic if you also like to type your style names in the Style box to select them. It takes too long to type a long name, and if you make a mistake, Word creates a new style, which isn't what you want to happen.
You can have it both ways. Use aliases. An alias is an abbreviated style name that Word recognizes in place of the full style name. For example, if you have a style named Major Headline, you might want to use the alias MH.
You can create an alias from either the New Style or the Modify Style dialog box. Type the style's full name, add a comma, and then type your alias. For example, to create the style Document Summary and assign the alias DS at the same time, enter
Document Summary,DS
Both the full name and the alias appear in the Style box, but you can select the style by typing only the alias.
Keeping Track of Styles with the Organizer
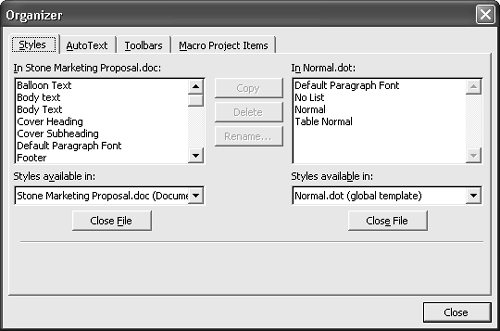
The Organizer (see Figure 10.10) is Word's control center for copying, deleting, and renaming styles. To display the Organizer, choose Tools, Templates and Add-Ins, and click Organizer. The Organizer opens. If the Styles tab is not displayed, click Styles to display it.
Figure 10.10. You can use the Organizer to move styles between documents or templates.

TIP
The procedures you'll learn for working with styles in the Organizer also work for moving AutoText entries, toolbars, and macro project items.


When the Styles tab of the Organizer opens, it displays two windows. The left window, named after the document that is currently active, lists all the styles contained in that document. The right window corresponds to the Normal template (Normal.dot).
Copying Styles
When you open the Organizer and choose the Styles tab, the Organizer is already set to copy styles from the current document to the Normal template. All you need to do is select the style or styles you want to copy, and click Copy. If you're not sure whether you want to copy a style, you can review the style's contents, which are displayed beneath its window.
You can also copy styles in the opposite direction, from the Normal template to the current document. Click one or more styles in the right window. The arrow inside the Copy button switches direction, now facing the Document window.
NOTE
You'll often want to copy styles to different templates, not just different documents. To learn how, see "Working with Different Documents and Templates," later in this chapter.
If you copy styles to a destination that already has styles of the same name, Word displays a warning dialog box asking whether you're sure that you want to do so. Click Yes to confirm; click Yes to All if you're sure that you want to overwrite any other styles as well.
TIP
If you want to copy a style from one document to another, and the style name isn't already used by the destination document, try this shortcut. Select some text that's already formatted using the style, and copy it. Then simply paste it into the other document.
The style comes along with it and is now listed on the Style box along with all other styles in this document. It'll still be there even after you delete the text associated with the style.
Renaming Styles
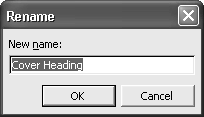
Sometimes you might want to rename a style. For example, you might be setting up several styles associated with a specific project and template, and you want them all to begin with the same letter or word. To rename a style, select it in the Organizer and click Rename. Then, enter the new name in the Rename dialog box (see Figure 10.11) and click OK.
Figure 10.11. The Rename dialog box displays the current name, which you can edit or replace.

TIP
You can also rename a style from the Modify Style dialog box. Display the Styles and Formatting task pane by clicking the Styles and Formatting button on the Formatting toolbar, or by choosing Format, Styles and Formatting. Right-click on the style you want to rename, and choose Modify Style from the shortcut menu. Then, enter a new name in the Name text box and click OK.
Working with Different Documents and Templates
Until now, you've used the Organizer only to move styles between the current document and the Normal (Normal.dot) template. However, the Organizer can be used to move styles between any documents or templates. You simply need to place the appropriate documents or templates in the left and right windows. To do so, follow these steps:
Under either the left or the right window, click the Close File button. The window becomes empty, and the button changes to Open File.
Click the Open File button. Word displays the Open dialog box, showing your current list of document templates stored in the Templates folder. If you want a template, navigate to it, select the template, and click Open. If you want a document instead, choose Word Documents in the Files of Type box. Then navigate to the document you want to use and click Open.
Repeat the same process in the other window to display the appropriate document or template there.
You can now copy, delete, or rename styles just as you've already learned in this chapter.
TIP
Because the Organizer's Open File button displays the same Open dialog box you normally use to open files, you have full access to the extensive file search capabilities covered in Chapter 3, "Essential Document Creation and Management Techniques."
TIP
If you're organizing a template with several specific styles, you can create all the styles in a new, blank document, delete the styled text, and save the remaining blank document as a template. Then, use that template whenever you want to access those styles.
Word Styles and Desktop Publishing Programs
If you export files for use in separate desktop publishing programs, most of these programs can recognize Word styles. The designer working with that software is likely to want to change the specific formatting associated with each style, but the styles themselves already exist, eliminating time-consuming "tagging."
Microsoft Publisher 2003 and other recent versions of Microsoft Publisher can import Word 2003 files directly. The two leading desktop publishing programs, Adobe's InDesign 2.0 and QuarkXPress 5.0, now ship with Word filters designed to open Word 97, 2000, 2002, and 2003 files.
CAUTION
QuarkXPress users have occasionally encountered trouble with documents created by new versions of Word, even though Word's official format has not changed. This is apparently due to very slight changes Microsoft introduces within the standard Word 97/2000/2002/2003 format in order to support new features. Moreover, relatively few QuarkXPress users have upgraded to the latest versions, so they may be using Word filters that are even more problematic.
If QuarkXPress users encounter difficulty with your documents, try saving them to Word 6/95 format.
Adobe PageMaker 6.x can import Word 2003 files using the optional Word 97 filter, which you can find by searching at www.adobe.com/support/downloads/main.html. Users of QuarkXPress 4.0 and older versions can find current Word filters by searching at www.quark.com/service/desktop/downloads/.
No filter is perfect. Even the best of them don't support all of Word's myriad features. For example, PageMaker 6.5's Word filter doesn't support character styles. Instead, it reformats that text as if you had manually formatted it. However, it does a nice job with paragraph styles.
For all these caveats, though, using Word styles in desktop publishing can still save significant time and money.


