Understanding and Using Word's Default Styles
You're using styles whether you know it or not.
Word actually contains more than 100 built-in styles. When you display a new document and begin entering text, Word enters the text using the Normal style, Word's standard style for body copy. (By default, Normal style is 12-point Times New Roman, left-aligned, single-spaced, with an outline level equivalent to body text.) Similarly, whenever you use automated features such as AutoFormat, Tables of Contents, or Indexes, Word applies built-in styles in many places to ensure overall consistency.
All of Word's built-in styles are designed to work together, creating documents that are consistently formatted, if somewhat ordinary-looking. These styles are stored together in Word's Normal template, which means that they are available to every document you create. And, as you'll see later, changing these built-in styles is the fastest way to change the overall look of all the documents you create.
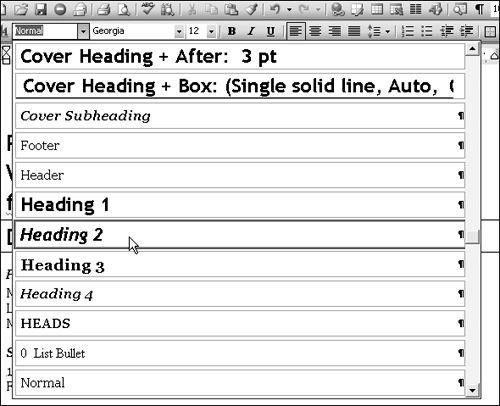
Because Word contains so many built-in styles, the fastest way to add styles to your document is to use the ones that already exist. To apply an existing style, select the text you want to style. Then click the arrow in the Style box on the Formatting toolbar, or press Ctrl+Shift+S (see Figure 10.3) and choose the style you want from the list that appears.
Figure 10.3. Choosing a style from the Style box on the Formatting toolbar.

In Word 2003, the Style box doesn't just list the available styles; it shows them formatted so that you can see what they look like before you apply them.
NOTE
Although all of Word's built-in styles are available to all your documents, this may not be true of custom styles you create.
If you have stored custom styles in more than one template, the custom styles available for your use may vary depending on which templates are currently accessible to your documents. To learn more about controlling which templates are available to your documents, see "Attaching a New Template to an Existing Document," in Chapter 11.
In the next few sections, you'll learn how to make the most of Word's built-in styles?and you'll also learn techniques you can use with the custom styles you create.
Applying an Existing Style from the Styles and Formatting Task Pane
Word 2003 provides yet another way to apply an existing style: the Styles and Formatting task pane. To display it, choose Format, Styles and Formatting, or click the Styles and Formatting button on the left edge of the Formatting toolbar. Next, select a style from the Pick Formatting to Display scroll box.
If the built-in style you're looking for doesn't appear, choose All Styles from the Show drop-down box.
Shortcuts for the Most Common Styles
Five of Word's most widely used styles also have quick keyboard shortcuts:
Style | Keyboard Shortcut | Common Use |
|---|---|---|
Normal | Ctrl+Shift+N | Body text |
Heading 1 | Alt+Ctrl+1 | First-level headings |
Heading 2 | Alt+Ctrl+2 | Second-level headings |
Heading 3 | Alt+Ctrl+3 | Third-level headings |
List Bullet | Ctrl+Shift+L | Bulleted lists |
Sometimes you want to apply a different paragraph style to a block of text. You can always do so by selecting any part of the paragraph and choosing a new style from the Style box.
Because many styles are heading styles, you often find yourself changing styles to change heading levels. One effective way to make these changes is to switch into Outline view and use the Promote and Demote buttons on the Outlining toolbar (covered in detail in Chapter 18). If, however, you're just changing one or two headings, simply click the Style box and use the up- or down-arrow keys to move to the style you want.
NOTE
Two additional keys allow you to change heading styles: Alt+Shift+right arrow demotes the paragraph you've selected. For example, if you select a paragraph formatted as Heading 1, pressing Alt+Shift+right arrow converts the paragraph to Heading 2 style.
Conversely, Alt+Shift+left arrow promotes the paragraph, for example, from Heading 3 to Heading 2.
NOTE
Later in this chapter, in the "Creating Keyboard Shortcuts for Your Styles" section, you'll learn how to provide custom keyboard shortcuts for the styles you create.
TIP
If you're sure of the style name you want to use, you can simply type it in the Style box. However, if you mistype, Word creates a new style formatted as your text already appears.
To minimize clutter, Word typically displays only seven built-in styles in the Style box of a new document: Normal, Heading 1, Heading 2, Heading 3, and three Table of Contents (TOC) styles. All the other styles built into Word are still available, however. If you want to apply a style that doesn't appear in the Style box, apply it from the Styles and Formatting task pane, as described earlier, in the "Applying an Existing Style from the Styles and Formatting Task Pane" section.
Applying Multiple Styles at the Same Time
Maybe you'd rather not have your train of thought interrupted by stopping to apply styles as you write. If so, you can write your document the way you normally do and then have Word's AutoFormat feature apply the styles for you, using the built-in styles it recognizes.
NOTE
You can also use AutoFormat As You Type to make similar changes as you type.
AutoFormat and AutoFormat As You Type are covered in detail in Chapter 9, but briefly, Word can recognize the following elements and assign styles to them:
Built-in heading styles. If you enter one line of text without a period, ending with a paragraph mark, Word recognizes it as a heading and applies a heading style. If your headings are not already manually numbered or styled, Word typically uses Heading 1.
If you have already formatted some headings, Word applies the next subordinate heading style beneath your headings. That's useful to know if, for example, only the name of your chapter uses Heading 1 style. Format that one line of copy manually, and Word automatically formats all the other headings it finds as Heading 2. This leaves you with fewer to correct manually.
List styles. AutoFormat can recognize some lines of text as belonging to a bulleted or numbered list and reformat those with built-in list styles. For example, if either AutoFormat or AutoFormat As You Type encounters paragraphs that begin with an asterisk and a space, it reformats them as items in a bulleted list.
Automatic bulleted lists. When you start a paragraph with an asterisk, one or two hyphens, the > symbol, or a "fake" arrow created by combining hyphens or equals signs with the > symbol (for example, ?>), AutoFormat assumes that you want to create a bulleted list and applies a list style containing a bullet.
Other paragraph styles. AutoFormat can search for other document elements it recognizes, such as addresses, and format them with its corresponding built-in styles. For paragraphs AutoFormat does not recognize as requiring special formatting, AutoFormat can apply Word's built-in Body Text style. Body Text style is identical to Normal style except that 6 points have been added after each paragraph to compensate for the extra paragraph mark AutoFormat automatically removes.
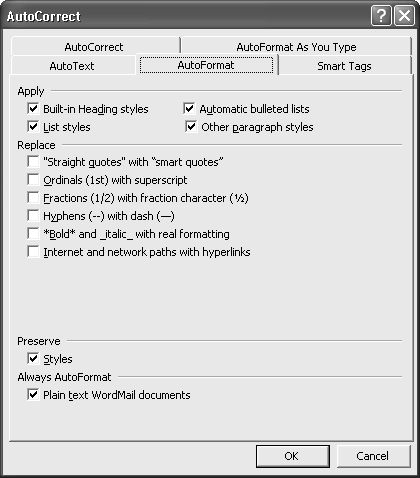
To use AutoFormat to apply several styles at once, choose Format, AutoFormat and click the Options button. Then, on the AutoFormat tab (see Figure 10.4), specify the types of styles you want Word to apply?Built-In Heading Styles, List Styles, Automatic Bulleted Lists, or Other Paragraph Styles. These options all appear in the Apply area of this tab. If you don't want Word to change any other document elements aside from these, clear the remaining check boxes elsewhere in the dialog box. Click OK twice, and Word AutoFormats the document.
Figure 10.4. If you want Word to apply styles automatically but make no other changes to your document, check the boxes in the Apply area of the AutoFormat tab and clear the boxes in the Replace area, as shown.

Word isn't perfect. Double-check the styles Word applies. You may have to do some tweaking. However, if your document's structure isn't too unusual, using AutoFormat can often save you a good deal of time.


