Creating a New Template
Now that you've learned what templates are and how to use the ones Word provides, it's time to start creating your own. Word gives you two ways to do so: from scratch, or by saving an existing document file as a template. Answer the following questions to decide which approach makes more sense:
Do you already have a document that can easily be transformed into a template? For example, if you're creating a template for business proposals, have you made a proposal lately with which you're especially pleased? Would it be easy to edit the contents specific to one client or project, leaving "holes" for you to fill in custom information later? If the answers to these questions are yes, it makes sense to open that file, make your changes, and save it as a template.
Are you creating a template for a document for which there is no usable model? Then you may want to create it from scratch.
Creating a Template Based on an Existing Document
To create a template based on an existing document, follow these steps:
Open the existing document.
Edit the document to eliminate the specific references that you don't want to appear every time you create a new document using this template.
TIP
Before you delete these references, consider whether they're worth saving as AutoText entries. If you're building your template from a proposal you made to Alpha Corporation, you don't want all your Alpha-related experience to show up in proposals you might make to their fiercest competitor, Omega Corporation.
But you do want to have that boilerplate conveniently available as an AutoText entry the next time you make a proposal to Alpha.
 For more information about using AutoText entries, see "AutoText: The Complete Boilerplate Resource," p. 301.
Make sure that all styles, AutoText entries, macros, toolbars, or keyboard shortcuts you want are properly set up (either by default from the existing document, added manually, or copied from some other existing document or template, using the Organizer).
For more information about working with the Organizer, see "Moving Elements Among Templates," p. 374.Choose File, Save As.
Choose Template in the Save as Type drop-down box. When you do, Word changes the current folder to the one where it saves user templates (see Figure 11.3).
Figure 11.3. When you tell Word you want to save a template, it switches you to the folder where you currently save all user templates.
Enter a name for the template in the File Name text box.
If you want to save your template in that folder so that it appears in the General tab of the Templates dialog box, click Save. If you want it to appear in a different tab in the Templates dialog box, double-click that folder and click Save. (You can also browse to folders on Web servers that you or your company have designated as central locations for storing templates.)
You are not limited to using the folders Word automatically provides. For example, you might want to create a new folder that contains all the custom templates you provide for your company and name that folder Company Templates. Word makes this easy to do.
After you display the Save As dialog box and choose Document Template to save your template, click the Create New Folder button. The New Folder dialog box appears. Enter the name you want to use and click OK. Word creates the new folder and opens it.
Enter an appropriate filename for your template and click Save. The next time you open the Templates dialog box, your new folder will appear with its own tab. If you click on that tab, you'll find an icon for the template you just saved.
NOTE
Word's Templates dialog box displays only subfolders containing at least one template. If you create the folder but then do not save your template, the folder will not appear in the Templates dialog box.
TIP
If you want to use your revised template with one of Word's built-in wizards (discussed later in this chapter), the filename must include the word Fax, Letter, Memo, or Résumé, and you must save the template in the corresponding subfolder. For example, if you want to make a new memo accessible to the Memo Wizard, store it in the \Templates\Memos folder.
Creating a Template Based on an Existing Template
Sometimes you may not have a document that's an adequate model for a template, but Word just might. You can browse the tabs in the Templates dialog box to find out.
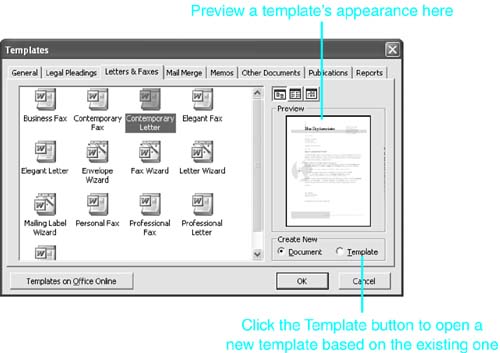
To display the Templates dialog box, choose File, New and click General Templates on the New Document task pane. In the Templates dialog box, click on a template; Word displays a thumbnail preview of a sample document based on it.
If you find a template you want to use, click the Template button to indicate that you want to create a new template rather than a document (see Figure 11.4). Then click OK. A new template opens, containing all the contents of Word's built-in template. Adjust it any way you want and save it under a new name or in a different folder. If you change the document's formatting, consider changing its styles to match.
Figure 11.4. Selecting a template to open as a template.
For more information about changing styles, see "Changing Styles," p. 345.
Creating a Template from Scratch
You can also create a new template from scratch, much as you create a new document. To do so, click the New Blank Document button on the Standard toolbar or press Ctrl+N. Add the text and formatting you want to include in the document. Then click the Save button and choose Document Template (*.dot) from the Save as Type drop-down box. As mentioned earlier, Word switches folders to display your default location for user templates. From here, browse to or create the location where you want to save the template, name the document in the File Name text box, and then click Save.


