Changing a Table's Structure or Formatting
As you begin to edit the contents of your table, you may find that you want to adjust its structure or formatting. This may include
Changing the column widths and row heights, perhaps to accommodate more or less information than you originally anticipated, or to adjust Word's automatic settings.
Adding or deleting rows or columns, again to accommodate more information (or less).
Merging two or more cells into one, perhaps to create complex table designs that are often used in forms.
Splitting one cell into two or more.
Changing the appearance of individual cells or the entire table.
When you create a table, it takes on the character and paragraph formatting of the paragraph preceding it. In other words, if the preceding paragraph uses Times New Roman 14-point type, double-spaced, so will your table unless you change it. You can change any of this formatting by using any of the character and paragraph formatting techniques discussed in Chapter 4, "Quick and Effective Formatting Techniques."
Selecting Part or All of a Table
As with other formatting tasks in Word, your first step is often to select the elements of the table you want to change. You need to know a few special techniques to select part or all of a table.
You can use the following techniques to select elements of a table:
To select a column, move the mouse pointer over the top of the column. When the mouse pointer changes to a black arrow pointing downward, click the mouse. Or click anywhere in the column you want to select, and choose Table, Select, Column.
To select a row, move the mouse pointer to the immediate left edge of the row. Click when the pointer changes to a black arrow pointing up and to the right. Or click anywhere in the row you want to select, and choose Table, Select, Row.
To select a cell, move the mouse pointer to the left boundary of the cell. When the pointer changes to a black arrow pointing up and to the right, click. Or click inside the cell and choose Table, Select, Cell.
To select a block of cells, click in the upper-left cell you want to select and drag the mouse pointer across all the other cells you want to select, highlighting them. Or select the first cell, row, or column you want to select, and press Shift as you select the last cell, row, or column you want to select. Make sure that you don't click and drag until the cursor changes; otherwise, you may inadvertently resize your row or column.
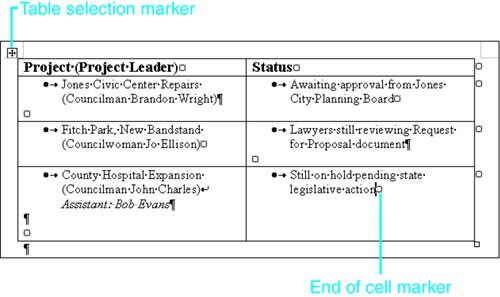
To select the entire table, hover the mouse pointer over the table or click anywhere inside it; a table selection icon appears at the upper-left corner of the table (see Figure 12.11). Click the table selection icon.
Figure 12.11. When you hover your mouse pointer over a table, a table selection icon appears at the upper left of the table.
If you try to move a table in Web Layout view and Word snaps the table into a position you don't want, see "What to Do If Word Moves Tables into the Wrong Position," in the "Troubleshooting" section of this chapter. |
Selecting Part or All of a Cell
Thus far, you've learned to select entire cells, rows, columns, and tables. However, at times you want to select only the text within a specific cell, not the entire cell. For example, if you copy an entire cell to another location in your document, you create a new one-cell table. Often, however, that's not what you intend: You want to copy the contents of the table cell, not the cell itself.
As shown previously in Figure 12.11, every cell in a Word table contains an end-of-cell marker. To avoid copying the cell itself, you must avoid copying this marker.
To see end-of-cell markers in your table, click the Show/Hide Paragraph Marks button on the Standard toolbar. As you type in a cell, the end-of-cell marker moves to stay just ahead of your typing.
Pay attention to end-of-cell markers when you format your tables. When an end-of-cell marker is selected, your formatting affects the entire table cell surrounding it. When an end-of-cell marker is not selected, your formatting affects only the text or graphics within that cell.
Inserting Additional Rows, Columns, and Cells
You may sometimes want to add a new row, column, or block of cells to your table. For example, in a year-to-date financial report, you might need to add a column containing the latest month's results, or a row reflecting the addition of a new department or sales channel. Word makes this easy.
Inserting New Rows
To add a new row to the bottom of your table, position your insertion point in the last cell and press Tab. A new row appears in the same format as the preceding row.
To add a new row anywhere else in your table, select the row where you want a new row to be placed. The standard Table toolbar button changes to an Insert Row button. Clicking the Insert Row button inserts a row above the row you selected. Alternatively, you can right-click on a table row and choose Insert Rows from the shortcut menu. (This option is available only when a table row is selected.)
Whichever method you choose, a new row appears, using the height, widths, and formatting of the row in which your insertion point is currently located. Other rows are pushed down to make room.
If you want to insert a row below the one you've selected, choose Table, Insert, Rows Below.
TIP
You can insert several rows at the same time by selecting the same number of rows in the table, before you choose the menu command to insert rows. In other words, if you select six rows before choosing Table, Insert, Rows Above, Word places six empty rows above the rows you selected.
Inserting New Columns
To add a new column within your table, select a column to the right of the location where you want your new column. The Insert Table button in the Standard toolbar changes to an Insert Column button. Click it, and the new column is inserted; the other column widths are adjusted to compensate, so the entire table is no wider than it was before.
If you do not want to change the widths of existing columns when you insert a new one, there is a different procedure to follow. If you want the new column to appear to the left of the column you selected, choose Table, Insert, Columns to the Left. If you want the column to appear to the right, choose Table, Insert, Columns to the Right.
A new column appears where you specified, and columns to the right of it are pushed further to the right to make room. To add a new column at the right edge of your table, select the column at the far right of the existing table and choose Table, Insert, Columns to the Right.
When you insert a new column, it takes the same formatting as the column you selected before inserting it.
TIP
As with rows, you can insert several columns at the same time by selecting the same number of columns in the table, before you choose the menu command to insert columns.
TIP
Often, you'll want to insert a column containing a list of consecutive numbers, such as serial numbers. Use Table, Insert, Columns to the Left to insert a blank column. Then, with the blank column selected, click the Numbering icon on the Formatting toolbar.
Inserting New Cells
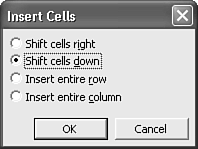
You also can insert cells anywhere within a table. Select a cell adjacent to where you want your new cell to appear. The Insert Table button on the Standard toolbar changes to the Insert Cells button. Click it, and the Insert Cells dialog box appears, as shown in Figure 12.12.
Figure 12.12. Telling Word how you want it to insert cells.
NOTE
You can also display the Insert Cells dialog box from the Tables and Borders toolbar. If the Tables and Borders toolbar is displayed, click the down arrow next to the Insert Table button, and choose Insert Cells from the shortcut menu.
Tell Word where you want to move the cells you are displacing: Shift Cells Right or Shift Cells Down. If this is what you want, click OK in the dialog box to confirm. Some of the time, you may want to make further adjustments. For instance, you might really want to add an entire row or column, so Word also offers those options.
If you choose to Shift Cells Right or Shift Cells Down, Word shifts only these cells?leaving you with a table that has additional cells in some rows or columns, as shown in Figure 12.13.
Figure 12.13. A table with extra cells in some rows.

CAUTION
If you intend to perform calculations that use cell references in your table, be careful about adding or removing cells from rows; this can make it difficult to accurately identify cells in your formulas.
Deleting Rows, Columns, or Cells
Word makes it easy to delete portions of a table?or the entire table. Simply click one of the cells you want to delete, or (if you are deleting more than one row or column) select all the rows and columns you want to delete. Then,
To delete the column in which your insertion point is (or all the columns you've selected), choose Table, Delete, Columns; or select the column, right-click, and choose Delete Column from the shortcut menu.
To delete the row in which your insertion point is (or all the rows you've selected), choose Table, Delete, Rows; or select the row, right-click, and choose Delete Row from the shortcut menu.
To delete the entire table, choose Table, Delete, Table; or select the table by clicking on the icon at its upper left, and press Backspace or Delete.
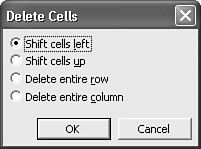
To delete individual cells, select them, right-click, and choose Delete Cells from the shortcut menu. A dialog box appears, asking you how to adjust the table after deleting the cells (see Figure 12.14). Be aware that you can inadvertently create a lopsided table by deleting single cells, thereby leaving fewer cells in one row or column than are contained in the other rows or columns in the table.
Figure 12.14. Choose the adjustment you want to make to the table's structure after you delete a single cell.
Merging and Splitting Cells
Occasionally, you create a table with information in separate cells that you later decide should be merged into a single cell. Perhaps you realize that there isn't enough width to create all the columns you wanted, but you do have room to extend the information vertically, in deeper rows.
Merging cells solves this problem. Select the cells you want to merge and choose Table, Merge Cells; or from the Tables and Borders toolbar, click the Merge Cells button; or right-click and choose Merge Cells from the shortcut menu. |
Word combines all the selected cells in each row into a single cell. The information that originally was in separate cells is separated with a paragraph marker within each new cell. The new cell is the same width as all the previous cells combined and can be adjusted with any of Word's column width tools. The overall width of the row is not changed; nor are the widths of other cells in the same column that you did not select.
Figure 12.15 and Figure 12.16 show a typical before-and-after example of using Merge Cells.
Figure 12.15. Cells before merging…
![]()
Figure 12.16. …and after merging.
![]()
NOTE
You can also merge cells from two rows, or merge cells in both rows and columns at the same time. It always works the same way: Select the cells you want to merge, and then choose Merge Cells from the menu, shortcut menu, or Tables and Borders toolbar.
Conversely, you may sometimes find that you need to split one table cell into two, perhaps to customize a form or some other complex layout. To do so, follow these steps:
Right-click inside the table cell you want to split.
Choose Split Cells from the shortcut menu. Word displays the dialog box you see in Figure 12.17.
Figure 12.17. Use this dialog box to split cells in a table.
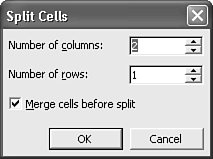
In the Number of Columns scroll box, specify into how many columns you want to split the cell.
In the Number of Rows scroll box, specify into how many rows you want to split the cell.
Click OK. Word divides the cell you've chosen into the number of rows and columns specified.
All the text that appeared in the original cell now appears in the first cell, unless one or more paragraph marks appeared in the original cell. In that case, Word will follow your paragraph marks, placing text after the first paragraph mark into the second cell, text after the next paragraph mark into the next cell, and so forth.
TIP
You can use this technique to quickly create an entire table with rows and columns of equal size. Use the Draw Table toolbar button to draw a large one-cell table, and use Split Cells to create the correct number of rows and columns, while retaining the overall dimensions of the table.
Cutting or Copying Table Information
To move or copy information from one cell to another, select the text and use standard drag-and-drop methods (drag to move, Ctrl+drag to copy), or use the Cut, Copy, and Paste commands. To replace the contents of the destination cell, select the entire source cell, including its end-of-cell marker. To retain the contents of the destination cell, select text but not the end-of-cell marker in the source cell.
If the text you move or copy contains character formatting, both the text and its formatting appear in the destination cell; however, you cannot move or copy any cell formatting, even if you include end-of-cell markers. Cell formatting includes borders, shading, text alignment, and text direction.
You can also use standard drag-and-drop or Cut, Copy, and Paste commands to move entire rows or columns by selecting entire rows or columns before you move. When you move or copy a row or column, Word automatically overwrites the destination cells with the source information because the source selection contains end-of-cell markers.
Copying and Moving Entire Tables
After you have a table looking the way you want, you might want to copy or move it elsewhere in your document. To do so, choose Table, Select, Table to select the table. Then cut or copy it, and paste the table using whatever methods you prefer.
Word also enables you to move or copy entire tables by dragging and dropping them:
To move a table, click and hold the selection handle at its upper-left corner, drag the table to its new location, and release the selection handle.
To copy a table, click and hold the selection handle at its upper-left corner, press and hold the Ctrl key, drag the table to its new location, and release the selection handle.
TIP
You can select a formatted table and store it as an AutoText entry, making it easy to insert anytime you want. Choose Table, Select, Table; then choose Insert, AutoText, New. Enter a one-word name for the AutoText entry in the Create AutoText dialog box and click OK.


