Converting Text to Tables
Sometimes you might need to convert text into a table format, or the other way around. For example:
You might have an old table created using tabs; you now want to revise it, and it is easier to make the revisions by using tables.
You might have a print merge or database file that was created or exported in tab-delimited or comma-delimited (comma-separated) format.
You might have text that you decide would simply look better in table format.
To create a table using existing text, first make sure that the text contains a separator character Word can use to identify where it should start new table cells and rows. It's common for documents to use tabs or commas in locations where you'll want new cells and to use paragraph marks in locations where you'll want new rows. However, as long as the document is consistent, Word lets you work with any separator characters that may be present.
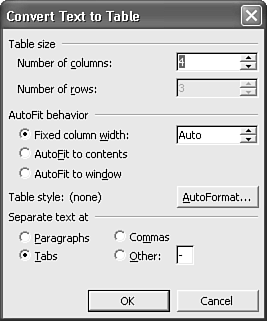
After you've checked the document, select the text you want to convert; then choose Table, Convert, Text to Table. The Convert Text to Table dialog box appears, as shown in Figure 12.33.
Figure 12.33. The Convert Text to Table dialog box gives you extensive control over how Word transforms text into a table.

When the dialog box opens, Word shows you its best guess as to the Number of Columns required and how you want the text to be separated. If, for example, you have selected tabbed material, Word is likely to assume that you want to Separate Text at Tabs. The result: Word starts a new cell every time it encounters a tab mark.
If the only breaks Word can find are paragraph marks, Separate Text at Paragraphs is likely to be marked. If you leave this marked, Word starts a new cell every time it encounters a paragraph mark. You can also change the setting to Tabs, Commas, or Other. This last option allows you to enter whatever separator character you want in the text box next to the button.
Some Tips for Better Text-to-Table Conversions
It is generally easier to convert text in which tabs or commas split cells than those in which all you have are paragraph marks. First, much of the text you will want to reformat as tables was probably originally created with tabs. (Commas are often used to separate fields in exported database files.) A more important reason, however, is the difference in how Word handles the text-to-table conversion.
When you are converting from tabbed or comma-delimited material, Word recognizes a paragraph mark (or line break) as its cue to start a new row. Word also is smart enough to create a table that accommodates the line with the most commas or tabs. All this means is that you can easily convert long lists of text into tables.
However, if you choose paragraph marks, Word can no longer tell when to end a row. It places each paragraph (or each chunk of text ending with a line break) in its own row. The result is a one-column table.
If you have a table of moderate length, you can use Edit, Replace to swap all the paragraph marks (^p) in the selected text for tabs (^t). Then manually restore the paragraph marks where you want each row to end. Finally, use Table, Convert Text to Table.
If you are converting from tabbed text, whenever Word sees a tab, it places the text that follows the tab in a new cell to its right. Sometimes people use extra tabs (in the place of blank data) to make sure that all the text lines up properly.
Extra tabs can create havoc when you convert from text to table because Word creates unwanted empty cells. Of course, this does not happen if custom tabs are set, replacing the 0.5" default tabs.
If you are converting from comma-delimited text, make sure that your document contains commas only where you want cell breaks. Sometimes a comma is really just a comma. It is easy to be thrown off by city/state addresses ("Fort Myers, FL" would be split into two columns) and by numbers ("1,000,000" would be split into three columns).
Controlling Widths and AutoFitting When Converting Text to a Table
Working from the Convert Text to Table dialog box, you can specify the column width manually by setting a Fixed Column Width. Or, if you prefer, you can specify one of Word's AutoFit options to enable Word to control your column widths. AutoFit to Window adapts your column widths depending on the display device and browser software with which your page is being displayed. AutoFit to Contents adapts the column's width based on the width of text in the column. You can also click AutoFormat to select an automatic table format from Word's AutoFormatting dialog box.
When you finish establishing settings, click OK, and Word converts your text to a table.
TIP
If you don't like the results of your text-to-table conversion, use Undo Text Table immediately. If you change your mind later, you can still revert to text by using Convert Table to Text, as described next. But you have to accurately specify whether Word should use paragraph marks, tabs, or commas to divide the contents of the table.
If you use tabs, you might also need to adjust the tab settings Word creates, which match the cell borders of the table you just eliminated.
Converting Tables to Text
As you might expect, just as you can create a table from text, you can also convert a table back to straight paragraph text. To do so, follow these steps:
Select the entire table you want to convert.
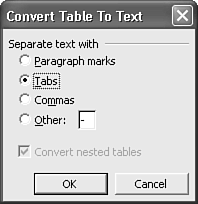
Choose Tables, Convert Table to Text. The Convert Table to Text dialog box appears (see Figure 12.34).
Figure 12.34. Deciding what settings to use in converting a table to text.

As with creating a table from text, you need to choose how Word separates the text. In the Separate Text With area, choose one of the following options: Paragraph Marks, Tabs, Commas, or Other. If you choose Other, type the character you want Word to insert when it comes to the end of each row.
Click OK. Word converts the selected table into regular text, breaking at the separator you chose.
TIP
Word also converts nested tables, but only if you specify Separate Text with Paragraph Marks.


