Word's Multiple Approaches to Creating a Table
Depending on the kind of table you want, and how you prefer to work, Word offers several approaches to drawing a table:
 If you need to create a simple table and you know how many rows and columns you need, but you don't need to control anything else, you can use the Insert Table button on the Standard toolbar.
If you want to control the number of rows and columns, but you also want to control column width at the same time, choose Table, Insert, Table to work from the Insert Table dialog box.
 If you prefer to draw your tables freehand, or if you need tables with varying row and column sizes, click the Tables and Borders button on the Standard toolbar (or choose Table, Draw Table) and use the tools on the Tables and Borders toolbar.
If you already have information in tabular form, or you've imported information in a standard format such as comma-delimited, use Word's Convert Text to Table feature, covered in the "Converting Text to Tables" section of this chapter.
If you learned to create "fake tables" on a typewriter, using hyphens (rows) and plus signs (columns), do the same thing in Word; when you press Enter at the end of the first line, Word transforms your typing into a real table.
The following sections cover each of these methods in more detail.
TIP
Know how your table will be used before you format it. If your document will be published in a journal, a magazine, or even a company brochure, find out what the publisher's needs are. Find out whether the table will be a graphic element placed in the text before printing or whether it will be laid out as a table within the text. Many scientific journals ask that you include your tables on separate pages at the end of your manuscript, one table per page.
Unfortunately, in certain cases, your publisher may not accept Word tables at all. In this case, use Word's Table, Convert, Table to Text feature to replace table cells with tabs or other document elements that the publisher can use. For more information, see the "Converting Tables to Text" section, later in this chapter.
Creating Neat Rows and Columns with the Insert Table Button
In many tables, each column is the same width, and each row is the same height. Word makes it easy to create tables such as these. If you need to make modifications later?perhaps adjusting the width of just one column?it's easy to do.
 For more information about changing the width of a table, see "Controlling the Width of Columns," p. 421.
To create a table in which each column is the same width and each row is the same height, follow these steps:
Click the Insert Table button in the Standard toolbar. A set of rows and columns appears under the button, similar to a shortcut menu.
Drag the mouse pointer down as many rows as you need. Word automatically adds rows as you drag. You see the number of rows highlighted as you go.
Still pressing the mouse button, drag the pointer across, covering as many columns as you need. Again, you see the number of columns highlighted (see Figure 12.1).
Figure 12.1. Clicking the Insert Table button displays a white grid of cells. Drag down and across to specify the number of rows and columns you want.
TIP
It helps to have a rough idea of how many rows and columns you'll ultimately need, but don't worry about it too much. After the table is created, it's easy to add and delete rows and columns.
When you are satisfied, let go of the mouse. Word creates a table, as shown in Figure 12.2.
Figure 12.2. When you release the mouse pointer, the table appears in your document.

Word sets the height of each row in your table to match the height of surrounding paragraphs. By default, this is 12-point (in other words, six lines to an inch). However, if your surrounding paragraphs use different line-spacing settings, your tables match those instead.
Word sets the width of each column by calculating the width between the margins you've set and dividing that width equally among the number of columns you specify.
Controlling Column Widths When You Create a Table
Although you can change the width of a column anytime you want, sometimes you may want to set widths precisely as you insert the table?or tell Word how to automatically set them for you. To do so, use the Insert Table dialog box, as described here:
Click in your document where you want the table to appear.
Choose Table, Insert, Table, and the Insert Table dialog box appears (see Figure 12.3).
Figure 12.3. Inserting a table using the Insert Table dialog box.
Specify the Number of Columns and Number of Rows you want in the table.
Next, specify column width, choosing one of three options:
You can set a precise width to be used by all the columns in your table by clicking in the Fixed Column Width scroll box and entering (or scrolling to) the value there, which is set in inches by default.
You can choose AutoFit to Contents, which enables Word to widen or narrow columns based on the contents you insert in them. Word adjusts the columns as you type within the cells. This feature works in regular Word documents as well as documents saved as Web pages.
You can choose AutoFit to Window, which adjusts the width of every cell based on the width of the screen of the individual viewing it. For example, if you change your monitor from displaying at 640x480 to 800x600, your cells widen. This feature works only with documents saved as Web pages and viewed from within Word or a Web browser.
If you want to use one of Word's built-in AutoFormats to format your table now, click AutoFormat and work in the AutoFormat dialog box. (This feature is covered later in the chapter, in the section "Using Table Styles to AutoFormat a Table.")
If the settings you've established reflect the way you'll usually want your tables to look, check the Remember Dimensions for New Tables check box.
When you're finished, click OK. Word inserts your table into your document.
NOTE
After you create a table, it's easy to change its AutoFit setting. Select the table; choose Table, AutoFit; and choose whichever setting you prefer: AutoFit to Contents, AutoFit to Window, or Fixed Column Width.
TIP
A quick way to AutoFit a column containing a single word or number is to double-click the column boundary at its right. When cells contain multiple words or numbers, each double-click expands the column incrementally until all the data fits on a single line.
Drawing Tables Freehand with Word's Draw Table Feature
Word provides an even more intuitive way to insert tables: You can simply draw them with your mouse, much as you might draw them with a pencil on a piece of paper. Don't worry if you can't draw a straight line; Word straightens your lines for you.
Draw Table is ideal for creating tables that contain uneven columns or rows?similar to the table you see in Figure 12.4.
Figure 12.4. Using the Draw Table feature, you can easily create a table similar to this one.
To draw a table, follow these steps:
Click the Tables and Borders button on the Standard toolbar. If you're not there already, Word switches to Print Layout view and displays the Tables and Borders toolbar. (Most of this toolbar's buttons remain gray until you create a table.) See Table 12.1, later in the chapter, for a description of each button on the Tables and Borders toolbar.
Click in the document where you want to begin drawing the table. The mouse pointer icon changes to a pencil.
Drag the mouse pointer down and to the right margin until the outline that you see while dragging appears to be the approximate size you want for the outside boundaries of the table.
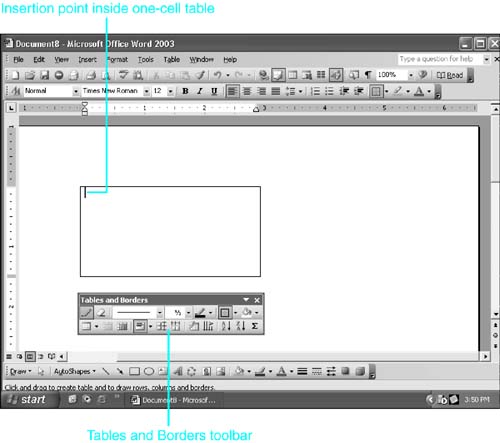
When you release the mouse button, the insertion point appears inside the table, which looks like a box; the Tables and Borders toolbar also appears, as shown in Figure 12.5.
Figure 12.5. Drawing a table.
You now have a table consisting of one large cell (the intersection of a row and a column). To create multiple cells that appear in rows and columns, you can draw additional columns and rows inside the original cell, roughly where you want them to appear. As long as you start or finish the lines near a cell border, Word automatically extends and straightens lines that you've drawn only part way. Word provides a visual cue to tell you whether you've connected to a border: When you have, the border is temporarily shaded blue.
NOTE
If your lines come nowhere near an existing cell border, Word may insert a nested table instead?a second table within a table. If this isn't what you want, click Undo to back up a step.
If you draw a line where you don't want one, click the Eraser button on the Tables and Borders toolbar and drag across the line until it disappears.
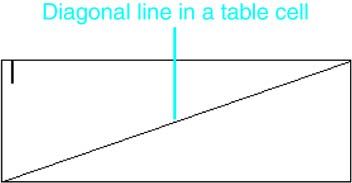
You can also use Draw Table to draw diagonal lines that extend across an individual cell. To do so, click the Draw Table toolbar button; then click in one corner of a cell and drag to the other corner.
You can use diagonal lines to call attention to the fact that a cell contains no data, as shown in Figure 12.6. Notice that drawing diagonal lines does not actually divide a rectangular cell into smaller triangular cells: If you type in the cell, your text will overlap the diagonal line.
Figure 12.6. Creating diagonal lines in a table cell.
When you finish drawing the table's rows and columns, click the Draw Table toolbar button again, and your mouse pointer reverts to its normal state. You can now edit or format the table as you want (or work elsewhere in the document).
Now that you have a table, you can polish it any way you want. For example, if you want several of your columns to be the same width, select them, right-click on them, and choose Distribute Columns Evenly from the shortcut menu. Or, after you enter text in a cell, you can turn that text sideways by clicking Change Text Direction on the Tables and Borders toolbar. Table 12.1 shows the options available on this toolbar.
Button | Function |
|---|---|
| Draws a table. |
| Erases borders in a table. |
| Specifies the style of line used when drawing. |
| Specifies the thickness of the line used when drawing. |
| Specifies the color of the line used when drawing. |
| Specifies where borders should appear around a cell, group of cells, or table. |
| Specifies a cell shading color. |
| Displays the Table shortcut menu, offering choices for inserting columns, rows, and cells, and controlling column width. |
| Merges selected cells. |
| Splits a selected cell into multiple cells. |
| Enables you to choose the alignment of text in a cell or cells you select. |
| Formats the rows you select with equal heights. |
| Formats the columns you select with equal widths. |
| Displays the AutoFormat dialog box, where you can choose how you want to automatically format the table. |
| Changes the direction of text in a cell. |
| Sorts selected entries in ascending order (A?Z). |
| Sorts selected entries in descending order (Z?A). |
| Adds the values above or to the left of the cell containing the insertion point and inserts the sum in the cell in which you've clicked. |
In addition to the Tables and Borders toolbar, you can find tools for working with tables in the Table menu and in the Table shortcut menu that appears whenever you right-click inside a table (see Figure 12.7).
Figure 12.7. The Table shortcut menu appears whenever you right-click inside a table.
Creating a Table from the Keyboard
If you're more comfortable working with the keyboard, you can also type a pattern that represents the kind of table you want, with plus signs corresponding to cell borders and minus signs corresponding to units of width within a cell. Here is an example:
+-----+-----+-----+
After you type the line, press Enter. Word inserts a one-row table. Each cell is the same width as the number of hyphens you typed between plus signs.
NOTE
If this feature does not work, make sure it is turned on in the AutoFormat As You Type tab of the AutoCorrect dialog box. Choose Tools, AutoCorrect Options; click the AutoFormat As You Type tab; check the Tables check box; and click OK.
Creating Side-by-Side Tables
Word can create tables that appear side by side on your page, as shown in Figure 12.8.
Figure 12.8. An example of side-by-side tables.
To create two tables on the same line, follow these steps:
Insert the first table using Draw Table on the Tables and Borders toolbar, or the Insert Table dialog box (choose Table, Insert, Table).
CAUTION
Don't use the Insert Table button on the Standard toolbar?it uses up all the space between your left and right margins, leaving no room for another table.
To the right of the existing table, use Draw Table to draw another table. Word inserts the table with a .5" border and adds unbordered table cells between the two tables (creating the illusion of a second table but actually simply extending the first table).
Creating Nested Tables
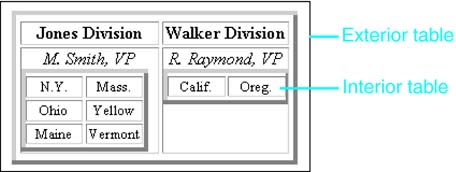
Word enables you to create tables within tables, called nested tables. This technique is primarily used in building Web pages. It can give you more control over the appearance of your table, by allowing you to more precisely control where information in your table appears. Sample nested tables are shown in Figure 12.9.
Figure 12.9. An example of nested tables.
To create a nested table within an existing table, first click inside the table where you want the nested table to appear. Then create a new table, using any of Word's table creation tools: the Insert Table button on the Standard toolbar, the Draw Table button on the Tables and Borders toolbar, or the Insert Table dialog box.
CAUTION
If you're concerned about how quickly your Web pages will display on browsers, use nested tables sparingly; they tend to display more slowly than ordinary tables. In particular, avoid creating complex nested tables. Especially avoid nesting tables within other nested tables.
TIP
You can copy existing nested tables into Word from a Web browser and edit them to meet your needs. Nested tables copy into Word with surprising fidelity.


