Working with Table Properties
Microsoft provides extensive control over tables through the Table Properties dialog box. From here, you can control all these options and more:
Table height and width
The height of individual rows
The width of individual columns
The alignment of your table on a printed or Web page
Whether text should wrap around your table, and if so, how it should wrap
The vertical alignment of text within individual cells
Whether a header row should repeat across multiple pages
Cell margins and whether any individual cells should have unique margins
The following sections walk you through the use of Table Properties?and in some cases, show you faster or easier ways to achieve the same goals.
Setting the Properties for an Entire Table
Word provides settings you can use to control the appearance or behavior of an entire table. To work with these settings, right-click on the table and choose Table Properties from the shortcut menu. Then click the Table tab, shown in Figure 12.26.
Figure 12.26. Controlling table settings that affect the entire table.
Controlling the Preferred Width of a Table
The first option in the Table tab allows you to specify a preferred width for your table?an overall table width that is to be used unless you choose other settings or display the table on a browser or monitor that makes your preferred width impossible to use. To set a preferred width for the entire table, check the Preferred Width check box and enter the width in the scroll box that appears next to it.
As with many of Word's measurement-related features, you can set your measurement either in inches or in percent?a percentage of the width of the screen. If you're creating a Web page, using percentages enables a viewer's browser to adjust how it displays your table so that the entire table is visible no matter what monitor (or monitor settings) your viewer is using. The browser formats the table as a percentage of the width available.
CAUTION
As always when creating Web pages, test your pages to see how they will actually display on the browsers and monitors you expect your site's visitors to use.
Controlling the Alignment of a Table
By default, Word tables start at the left margin, but you can choose to start them anywhere on your page. If you're inserting a new table, you can use the Draw Table button on the Tables and Borders toolbar and start drawing the table anywhere on the page. No matter how you insert the table, however, you can adjust its alignment any way you want, using the Alignment settings on the Table tab of the Table Properties dialog box.
To specify whether your table is left-aligned, center-aligned, or right-aligned on the page, click the sample table above the Left, Center, or Right windows. Or, to set a precise indentation from the left margin, enter the value in the Indent from Left scroll box.
Using an Indent from Left setting is often the best way to get precise control over alignment because your table doesn't move unless you change the left margin. With centering, in contrast, your table adjusts every time the total width of all its columns changes. This tends to happen often.
NOTE
These table alignment settings don't affect the alignment of text within each cell of a table. You can control horizontal text alignment using the same tools you use outside a table, including the Left Align, Center Align, and Right Align buttons on the Formatting toolbar.
And, as you'll see later in this chapter, you can control vertical alignment of text within a cell by using the Cell tab of the Table Properties dialog box.
Controlling Text Wrapping Around a Table
Word permits you to run text around a table, just as you could if it were a graphic.
To do so, locate the Text Wrapping portion of the Table tab in the Table Properties dialog box, and click the Around table sample. After you click Around, the Positioning button becomes available.
To adjust how text wraps around your table, click Positioning; the Table Positioning dialog box appears, as shown in Figure 12.27.
Figure 12.27. Controlling how text wraps around a table.
The Horizontal and Vertical controls specify where the table appears in relation to the surrounding text, and the Distance from Surrounding Text section of this dialog box controls how far text appears from the table when wrapping around it.
Controlling the Horizontal Relationship of a Table to Surrounding Elements
By default, the Horizontal controls set the table so that it appears to the left of surrounding text. You can, however, choose Center or Right instead; these move the table to the center of the page or the right margin, respectively.
You can also set the Horizontal position to choose Inside and Outside; these settings move the table to the inside or outside the page and then adjust the location of the table automatically if an odd-numbered page becomes an even-numbered page, or vice versa.
For example, in most books, page 1 is a right-hand page; choosing Outside would display the table toward the right edge of that page. However, if you edit the book so that the table now appears on page 2, Word moves it automatically to the left edge of the page?and moves the surrounding copy to the right edge.
As covered in Chapter 5, "Controlling Page Features," Word enables you to create multiple-column documents, in which text snakes from the bottom of one column to the top of the next. This is a technique you might use in newsletters and magazines.
In one-column documents, of course, it makes no difference whether you measure a table from the margin of your current column or your page margin. In multiple-column documents, however, there is a difference?and Word allows you to control the position of your table in reference to either the column margin or the page margin.
Use the Relative To drop-down box to specify what you want Word to measure your table's position against: Margin, Page, or Column.
Controlling the Vertical Relationship of a Table to Surrounding Elements
The settings described in the preceding section cover the table's horizontal relationship to its surroundings; you can also control its vertical relationship. By default, the table and its surrounding text both start at the same point on a page, as shown in Figure 12.28. However, if you choose, you can specify that the table begin higher or lower by setting a different value in the Vertical Position combo box. For example, specifying .75" tells Word to insert .75" of the surrounding text before starting the table, as shown in Figure 12.29.
Figure 12.28. Word's default setting: Table and text begin together.
Figure 12.29. Using Vertical Position to start a table .75" lower on the page than the surrounding text.

By default, this measurement is set off against the surrounding paragraphs of text, but you can tell Word to set the vertical position against the top or bottom page margin, or against the edge of the page itself. To do so, choose Margin, Page, or Paragraph in the Vertical Relative To scroll box.
Controlling the Distance Between a Table and Surrounding Text
When you wrap text around a table, Word places no extra space above or below a table; it places .13" to the left or right of the table. Using the Table Positioning dialog box, you can change each of these settings by entering new values in the Top, Bottom, Left, and Right scroll boxes.
Word moves your table with the surrounding text as you make edits to your document. If you want the table to remain anchored in a specific location even as surrounding paragraphs move, clear the Move with Text check box.
By default, Word prevents tables from overlapping text or pictures in documents saved as Web pages. If you want to permit overlap?perhaps for reasons of graphic design?check the Allow Overlap check box.
Setting Default Margins for All the Cells in a Table
Each cell in a Word table has its own left, right, top, and bottom margins: the space between the edge of text and the border of the cell. (In an HTML document, this is known as cellpadding.) By default, the top and bottom margins of cells are zero; the left and right margins are .08". Similarly, Word does not typically provide for any spacing between cells.
It's unlikely that you'll need to change these margins in printed documents, but many Web designers need more control over cell margins and spacing?and Word provides that control. To control these settings, return to the Table tab of the Table Properties dialog box and click the Options button. The Table Options dialog box appears (see Figure 12.30).
Figure 12.30. Make changes to your table in this dialog box.
To change the default cell margins in your current table, enter new values in the Top, Bottom, Left, or Right scroll boxes. To change Word's default setting of no spacing between cells, check the Allow Spacing Between Cells check box and enter a value in the scroll box next to it.
By default, Word automatically resizes columns in a table to accommodate the content you place in them?for example, extending a column as you type text too long to fit in it. If you don't like this feature?and many Word users find it annoying?clear the related check box.
Controlling the Height of Rows
By default, when you create a table, Word uses a row height of "one line." "One line" starts out equal to one line in the preceding paragraph. As you work within the table, "one line" can grow or shrink depending on the type size you use on each row. When Word shrinks or enlarges a row's height, it generally does so for all the cells in the row.
Word provides several ways to change row height. The first involves simply dragging the row's borders where you want them. This is visual and easy, but it works on only one row at a time?and unless your eye-hand precision is outstanding, it's also approximate. The second method takes you into the Table Properties dialog box, so it involves a few more steps; but it is highly precise and can control many rows (or an entire table) at once.
You might want to take a hybrid approach. First, manually adjust one row as described previously. Examine its properties to see the measurements you created. Then, display the Table Properties dialog box and change all rows to match the same measurement.
Changing a Row's Height by Dragging Its Borders
In Print Layout or Web Layout views, you can change the height of one row within a table by dragging its borders, as described here:
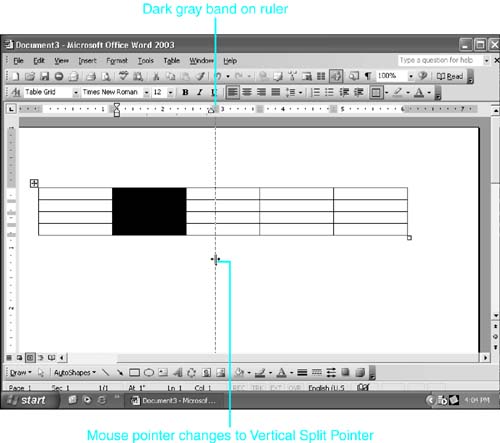
In the table, point the mouse pointer to the bottom of the row you want to change. The mouse pointer changes to display vertical arrows.
Click and drag the row's border up or down to shrink or enlarge the row's height.
Release the mouse pointer when you're finished.
TIP
You can also use the vertical ruler to move a row's border: Drag the dark gray band immediately to the left of the row you're adjusting.
TIP
If you want to see the exact measurements of rows or columns as you drag their borders, press the Alt key as you drag; the changing measurements will appear in the vertical or horizontal ruler.
Changing Row Height Through the Table Properties Dialog Box
To change the height of table rows using the Table Properties dialog box, follow these steps:
Select the row or rows you want to adjust.
Choose Table, Table Properties.
Click the Row tab.
Check the Specify Height check box.
Enter the row height you want in the Specify Height scroll box.
In the Row Height Is drop-down box, choose whether Word must follow your row height Exactly, or whether Word can use your row height as a minimum (At Least).
If you want to control rows above the ones you selected, click Previous Row. If you want to control rows below the ones you selected, click Next Row.
When you're finished, click OK.
If Word is displaying only part of the text in a table cell, see "What to Do If Word Cuts Off the Tops of Letters in a Table Cell," in "Troubleshooting" at the end of this chapter. |
Making Sure Several Rows Have the Same Height
Sometimes, you're not that concerned with the precise height of rows in a table, but you do want them all to have the same height so that the table looks as professional as possible.
To accomplish this, first select the rows you want to adjust. Then choose Table, AutoFit, Distribute Rows Evenly. (Or, if the Tables and Borders toolbar is displayed, click the Distribute Rows Evenly button.)
Word reformats the rows you selected so that they are all the same height. If the rows are empty, or have text that is all the same size, Word distributes the rows so that they take up the same amount of height they did before; in short, if all the rows together were 3" high before, they will still be 3" high. However, if the rows contain text of differing sizes, Word distributes the rows to reflect the largest text so that no letters are cut off in any row?even if this means that some rows are much larger than necessary.
Controlling the Width of Columns
Often, the column widths you set when you create your table need to be adjusted later, as you modify the content that goes into the table. For example, you may have created a descriptive first column followed by many shorter columns of numbers. Or, in a glossary, your first column might include just a word or a phrase, but your second column might include a detailed explanation.
Earlier in this chapter, you learned how to use AutoFit to enable Word to control your column widths. However, you sometimes need to control your column widths manually, and Word provides several ways to do so. As with rows, you can adjust column widths directly by dragging their borders, or via the ruler, or through the Table Properties dialog box.
Changing Column Width by Dragging Its Edge
The easiest way to adjust a column's width is usually to drag the edge of the column with the mouse pointer. To do so, position the mouse pointer anywhere on the column's right gridline or border. Next, drag the gridline or border left or right to the location you want, and release the mouse pointer.
Unless you're adjusting the last column in your table, the width of the following column changes to compensate for the widening or narrowing you've just done, so your overall table retains the same width.
Changing Column Width Using the Horizontal Ruler
You also can change column width in the horizontal ruler. As you can see in Figure 12.31, when you are within a table, the table's column borders are shown on the horizontal ruler. You can change these column borders by positioning the mouse pointer on the border shown in the ruler (avoiding the indent markers) and dragging to the new border that you want. The columns that follow shrink or enlarge to compensate, unless you are changing the last column.
Figure 12.31. Changing a column's width with the horizontal ruler.
Changing Column Width Through the Table Properties Dialog Box
If you need more precise control over your column width, or if you want to change a column's width without changing the width of the others, display the Column tab of the Table Properties dialog box, and perform these steps:
Check the Specify Width check box.
Enter the Column Width you want in the Specify Width scroll box.
In the Column Width Is drop-down box, choose whether Word should measure your column width in inches or as a percentage of the overall width of your table (Percent of Table).
NOTE
The Percent of Table setting is used primarily on Web pages and enables your columns to adjust themselves automatically based on your other settings and the monitor and browser being used to show your page.
If you want to control columns to the left of the ones you selected, click Previous Column. If you want to control columns to the right of the ones you selected, click Next Column.
When you're finished, click OK.
Making Sure Several Columns Have the Same Width
Sometimes, you're not that concerned with the precise width of columns in a table, but you do want them all to be the same width. To accomplish this, first select the columns you want to adjust. Right-click anywhere on the columns you selected, and choose Distribute Columns Evenly from the shortcut menu.
Controlling the Properties of Individual Cells
Just as Word gives you extensive control over the properties of tables, rows, and columns, you can also control the properties of individual cells. These include
The width of the specific cell
The vertical alignment of text or other elements within the cell
Whether the cell shares the same margins and wrapping options as the rest of the cells in the table
Changing a Cell's Width by Dragging Its Edge
The easiest way to adjust a cell's width is to drag the edge of the cell with the mouse pointer. To do so, select the cell; then place the mouse pointer anywhere on the cell's right gridline or border. Next, drag the gridline or border left or right to the location you want, and release the mouse pointer.
Unless you're adjusting a cell in a column that's on the right edge of your table, the width of the adjacent cell changes to compensate for the widening or narrowing you've just done, so your overall table retains the same width.
If you're widening the last column, your cell "bulges outward" to the right. Conversely, if you're narrowing the last column, your cell may be indented inward. Make sure that this is what you really intend. Often, it isn't.
Changing the Width of Cells Through the Table Properties Dialog Box
Sometimes you need more precise control over the width of an individual cell (or cells). Or you may want to adjust a block of cells at once, without changing entire rows or columns. Or you may want to adjust one cell without also changing the adjacent cell.
In these cases, you need to work from the Table Properties dialog box. To change the width of cells using the Table Properties dialog box, do the following:
Select the cell or cells you want to adjust.
Choose Table, Table Properties.
Click the Cell tab.
Check the Preferred Width check box.
Enter the cell width you want in the Preferred Width scroll box.
In the Measure In drop-down box, choose whether Word should measure your column width in inches or as a percentage of the overall width of your table (Percent of Table).
Click OK.
Controlling the Vertical Alignment of a Cell's Contents
By default, Word starts the contents of individual cells at the upper-left corner of the cell, but this may not always be what you want. For example, if some of the cells in a row are very deep, the result can be an unbalanced, unattractive design.
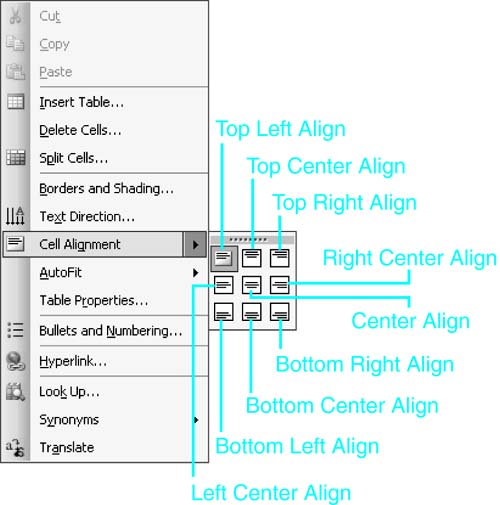
Word enables you to control both vertical and horizontal alignment at the same time. Select the cell or cells you want to adjust, right-click to display the shortcut menu, and click the right arrow next to the Cell Alignment command. Then choose one of the nine options that appear (see Figure 12.32).
Figure 12.32. Choosing a cell alignment from the shortcut menu.
TIP
If you've displayed the Tables and Borders toolbar, you can get the same choices by clicking the Cell Alignment (Align Top Left) button.


