Creating Custom Dictionaries for Custom Needs
When you use Word's spell checker to add words to your dictionary, Word stores these in a custom dictionary file called custom.dic. It then consults custom.dic whenever you run a spell check?thereby making sure that it doesn't flag words as incorrect that you indicated are accurate. If you want, you can also create other custom dictionaries?up to 10?for special purposes. For example, if you do legal editing on only Tuesdays and Thursdays, you can maintain a legal custom dictionary and use it on only those days.
The following sections show you how to work with Word's custom dictionaries.
Creating a New Custom Dictionary
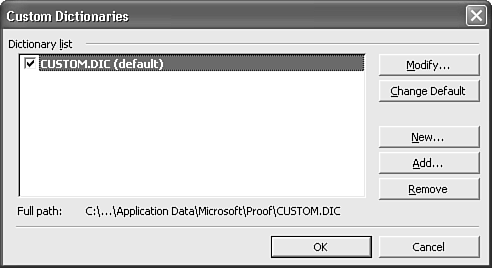
To create a new custom dictionary, choose Tools, Options, Spelling & Grammar, and click Custom Dictionaries. The Custom Dictionaries dialog box appears (see Figure 8.6), listing custom dictionaries that already exist. Dictionaries that are currently enabled?in other words, dictionaries Word is currently using in spell checking?appear checked.
Figure 8.6. The Custom Dictionaries dialog box shows the custom dictionaries being used during a spelling and grammar check.

To create a new dictionary, click New. The Create Custom Dictionary dialog box opens. Enter a name for your dictionary and click Save. The dictionary now appears checked in the Custom Dictionaries dialog box. Note that words you add to custom dictionaries during a spell check are placed in the Default custom dictionary?whichever one is currently listed first.
Disabling a Custom Dictionary
From the Custom Dictionaries dialog box, you can also make a custom dictionary unavailable by clearing its check box. While the dictionary is unavailable, keeping it in the list allows you to make it available again without first browsing your system to locate it.
To make the dictionary disappear entirely from the list of dictionaries, select it and click Remove. Note that this doesn't erase the dictionary file; you can use the Add button to locate it, place it back on your list, and make it available again.
Choosing a Custom Dictionary While Spell Checking
Suppose, during a spell check, that you find a word you want to add to a custom dictionary other than the default custom.dic file that Word normally uses. To select a different custom dictionary, perform these steps:
Make sure that the word you want to add appears highlighted in the Spelling and Grammar dialog box.
Click Options.
Click Custom Dictionaries.
Make sure that a check mark appears next to the custom dictionary where you want to store words.
If the dictionary you want to use is not the default dictionary, select it, and click Change Default. After you change the default custom dictionary, Word places all words you add in that custom dictionary until you change it again.
Click OK twice to return to the Spelling and Grammar dialog box.
Click Add to add the word to the dictionary you've selected. Any additional words you add to the custom dictionary will be placed in the dictionary you've selected, until you choose a different one.
Continue checking spelling and grammar as usual. If you want to add words to a different custom dictionary, change the custom dictionary by following steps 1?5 again.
Editing a Custom Dictionary
While you're spell checking, it's easy to mistakenly add words to the custom dictionary that shouldn't be there. If you do enter words in a custom dictionary by mistake, however, it's easy to delete them. You can also manually add lists of words to a custom dictionary?you don't have to wait for them to show up in your documents. For example, you might want to add the last names of all the employees in your company or the company names of all your clients.
There are two ways to edit a custom dictionary. If you simply want to add or delete one word, or a few words, Word provides a dialog box that makes this easy. If you want to add many words at once, you can edit the .dic file manually. Each approach is covered next.
Adding and Deleting Individual Words from a Custom Dictionary
To add or delete a single word from a custom dictionary, display the Spelling & Grammar tab of the Tools, Options dialog box; then follow these steps:
Click Custom Dictionaries.
Select the dictionary you want to edit.
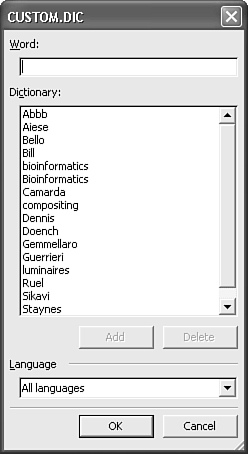
Click Modify. Word displays a dialog box listing all the words in the custom dictionary you selected (see Figure 8.7).
Figure 8.7. Word displays a dialog box that simplifies the editing of custom dictionaries.

To add a new word, type it in the Word text box and click Add.
To delete an existing word, choose it from the Dictionary scroll box and click Delete.
When you've finished making changes to your custom dictionary, click OK.
COPYING LARGE NUMBERS OF WORDS INTO A CUSTOM DICTIONARY
The dialog box covered in the preceding section is designed to work one word at a time. If you want to add many words to a custom dictionary, you can do so. Because word dictionary files are ASCII (text only) lists of words with a .dic extension, you can use Word to open them and look at them.
When you open a custom dictionary, you can add as many words as you want?either manually, or by cutting and pasting them from another file. The only limitation is that you must save the file as a Text Only (.txt) document and place only one word on each line.
NOTE
Word stores words in custom dictionaries in alphabetical order, with all capitalized words appearing before all lowercased words. However, you do not need to store your words in this order?you can insert them any way you want. Word reorganizes your list automatically the next time you add a word to this dictionary during a spell check.
To edit a custom dictionary manually (without using the Custom Dictionaries dialog box), perform the following steps:
Choose File, Open.
Browse to and open the custom dictionary. Typical Windows 2000 and Windows XP systems store custom dictionaries in the \Documents and Settings\profile\application data\microsoft\proof folder, where profile is the user profile associated with this installation of Office.
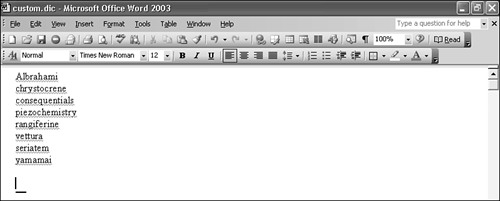
Copy or type the new words into the file. One word should appear on each line, separated from other words by a paragraph mark (press Enter, not Shift+Enter). Figure 8.8 shows a sample dictionary file being edited.
Figure 8.8. Editing a custom dictionary manually.

Save the file as a Plain Text (.txt) file. Be sure to change Word's default file extension from .txt to .dic.
Flagging "Correct" Words as Potential Errors
Occasionally, you might want to have the spell checker flag a word as a possible misspelling even though the word is in the dictionary. Suppose that you often mistype "liar" as "lira," both of which are spelled correctly. Because you write crime novels, not reports on European currency exchange, wouldn't it be nifty if the spell checker would always question "lira" as a misspelling, rather than assume that you know what you're doing?
You can't remove a word from Word's basic dictionary. You can, however, create a supplemental file called an exclude dictionary, which includes words you want to flag as problems even if they're spelled correctly.
CAUTION
When you create an exclude dictionary, all your Office applications will use it.
Like custom dictionaries, exclude dictionaries are ASCII files with one word on each line. Exclude dictionaries use the same filename as the main dictionaries with which they're connected, except that they have an .exc extension. They are stored in the same folder as the main dictionary.
For example, if you are using the default dictionary for American English, mssp3en.lex, then the name of the exclude dictionary you will create must be mssp3en.exc.
The default location for the exclude dictionary is the following path: Windows\application data\microsoft\proof.
To create an exclude dictionary, edit it manually and save it as Text Only with the correct name and extension in the correct folder. (Make sure that Word doesn't append a .txt extension to the filename, or it won't work.)


