Using Automatic Spelling and Grammar Checking
By default, when you open a file in Word, Word's automatic language feature checks the text to determine which language you are writing in. It then runs a spell and grammar check on all sections written in languages for which it has proofing tools. Because you probably write most documents in your default language, Word typically proofs your entire document.
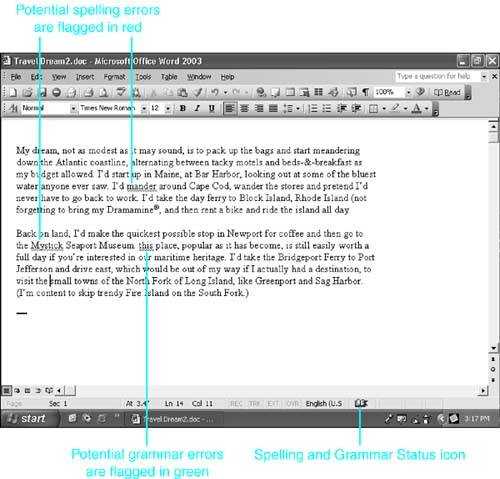
Word flags all possible errors with wavy underline marks, as shown in Figure 8.1. Potential spelling errors are marked with a red wavy underline?including words not in Word's dictionary, repeated words, apparent errors in capitalization, and combinations of words with the spaces missing. Word flags potential grammar errors with a wavy green line.
Figure 8.1. Potential spelling and grammar errors are flagged automatically by Word.
NOTE
Word can also track inconsistent formatting, if Format Tracking is turned on. To track formatting inconsistencies, choose Tools, Options, Edit, and check both the Keep Track of Formatting and the Mark Formatting Inconsistencies check boxes. Inconsistent formatting is marked with a wavy blue line. For more information on working with Format Tracking, see the "Using On-the-Fly Format Checking" section of Chapter 4, "Quick and Effective Formatting Techniques."
When Word is checking spelling or grammar, an animated icon appears in the status bar, showing a pencil writing and pages turning. When Word has completed checking spelling or grammar, the icon shown in Figure 8.1 appears.
 For more information about automatic language detection, see "Turning on Automatic Language Detection in Word," p. 1138.
TIP
Some users do not like the red and green colors Word provides for underlining potential spelling and grammar errors. In addition, some color-blind users find that Word's red and green colors look alike to them. Microsoft has provided a macro you can use to change these colors.
The macro is part of Word's SUPPORT.DOT template. To use it to change the colors of Word's proofing underlining, follow the steps listed next.
Unless you want to trust all macros from Microsoft, before you follow these steps, make sure that your security level is not set to High. To do so, choose Tools, Macro, Security; click the Security Level tab; choose Medium; and click OK.
Choose Tools, Templates and Add-Ins.
Click Add.
Browse to the SUPPORT.DOT template, which is typically found in the \Program Files\Microsoft Office\Office11\Macros folder.
Select SUPPORT.DOT, and click OK.
If a Security Warning dialog box appears, you have two options:
You can check Always Trust Macros from this Publisher, and click Enable Macros. From now on, Word will automatically assume that it can run macros authenticated as coming from Microsoft.
You can cancel the wizard, and reduce your security setting to Medium, as described immediately before this procedure.
Choose Tools, Macro, Macros.
From the Macros In drop-down box, choose SUPPORT.DOT (global template).
In the Macro Name scroll box, choose RegOptions, and click Run. The Word Options tab of the Set Registry Options dialog box appears.
From the Option scroll box, choose SpellingWavyUnderlineColor.
Click Choose Color.
Select the color you want Word to use when it flags a potential spelling error, and click OK.
To change the color Word uses for grammar errors, choose GrammarWavyUnderlineColor in the Option scroll box, and repeat steps 9?10.
When you're finished, click Close.
In general, Word flags as potential spelling errors any word it cannot find in its built-in dictionaries, or in any added dictionary entries you have created.
NOTE
Word disregards certain text that would ordinarily lead to extensive "false positives," such as Internet and file addresses. Later, in the section "Controlling Spelling Settings," you'll learn how to control which text Word ignores.
The easiest way to resolve an individual potential spelling error is to right-click on the flagged word. A shortcut menu appears (see Figure 8.2), listing any suggestions Word may have about the correct spelling, as well as a set of other choices. These choices, which depend on the error Word has found, include the following:
Ignore All. Tells Word to disregard all occurrences of the spelling within the current document (and to stop displaying them with red underline).
Add to Dictionary. Tells Word to add the spelling to your custom dictionary; after you add it, Word won't flag the spelling as an error anymore, in any document that uses the same custom dictionary.
AutoCorrect. Enables you to select a way to correct your spelling and add it to your AutoCorrect file so that Word can make the same correction automatically every time you make this (exact) mistake from now on.
Language. Enables you to mark the word as being in another language. If you have proofing tools installed for that language, Word uses those proofing tools automatically to check the word. If you do not have the appropriate proofing tools, Word skips the word and any future occurrences for that document.
Spelling. Opens Word's spell checker dialog box, which may provide more alternative spellings than the shortcut menu, and can allow you to save a new word in a different custom dictionary, if you have one. Custom dictionaries are covered in greater detail later in this chapter, in the "Creating Custom Dictionaries for Custom Needs" section.
Look Up. Opens Word's Research task pane, and searches Encarta Dictionary and other Web reference books to see whether the word can be found?and if so, provides definitions and pronunciation information.
Figure 8.2. You can access Word's most commonly used proofing features from the Spelling and Grammar shortcut menu.
For more information about using Word's reference tools, see "Working with Additional Research Services," p. 276.
If Word shows a green wavy underline indicating a possible grammar error, right-click to see the grammar shortcut menu. Word may propose choices, as in Figure 8.3, or make general suggestions. You can also
Instruct Word to ignore the sentence this time only (Ignore Once).
Open the Grammar checker to see more options. (For more information about grammar checking, see "Checking Your Document's Grammar," later in this chapter.)
Choose About This Sentence to see more information about the potential error Word has flagged.
Figure 8.3. In some cases, Word presents a specific suggestion for solving the grammar problem.
You can also resolve errors without using the shortcut menu by simply editing the text. Word checks the word or sentence again as you move your insertion point away from it, and if the word is now spelled correctly or the sentence now uses correct grammar, the corresponding wavy underline disappears.
TIP
To quickly find the next spelling or grammar problem, double-click the Spelling and Grammar Status icon on the status bar (at the bottom of the screen), or press Alt+F7.


