AutoCorrect: Smarter Than Ever
Unless you tell it to do otherwise, Word automatically corrects thousands of the most common spelling mistakes?even using suggestions built into the spell checker that it didn't use before. That's not all. Word also performs the following tasks:
Makes sure that you start all your sentences with a capital letter
Corrects words you inadvertently start with two capital letters
Capitalizes days of the week, such as Tuesday
Fixes things when you inadvertently press the Caps Lock key
Replaces character strings such as (c) with symbols such as ©
Replaces Internet "smileys" such as :) with Wingding symbols such as A
NOTE
Word's AutoCorrect features work closely with its multilingual spelling capabilities, so Word will not incorrectly AutoCorrect words that have been formatted in a foreign language.
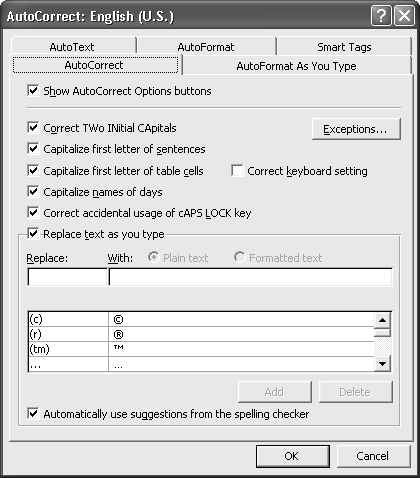
If you're using Word's default settings, this is all happening right now in the background; you haven't had to do a thing. You can take control of the settings and make AutoCorrect back off on certain things, or stop correcting you altogether. Conversely, you can make it even smarter by adding your own entries. To control AutoCorrect, choose Tools, AutoCorrect Options to display the AutoCorrect tab of the AutoCorrect dialog box (see Figure 9.1).
Figure 9.1. From the AutoCorrect tab, you control AutoCorrect's overall behavior and specify which text elements it automatically corrects.
TIP
AutoCorrect is invaluable if you extensively use long words or complex phrases?for instance, if you use technical, scientific, or legal terms in your work. You can set up shortcuts for words, phrases, or even paragraphs you use often and have AutoCorrect insert the lengthy text blocks automatically whenever you type the shortcut.
Simply type a few letters in the Replace text box of the AutoCorrect dialog box and copy the lengthy word or phrase into the With text box. When choosing the few letters that will serve as your shortcut, make sure that they are memorable, are easy to type, and will not appear in your document except when you intend for AutoCorrect to replace them.
Don't use a shortcut consisting of a word you type often; if you do, whenever you press the Enter key after typing that word, Word will replace it with your AutoText entry.
NOTE
Four of Word's automation features?AutoCorrect, AutoFormat, AutoText, and Smart Tags?can be controlled from the AutoCorrect dialog box. Rather than accessing this dialog box only when you want to make a single change, consider investing a few minutes in systematically adding entries to AutoCorrect and AutoText, and setting the AutoFormatting controls that make the most sense for you.
By default, all of Word's AutoCorrect capabilities are selected. A couple of AutoCorrect options are so innocuous that few people want to turn them off. Capitalize Names of Days automatically adds a capital letter at the beginning of the seven days of the week: Sunday, Monday, Tuesday, and so on. You'll rarely, if ever, want these words lowercased.
NOTE
The Capitalize Names of Days feature doesn't change day-of-the-week abbreviations such as Tues. or Thu.; it affects only days of the week that are fully spelled out.
Another option, Correct Accidental Usage of cAPS LOCK Key, is designed for those times when your left pinkie finger inadvertently presses Caps Lock rather than A or Q at the left edge of your keyboard. If this happens partway into a word, Word recognizes that you probably didn't mean it. Rather than letting you continue typing until you notice the problem, it turns off Caps Lock and changes the capitalization on all the letters it thinks you reversed. For instance, if you typed
sPORTSMANSHIP
Word would turn off Caps Lock and edit your text to read
Sportsmanship
NOTE
This feature never changes text you capitalized by pressing and holding the Shift key.
In the following sections, you'll learn about several more of AutoCorrect's capabilities. You'll also learn how to control AutoCorrect so that it behaves as you want it to?and leaves your text alone the rest of the time.
Automatically Capitalizing the First Letter in Table Cells
Often, table cells contain text that does not consist of complete sentences, but should nevertheless begin with a capital letter for style or consistency. You can instruct Word to capitalize the first word placed in any table cell regardless of whether the table's contents consist of a full sentence. To do so, display the AutoCorrect tab of the AutoCorrect dialog box, and check the Capitalize First Letter of Table Cells check box.
Selecting this option does not change cells whose contents begin with numbers.
Automatically Changing Keyboard Settings to Match the Language You're Typing
If you commonly switch among languages as you type, you may have found it frustrating to manually switch keyboard settings in order to make sure that the correct foreign language characters are always available to you. Word can do this task for you.
If you check the Correct Keyboard Setting check box in the AutoCorrect tab of the AutoCorrect dialog box, Word will automatically change your keyboard settings to match the language you are typing. This feature works if Word recognizes the language you're typing (based on the dictionaries installed with Microsoft Office) and if the appropriate language support is installed on your computer.
AutoCorrecting Errors Flagged by the Spell Checker
AutoCorrect finds errors in two ways. First, it watches for errors flagged by Word's interactive spell checker. When an error is made, and Word is sure of the correct spelling, AutoCorrect fixes the error automatically. If Word is not sure of the correct spelling?for example, if several alternative words seem reasonable?AutoCorrect leaves the word unchanged.
NOTE
If you find AutoCorrect making spelling changes you disagree with, you can turn off this feature by choosing Tools, AutoCorrect Options and clearing the Automatically Use Suggestions from the Spelling Checker check box in the AutoCorrect tab.
AutoCorrecting 1,000 Common Errors
In addition to AutoCorrecting errors caught by Word's spell checker, AutoCorrect draws on a database containing more than 1,000 mistakes that writers tend to make most often. These errors fall into the following categories:
Spelling errors. For example, Word replaces acheive with achieve.
Common typos and transpositions. For example, Word replaces teh with the.
Spaces left out between words. For example, Word replaces saidthat with said that.
Spaces misplaced between words. Word fixes many pairs of words in which the space between words has been typed in the wrong place.
Errors in usage. Word replaces should of been with should have been and their are with there are.
Missing or incorrect apostrophes. Word replaces wouldnt with wouldn't and you;re with you're.
Forgotten accent characters. Word replaces seance with sáance.
In addition, Word inserts a wide variety of symbols in place of the "fake" symbols that many writers use. For example, if you type (c), Word replaces it with ©. Word also replaces various Internet/email smileys. For example, Word replaces :) with the corresponding symbol from the Wingding font: A. Table 9.1 shows the complete list of symbols AutoCorrect replaces.
Text You Type | Symbol Word Inserts |
|---|---|
(c) | © |
(r) | ® |
(tm) | ™ |
... | … |
:( | L |
:-( | L |
:) | A |
:-) | A |
:-| | K |
:| | K |
<? |
|
<== |
|
<=> |
|
==> |
|
?> |
|


If you're simply not comfortable with Word changing your text, you can clear the Replace Text As You Type box, and Word will leave all your potential errors alone.
Removing or Changing an AutoCorrect Entry
You might be comfortable with Word's AutoCorrect feature but object to one or more of the replacements Word makes by default. For example, if you copy text formatted with the Wingdings font into an email message, that text may not appear correctly when your recipient gets it. If you are a fiction writer using dialect, you don't want Word to clean up usage like "should of had." Or perhaps you work for the CNA insurance company and want Word to stop changing your company name to "CAN."
To remove an AutoCorrect entry, choose Tools, AutoCorrect Options. In the Replace text box, type the entry you want to remove (or scroll to it in the list beneath the Replace text box); then click Delete.
The entry is removed from your AutoCorrect list. However, it remains in the Replace and With text boxes, so if you immediately change your mind, you can click Add to put it back in your list.
NOTE
If you save a Word file to text-only format, Word reverts the smileys to their original characters. For example, [sf] becomes :) again.
On occasion, rather than delete an entry, you might want to change the replacement text Word uses. From within the AutoCorrect tab, scroll to the entry you want to change and select it. The entry appears in the Replace and With text boxes. Enter the replacement text you prefer in the With text box and click Replace.
Adding a New AutoCorrect Entry
Just as you can remove AutoCorrect entries you don't want, you can also add new, custom AutoCorrect entries that reflect the errors you make most often. To add a new entry, display the AutoCorrect tab by choosing Tools, AutoCorrect Options; then type the incorrect text you want Word to replace. In the With text box, type the text you want Word to insert. Click Add. The new entry now appears in the AutoCorrect list.
You can also add AutoCorrect entries while you're spell checking. In fact, that's a great time to do it, because that's when you systematically review documents and discover the errors you're most likely to make.
Click the Spelling and Grammar button on the Standard toolbar to run Word's spell checker. Word displays your first error in the Spelling and Grammar dialog box. Select the replacement text you want to use; if you want Word to correct this error from now on, click AutoCorrect.
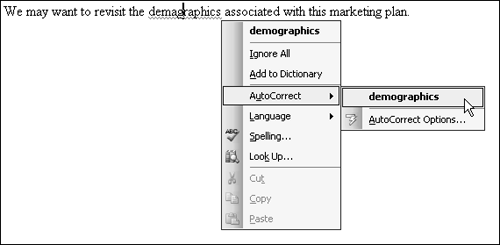
You can also right-click an error within the document; select AutoCorrect from the shortcut menu, and select one of the choices Word provides (see Figure 9.2). Word then automatically corrects the mistake in the future.
Figure 9.2. You can add an AutoCorrect entry from the shortcut menu in any document.
 To learn more about working with Word's spell check feature, see Chapter 8, "Making the Most of Word's Proofing and Research Tools," p. 253.
TIP
A word doesn't have to be misspelled for you to ask Word to correct it. For example, if you constantly type manger rather than manager, you can tell Word to make the change automatically, even though manger is a perfectly legitimate word.
This is an example of why it's not enough to run a spell check on an important document: You have to actually read the document to make sure that everything's okay!
Using AutoCorrect to Insert Boilerplate Text
Later in this chapter, you'll learn about AutoText, a powerful feature that enables you to manage boilerplate text and insert it into a document with just a few keystrokes. You can also use AutoCorrect this way?not to correct errors, but to insert large blocks of formatted or unformatted text automatically.
For example, ever since securities reform legislation passed Congress, it's common to see an extremely lengthy disclaimer appear in press releases and other documents. Usually these disclaimers say something to the effect that "forward-looking statements" involve risks and uncertainties, and the company is not making an ironclad commitment that these predictions will come true. These statements can involve 100 words or more; you wouldn't want to constantly retype them, and your lawyers wouldn't want you to inadvertently leave something out.
Follow these steps to have AutoCorrect insert such a block of text automatically:
Select the text you want Word to add automatically. (You don't have to copy it.)
Choose Tools, AutoCorrect Options. The text you selected appears as Formatted Text in the With text box. If necessary, the text box expands to two lines to accommodate at least some of the additional text. The text appears with the same boldface, italic, or underline character formatting you applied in the document; this formatting appears whenever Word inserts the AutoCorrect entry.
In the Replace text box, enter a distinctive sequence of letters that you wouldn't inadvertently use for any other purpose, such as dsclmr.
Click Add.
After you've added your AutoCorrect entry, every time you type dsclmr followed by a space, Word automatically replaces that word with the entire block of boilerplate text.
TIP
With the AutoCorrect dialog box open, you can enter as many new entries as you want. After you click Add to add an entry, type the next AutoCorrection you want in the Replace and With text boxes; then click Add again.
You can also use AutoCorrect to insert graphics or heavily formatted text. Follow the previous steps, selecting the graphics or formatted text before choosing Tools, AutoCorrect Options. A portion of your selected text or image appears in the With box, as shown in Figure 9.3.
Figure 9.3. When you select an image and open AutoCorrect, part of the image appears in the With box.

CAUTION
Word doesn't limit the length of Formatted Text you can place in an AutoCorrect entry, but it does limit Plain Text (ASCII) entries to 255 characters and cuts off any text that extends beyond that.
TIP
Just as you can insert formatted text or images, you also can insert fields using AutoCorrect. For instance, you might want to use AutoCorrect to replace text with { INCLUDETEXT } fields that retrieve text from an external "source" file. When you change the text in that source file, you can update the document containing the fields, and the text in that document will be updated wherever it appears.
For more information about working with fields, see Chapter 23, "Automating Your Documents with Field Codes," p. 771.
Using AutoCorrect to Add Dummy Text
Ever need to quickly add some generic or dummy text just to get a feel for the formatting of a page? Word has a built-in AutoCorrect entry that'll do it for you. It enters paragraphs full of this classic sentence (carefully designed to use one of each letter in the alphabet): The quick brown fox jumps over the lazy dog.
To tell Word to insert a paragraph containing this sentence five times over, type =rand() and press Enter.
You can actually control how many times the sentence appears and how many paragraphs you get. Type =rand(p,s), where p equals the number of paragraphs, and s equals the number of sentences. This works only when the Replace Text As You Type feature is turned on in the AutoCorrect tab.
AutoCorrecting Initial Caps and Sentence Capitalization
You might have noticed two more options in the AutoCorrect dialog box:
Correct Two Initial Capitals. If you place two capital letters at the beginning of a word, AutoCorrect makes the second letter lowercase.
Capitalize First Letter of Sentences. If you start a sentence with a lowercase letter, AutoCorrect capitalizes it for you.
Most of the time, these features work as intended, fixing inadvertent mistakes. However, there are times you won't want Word to make these AutoCorrections. For example, say that you include an abbreviation within a sentence, and the abbreviation ends in a period, as follows:
Please contact Smith Corp. regarding their overdue invoices.
When AutoCorrect was first introduced, it would see the period after "Corp.," see the space after it, and assume wrongly that the word "regarding" started a new sentence. Word has since fixed this problem by enabling you to specify exceptions?words that AutoCorrect won't fix. AutoCorrect now contains a list of 128 common abbreviations. When Word sees one of these abbreviations, it doesn't assume that it has arrived at the end of a sentence, notwithstanding the period in the abbreviation.
If you use specialized abbreviations, such as those common in scientific or technical fields, you might want to add them to your Exceptions list. To do so, follow these steps:
Choose Tools, AutoCorrect Options.
Click Exceptions. The AutoCorrect Exceptions dialog box opens, as shown in Figure 9.4.
Figure 9.4. Specifying abbreviations and other words that should not be followed by capital letters.
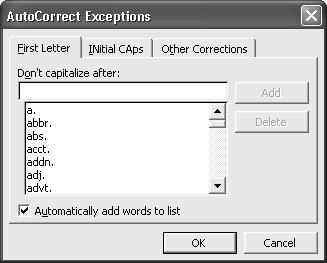
Click the First Letter tab.
Enter your new exception in the Don't Capitalize After text box.
Click Add.
Click OK.
Creating Capitalization Exceptions for Product Names, Brand Names, and Acronyms
As mentioned earlier, Word also automatically "fixes" words that start with two capital letters. No standard English words begin with two capital letters, so most of the time you'll want this fix to occur. However, you may occasionally come across a product, a brand name, or an acronym that is capitalized oddly to attract attention. For example, the CompuServe online information service renamed itself "CSi." Word automatically corrects this to "Csi." You can create an exception for oddly capitalized words as shown here:
Choose Tools, AutoCorrect Options.
Click Exceptions. The AutoCorrect Exceptions dialog box opens.
Click INitial CAps. The INitial CAps tab appears, as shown in Figure 9.5.
Figure 9.5. Specifying oddly capitalized words that should not be corrected.
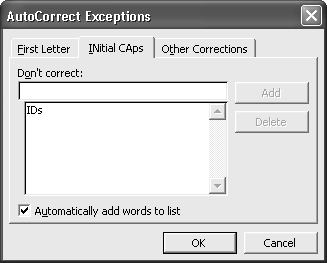
Enter your new exception in the Don't Correct text box.
Click Add.
Click OK.
Creating Other AutoCorrect Exceptions
Although many of the AutoCorrect exceptions you want to create are likely to fall into the First Letter and Initial Caps categories, what happens when you encounter an exception that doesn't?
For example, what happens if you sell a product with a lowercase name similar to a "real" word? Word may automatically assume that you meant to type the word in its dictionary. (This won't happen with capitalized words, which Word recognizes as names.) Or, what happens if you occasionally use a word in a foreign language, such as the French "sollicitation," which Word AutoCorrects to "solicitation"?
Word's solution is the Other Corrections tab. Follow these steps to create an exception that doesn't fall into the First Letter or Initial Caps categories:
Choose Tools, AutoCorrect Options.
Click Exceptions. The AutoCorrect Exceptions dialog box opens.
Click Other Corrections. The Other Corrections tab appears, as shown in Figure 9.6.
Figure 9.6. Specifying AutoCorrect exceptions that don't fall into the First Letter or Initial Caps categories.
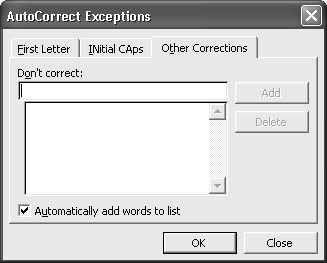
Enter your new exception in the Don't Correct text box.
Click Add.
Click OK.
Telling Word to Create Exceptions Automatically
Wouldn't it be nice if Word were smart enough not to make the same mistake twice? What if Word saw the fixes you made manually and added them to its Exceptions list so that you wouldn't be bothered again? It can, and it does.
If you check the Automatically Add Words to List check box in any of the three AutoCorrect Exceptions tabs, Word watches as you work. If Word corrects an initial cap, a first letter, or another word, and you immediately use the left-arrow key or the Backspace key to go back and type over the correction, Word adds your correction to the exception list.
NOTE
Word won't add a correction to the exception list unless you use the Backspace or left-arrow key to make the correction. Pressing shortcut keys or using Undo does not work.
TIP
Each tab of the AutoCorrect Exceptions dialog box has separate automatic exception controls. So, for example, you can tell Word to automatically add abbreviations to the list for First Letters, but not to the list of Initial Caps or Other Corrections.
Backing Up and Restoring AutoCorrect Entries
The longer you work with Word, the more entries you're likely to add in the AutoCorrect dialog box. If you get a new computer, can you move those entries with you? Or can you share these entries with other users? Or can you restore an AutoCorrect file that has somehow been damaged, preventing AutoCorrect (or Word itself) from functioning properly? The answer in all cases is yes. Microsoft provides a special AutoCorrect utility to perform these tasks.
The AutoCorrect utility is stored in the Support.dot template. This template is installed on your hard disk when you install Office 2003 with a Complete (not Typical or Upgrade) setup; however, it is not automatically loaded and made available to you.
NOTE
If you don't want to run a Complete install, you can install the SUPPORT.DOT template by running Setup in Maintenance Mode and installing More Templates and Macros (found within the Wizards and Templates section, in the Word section).
In the following procedure, you'll first load the template, then run the macro and follow the procedure within it.
To load the template and make the macro accessible, follow the steps listed next. Unless you want to trust all macros from Microsoft, before you follow this procedure, make sure that your security level is not set to High. To do so, choose Tools, Macro, Security; click the Security Level tab; choose Medium, and click OK.
Choose Tools, Templates and Add-Ins.
Click Add.
Browse to and select support.dot. This template is typically found in the \Program Files\Microsoft Office\Office 11\Macros folder.
Click OK twice. If a Security Warning dialog box appears, you have two options:
You can check Always Trust Macros from This Publisher, and click Enable Macros. From now on, Word will automatically assume that it can run macros authenticated as coming from Microsoft.
You can cancel the wizard, and reduce your security setting to Medium, as described immediately before this procedure.
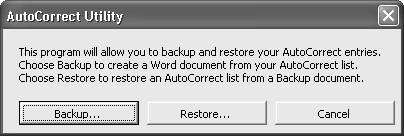
Next, to run the macro, follow these steps:
Choose Tools, Macro, Macros.
From the Macros In drop-down box, choose support.dot.
In the Macro Name scroll box, choose AutoCorrect Backup.
Click Run. The AutoCorrect Utility dialog box appears (see Figure 9.7).
Figure 9.7. From here, you can create a Word file containing your list of AutoCorrect entries, or transform such a list into a working AutoCorrect file.
To create a backup copy of your AutoCorrect file, click Backup. Word adds each AutoCorrect entry, showing its progress on the status bar. It then reformats the information into a three-column table, making the information easier to read and edit. This process may take a minute or two.
When Word finishes, it displays the Save As dialog box, suggesting AutoCorrect Backup Document as a filename. Click Save to save the file in your My Documents folder.
Word AutoCorrect files are stored in special binary files with an ACL extension. To back up an ACL file, the AutoCorrect Utility translates it from ACL format into Word document format. To restore an ACL file, the AutoCorrect utility translates it back into the ACL format.
Editing an AutoCorrect Backup Document
You can use Word to edit an AutoCorrect Backup Document to add or delete entries before restoring them to another computer. As shown in Figure 9.8, AutoCorrect Backup Document consists of three-column tables.
Figure 9.8. An AutoCorrect Backup Document contains a three-column table that you can edit to add, change, or delete entries.
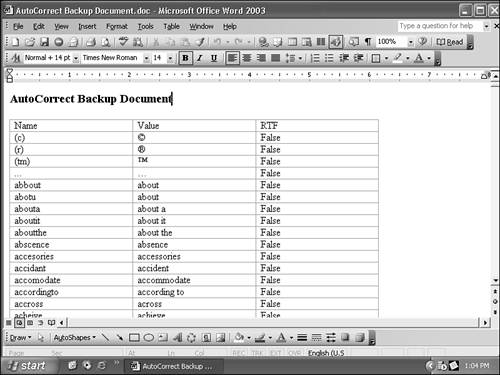
The first column, Name, includes the word or phrase you want to change. The second column, Value, indicates the word or phrase you want to use in its place. The third column, RTF, indicates whether the replacement text should be inserted as ASCII text or as formatted text. The default setting here is False. However, if you added text with formatting (as discussed earlier in the "Using AutoCorrect to Insert Boilerplate Text" section), the RTF entry is True.
Copying AutoCorrect Entries to an AutoCorrect File
To copy an AutoCorrect Backup Document's entries into Word's AutoCorrect file, follow these steps:
Run the AutoCorrect utility (as described earlier in "Backing Up and Restoring AutoCorrect Entries").
Click Restore.
Click Yes to confirm that you want to replace any current AutoCorrect entries with equivalent entries in the backup document. The Open dialog box opens.
Browse to and select the AutoCorrect Backup Document you want to use.
Click Open. Word begins adding AutoCorrect entries to the computer's ACL file. This may take a few minutes.
When Word finishes, it presents a message that it has completed. Click OK.


