AutoText: The Complete Boilerplate Resource
You've already seen how you can use AutoCorrect to enter large blocks of boilerplate text quickly?text that you use repeatedly in many documents. However, this isn't AutoCorrect's primary function. Another Word feature, AutoText, is designed specifically to help you manage and quickly insert boilerplate text.
If you build a library of AutoText entries, you can dramatically reduce the amount of retyping you have to do. At the same time, you can help your colleagues build documents more quickly and more consistently. In other words, whether you're working on your own or in a corporate setting, AutoText offers enormous opportunities to improve your productivity.
AutoText Entries Built into Word
Word comes with dozens of built-in AutoText entries to help you streamline letters and other documents. The categories of entries and the text associated with each entry are listed in Table 9.2.
Category (Submenu) | Entry Text Options |
|---|---|
Attention Line | Attention:; ATTN: |
Closing | Best regards; Best wishes; Cordially; Love; Regards; Respectfully Yours; Respectfully; Sincerely yours; Sincerely; Take care; Thank you; Thanks; Yours truly |
Header/Footer | Page?; Author, Page # Date; Created by; Created on; Confidential, Page # Date; Last printed; Last saved by; Filename; Filename and Path; Page X of Y |
Mailing Instructions | CERTIFIED MAIL; CONFIDENTIAL; PERSONAL; REGISTERED MAIL; SPECIAL DELIVERY; VIA AIRMAIL; VIA FACSIMILE; VIA OVERNIGHT MAIL; SPECIAL HANDLING |
Reference Initials | Your own initials |
Reference Line | In regards to; In reply to; RE:; Reference |
Salutation | Dear Madam or Sir; Dear Madam; Dear Mom and Dad; Dear Mother and Father; Dear Sir or Madam; Dear Sir; Ladies and Gentlemen; To Whom It May Concern |
Signature | Your signature |
Subject Line | Subject: |
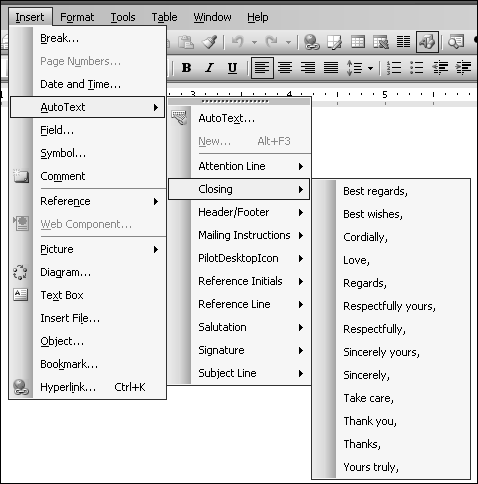
To use one of these entries?or any other entry you create?choose Insert, AutoText and display the cascading menu containing the entry you want to use (see Figure 9.9). Click the entry, and Word inserts the corresponding entry text in your document.
Figure 9.9. Select an existing AutoText entry.
NOTE
Some of Word's built-in AutoText entries insert not only text but also fields that update themselves. For example, if you insert the Author, Page #, Date entry in your header or footer, Word enters three fields: the { AUTHOR } field, which reports the name of the author as it appears in your Properties dialog box; the { PAGE } field, which displays the current page number, and the { DATE } field that displays the current date.
When you create your own entries, you'll typically use short, easy-to-remember names for your AutoText entries. If you remember the name of an AutoText entry (custom or built-in), you can use it in your document without working with menus. Just type the AutoText entry name and press F3. Word replaces the AutoText entry name you typed and inserts the longer text associated with the entry.
CAUTION
The AutoText entry must be separate from the text that precedes and follows it for Word to recognize it as an AutoText entry when you press F3. However, it can be within parentheses, or immediately before punctuation such as a period, colon, or semicolon.
Working with the AutoText Toolbar
If you're planning to work with quite a few AutoText entries at the same time, you may want to display the AutoText toolbar (see Figure 9.10). This toolbar contains three buttons:
The AutoText button, which displays the AutoText dialog box, where you can control all aspects of your collection of AutoText entries.
A button that displays all your current AutoText entries, or those associated with the style you're currently using.
A New button that appears when you've selected text. Click it to display the Create AutoText entry you've already seen.
Figure 9.10. If you're working on many AutoText entries at the same time, display the AutoText toolbar.
![]()
Entering AutoText Entries Even Faster with AutoComplete
Imagine that you have an AutoText entry, such as "dsclmr," that places your company's standard disclaimer clause in your document. As you've seen, if you want to use this entry, you can type dsclmr and press F3, and Word inserts the formatted text. But there's an even quicker way. As soon as you type the fourth letter in this (or any) AutoText entry, a ScreenTip appears showing all the text associated with the AutoText entry (or as much as will fit within the ScreenTip). You can see an example in Figure 9.11. If you are planning to use this AutoText entry, just press Enter, and Word AutoCompletes the entry at the current insertion point.
Figure 9.11. When you type the fourth letter of an AutoText entry, Word displays the beginning of the corresponding AutoText entry as a ScreenTip, along with instructions for inserting the text.
![]()
If you aren't planning to use the AutoText entry?for example, if you're typing another word that just happens to start the same way as an AutoText entry?just ignore the ScreenTip and keep typing.
NOTE
If you have two AutoText entries that start with the same four letters, Word doesn't display a ScreenTip until you've entered enough text for it to recognize which one you're most likely to want.
TIP
AutoComplete doesn't just work with AutoText entries; it also offers to complete months of the year, days of the week, and today's date.
Creating Your Own AutoText Entry
Word's built-in AutoText entries are handy, but you don't get the full benefits of AutoText until you start creating your own entries. There are several ways to create your entry. The quickest way is to select the text you want to transform into an AutoText entry and press Alt+F3 to display the Create AutoText dialog box. You can also display the same dialog box by choosing Insert, AutoText, New. Figure 9.12 shows the Create AutoText dialog box.
Figure 9.12. One quick way to create an AutoText entry is to select text and then press Alt+F3 to display the Create AutoText dialog box.
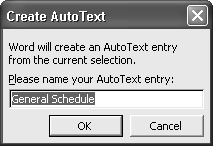
Word automatically displays the first word or words in the text you've selected. Edit this text into a brief entry name you'll easily remember and click OK. Now, the entry name appears in the AutoText cascaded dialog box with any other entries you may have added.
Controlling Which Formatting Is Included in an AutoText Entry
If you want your AutoText entry text to include paragraph formatting, include in your selection the paragraph mark (+) at the end of the paragraph containing that formatting.
AutoText entry text is stored with whatever character formatting you've applied to it. That saves you the trouble of duplicating complex character formats later. However, paragraph styles aren't saved unless you select a paragraph mark. When you do not select the paragraph mark, your AutoText entry text takes on the paragraph style of the surrounding text wherever you insert it.
Understanding Where AutoText Entries Are Stored and Displayed
All of Word's built-in AutoText entries are stored in the Normal (Normal.dot) template. New AutoText entries are stored in the template associated with the document in which you're working. In other words, if you are working on a document based on the Normal template, any AutoText entry you create manually is also stored in the Normal template.
Then, whenever you are working on a document based on the Normal template, you have access to all the AutoText entries you've stored in the Normal template, with one major exception. If your insertion point is currently within a block of text formatted in a custom style and if that custom style has AutoText entries associated with it, Word displays only the entries associated with the custom style.

You can see this most easily when the AutoText toolbar is displayed. If you are currently working in text formatted in a custom style that has AutoText entries associated with it, that style's name appears in place of All Entries. When you click the button, you see only the entries associated with that style.
TIP
If you need access to an AutoText entry that isn't displayed, press Shift before you display the list of AutoText entries via either the AutoText toolbar or the Insert, AutoText cascaded menu. Or click your insertion point in text formatted with any of Word's standard styles, such as Normal, Body Text, or any built-in heading style.
Saving an AutoText Entry in a Different Template
At times you might want to store AutoText entries in a template other than Normal. For example, your AutoText entries might be relevant only when you're creating a specialized kind of document, and you always use the same custom template to create that kind of document. Why clutter up the Normal template with AutoText entries you'll never use in the documents you create with Normal?
To create AutoText entries in another template, first create or open a document based on that template; then create the AutoText entry as you normally do.
Controlling the Templates in Which AutoText Entries Are Available
By default, Word makes available AutoText entries in all templates that are currently open. For example, if you are working in a file created by a template named Smith.dot, you have access to all AutoText entries stored in Smith.dot, as well as those in Normal.dot?a global template that is always open. However, you might not want to see the more general AutoText entries you may have associated with Normal.dot if you're using a customized template.
You can choose any open template and tell Word to display only the AutoText entries associated with that template. To do so, choose Insert, AutoText, AutoText. The AutoText tab of the AutoCorrect dialog box opens (see Figure 9.13). In the Look In drop-down list box, choose the template containing the entries you want to see and click OK.
Figure 9.13. With the AutoText tab of the AutoCorrect dialog box, you can control which template's AutoText entries are active.
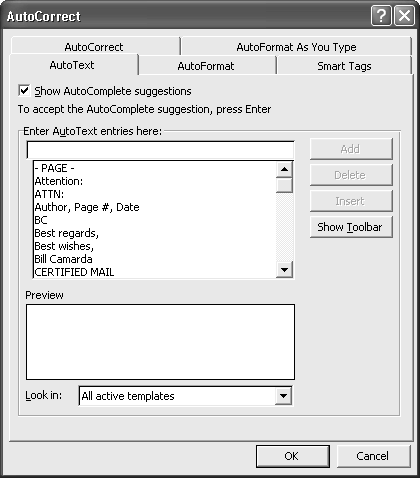
When you return to your editing window, you see that AutoText entries associated with other templates are no longer available from the AutoText menu. If you type them in your document and press F3 or use AutoComplete, nothing happens.
Moving AutoText Entries Between Templates
You can move AutoText entries between templates, using Word's Organizer feature. The Organizer is covered in detail in Chapter 11, "Templates, Wizards, and Add-Ins." Briefly, though, you follow these steps:
Choose Tools, Templates and Add-Ins.
Click the Organizer button.
Click the AutoText tab.
In one scroll box, display the document or template containing the AutoText entry or entries you want to move.
In the other scroll box, display the document or template you are moving the AutoText entry or entries to.
Select the entries you want to move.
Click Copy.
Click Close.
Adding New Categories of AutoText Entries
You might want to add new categories of AutoText entries. That way, when you click Insert, AutoText, your new categories appear along with Word's built-in submenus. For example, imagine that you work for the sales department of Acme Corporation; you might want to add a submenu called Acme Proposals that contains AutoText entries you can include in your sales proposals.
Word organizes AutoText entries in submenus, based on the styles with which they are associated. When you want to create a new submenu, you can use this to your advantage.
First, create a new style with the name you want to appear in your custom submenu. To do so, select a paragraph, click the drop-down style box, type the new name, and press Enter. Don't worry much about how your style is formatted. When you select an AutoText entry, it uses the surrounding formatting in your document, not the formatting associated with the style you've just created.
Next, enter the first block of text for which you want to create an AutoText entry and format the text using the style you just created.
Finally, create the AutoText entry using whatever method you prefer. Repeat the process for any other text you want to appear in the same submenu; make sure to format the text with your custom style before you create the AutoText entry.
After you do this, your new AutoText entries appear in their own submenu whenever you're working in the same template where you created them.
TIP
You can use AutoText to store virtually anything you can place in a document, not just text. Here are some types of entries you might want to store as AutoText:
Your handwritten signature and the signature of anyone else for whom you prepare documents
Your corporate logo
Photos and drawings
Complex table formats
Complex field codes, such as customized cross-references
If you are creating a Web page, you can also store AutoText entries that place custom design elements or pieces of HTML code into your document, such as customized bullets and borders.
Printing Lists of AutoText Entries
The more you work with AutoText entries, the more you'll need to keep track of them. You've already seen how you can review your entire list of AutoText entries in the AutoText dialog box. You might also want to print a list of entries associated with a specific template. To print the list of entries, first create or open a new document based on the template containing the entries you want to print. Choose File, Print. In the Print What drop-down box, choose AutoText Entries and click OK.
Changing an Existing AutoText Entry
You may occasionally want to change an AutoText entry. To change an entry, follow these steps:
Insert the AutoText entry in your document.
Edit the AutoText entry to reflect your changes.
Select the entire AutoText entry.
Choose Insert, AutoText, AutoText to display the AutoText dialog box.
Select the name of the AutoText entry you want to change.
Click Add. Word displays a dialog box asking whether you want to redefine your AutoText entry.
Click Yes.
Changing AutoText entries doesn't change any text you've previously inserted in a document using those entries?unless, that is, you use the procedure discussed in the following section.
Inserting AutoText Entries That Update Themselves
After you enter text in your document using an AutoText entry, that text looks and behaves no differently than if you had typed it manually. But what if you could enter an AutoText entry that updates itself whenever the AutoText entry is updated? Imagine that your corporate lawyers change the boilerplate disclaimer language you've been using. Wouldn't it be great if your entire workgroup could have access to the new language immediately? And wouldn't it be even better if you could automatically update your existing documents to reflect the change?
You can. Rather than inserting your AutoText entry using the methods discussed earlier, use an { AUTOTEXT } field. Follow these steps:
Choose Insert, Field. The Field dialog box opens.
Choose { AutoText } from the Field Names list. In the AutoText Name scroll box, Word displays a list of all the AutoText entries currently available to you.
Select the entry you want to insert.
Click OK.
If you display field results, your document looks exactly as if you had inserted the AutoText entry the normal way. If, however, you change the text (or other document elements) associated with this AutoText entry, Word can update the field the same way it updates any other field.
TIP
You can update all the fields in your document by pressing Ctrl+A and then F9.

Inserting AutoText Options Within Your Document
If you're setting up a document or template for others to work on, you can streamline their work by making it easy for them to choose the right AutoText entries wherever they're appropriate. You do this by inserting an { AUTOTEXTLIST } field at those places in your document where a choice needs to be made.
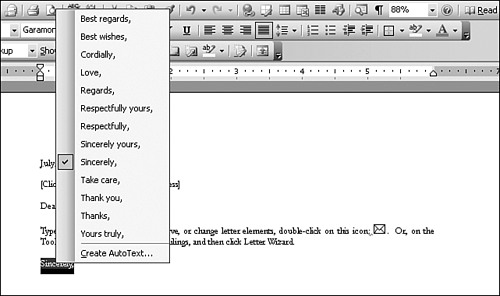
You can see { AUTOTEXTLIST } fields at work in Word's letter templates, which embed multiple options for Salutations and Closings directly in the documents they create. In Figure 9.14, if you right-click the word Sincerely, Word displays a list containing all Word's built-in choices for letter closings. If you merely pause over the word, a ScreenTip appears, telling you what to do.
Figure 9.14. If you right-click the letter closing in a built-in Word letter template, you can choose from all of Word's AutoText entries for letter closings.
To create an AutoText field, follow these steps:
Choose Insert, Field.
Choose { AutoTextList } from the Field Names scroll box. Word displays the options associated with the { AutoTextList } field (see Figure 9.15).
Figure 9.15. Setting properties and options for the { AutoTextList } field in the Field dialog box.
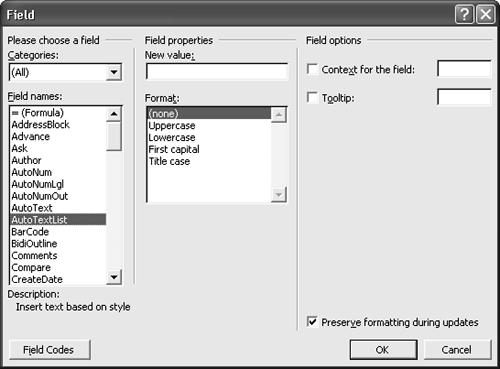
In the New Value: text box, enter the text you want to appear by default before users right-click the { AutoTextList } field. Use the text that's most likely to be the right choice. That way, your users can often ignore the field.
Next, enable users to choose among AutoText entries associated with a specific style. To do so, type the name of the style in the check box to the right of the Context for the Field check box.
TIP
You don't have to specify the same style in which the field result is formatted. You can choose any style currently available to the document.
If you want to provide users with help, enter your Help text in the text box to the right of the Tooltip check box. This information is shown whenever a user hovers his or her mouse pointer over the field.
TIP
The { AUTOTEXTLIST } field has potential to streamline the construction of a wide range of business documents. For example, you might use { AUTOTEXTLIST } to do the following:
Choose different text in a proposal based on whether the project schedule is normal or rushed
Select one of several preformatted tables
Insert a signature from any one of several people
Select the contents of a letter from a set of preestablished AutoText entries


