Working with AutoSummarize
Word can summarize your documents for you?or, more precisely, attempt to do so. AutoSummarize reviews the entire document and then scores each sentence based on a variety of factors, such as whether a sentence contains keywords?the words used the most often throughout the document. The sentences that get the highest score are included in your summary.
Because Word can't understand the subtleties of your document, the results of running AutoSummarize are mixed?from good to terrible. In general, the more tightly structured your document is, the better chance you have of getting useful results. You also generally have better luck with documents that cover a few key topics in-depth, as opposed to documents that include just a paragraph or two on many disparate topics.
In general, AutoSummarize does a fair-to-good job on the following types of document:
Reports
Articles
Scientific papers
Theses
AutoSummarize generally does a poor job on these:
Fiction
Most typical correspondence
How-to instructions (such as this book)
Of course, some documents, such as contracts, are just too important to rely on AutoSummarize; there's no alternative to reading every word.
On the other hand, there's no law that restricts you to summarizing only those documents you create. Use AutoSummarize as a tool to deal with all kinds of information overload. It's like hiring your computer to skim for you. Run AutoSummarize on any long, well-structured document that can be opened and edited in Word?such as Web pages formatted in HTML?and you can quickly see whether the document is worth reading in its entirety.
If you're creating an executive summary or abstract for a longer document, AutoSummarize rarely delivers perfection, but it often gives you a significant head start. Using the content AutoSummarize creates, you can fill in holes, polish and tighten the text, and make sure that your summary reads smoothly?all in significantly less time than it would have taken you to create it from scratch.
To AutoSummarize your document, choose Tools, AutoSummarize. Word immediately builds a summary of your document and stores it in memory pending your instructions. The AutoSummarize dialog box then opens (see Figure 9.23).
Figure 9.23. In the AutoSummarize dialog box, you specify where to place your summary and how detailed you want it to be.
You now have the following four choices:
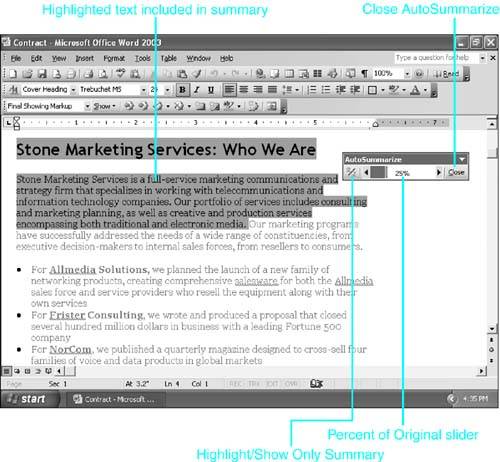
Highlight Key Points. Without changing the contents of your document or creating a new document, Word applies yellow highlighting to the sentences it deems most important, as shown in Figure 9.24. The AutoSummarize toolbar appears in your document. Other, unhighlighted paragraphs appear in gray. You can drag the Percent of Original scrollbar to highlight more or less of the document; as you drag it, more or fewer sentences are highlighted.
Figure 9.24. Using AutoSummarize to highlight the most important sentences in your document.
TIP
Word highlights AutoSummarized text in yellow, so if you used yellow highlighting elsewhere in the document, you won't be able to tell the difference. Consider using a different highlight color in documents you plan to AutoSummarize using the Highlight Key Points feature.
Create a New Document and Put the Summary There. Word creates a new document and places the summary there. This document has no link to the original document, so after the text has been inserted, there's no way to adjust it except by running AutoSummarize again. This option makes sense if you need to provide an executive summary or abstract but don't want to change the page numbering or contents of your original document.
Insert an Executive Summary or Abstract at the Top of the Document. This copies the AutoSummarized text to the beginning of your document, where it can be edited and saved along with any other document contents. After you copy the text, you can't adjust the size or contents of the summary except through conventional editing techniques.
TIP
If you choose either of the preceding two options, consider increasing the percentage of sentences Word inserts in your summary because it is easier to delete sentences from your summary later than to add more. You can change this value with the Percent of Original slider in the AutoSummarize dialog box.
Hide Everything but the Summary Without Leaving the Original Document. This option makes no changes to the text in your current document. Rather, it temporarily hides all the paragraphs that weren't selected to be part of the summary. In other words, your document looks as if it contains only the summary. If you print your document with only the summary showing, only the summary prints. However, when you click Close on the AutoSummarize toolbar, all the hidden text reappears.
You can also control what percentage of your document appears in the summary by entering a value in the Percent of Original drop-down list box. You can enter any percentage. Or, using the options in the drop-down list box, you can choose a specific number of sentences or words. If you leave Word's default setting alone, Word creates a summary containing 25% of the original document. If you're creating an executive summary of a long document, you may want to shrink it to 10%?15%, or place a word limit, such as 500 words, to keep things manageable.
If you choose either Highlight Key Points or Hide Everything but the Summary Without Leaving the Original Document, you can toggle between these options using the Highlight/Show Only Summary button on the AutoSummarize toolbar. In other words, if you've chosen to hide the parts of your document not included in the summary, you can view them at any time by clicking the Highlight/Show Only Summary button.
If you chose Highlight Key Points or Hide Everything but the Summary, you can adjust the percentage of the summary by dragging the Percentage of Original slider within the AutoSummarize toolbar.
When you're done working with AutoSummarize, and you no longer want to see highlighted text, click the Close AutoSummarize button on the AutoSummarize toolbar.
If Word is not summarizing your document as you expect, see "What to Do If Word Doesn't Summarize Your Document," in "Troubleshooting" at the end of this chapter. |
If text in an AutoSummarized document seems to disappear, see "What to Do If Text Disappears from an AutoSummarized Document," in the "Troubleshooting" section of this chapter.
Using AutoSummarize to Update File Properties
As you will learn in Chapter 34, "Managing Word More Effectively," you can use the Properties dialog box to track information about your document, making it easier to track and search for documents later. As you've seen, within the information that AutoSummarize generates about your document is a list of keywords. Of course, it also includes the summary itself. Because this information is already available, AutoSummarize offers to place it in your Properties dialog box.
 To learn more about working with document properties, see "Using Document Properties to Simplify Document Management," p. 1122.
When the Update Document Statistics check box is checked, as it is by default, Word inserts the top five keywords it finds in the Keywords text box in the Summary tab of the Properties dialog box. It also inserts the first few paragraphs of the summary itself in the Comments text box, also in the same tab.
CAUTION
When would you want to clear Update Document Statistics? If you are already using Keywords or Document Contents information for another purpose, you don't want Word overwriting the information stored there. For example, you might have already specified keywords and used the { KEYWORDS } field to display those keywords in a cover sheet to your document. Unless you clear this check box, when Word displays your summary it will also replace your keywords with the ones it thinks are most important.
To learn more about working with keywords and other document properties, see "Using Document Properties to Simplify Document Management," p. 1122.


