Editing Images to Serve Your Needs
Regardless of how you've inserted images into your documents, you may need to modify them to serve your needs more effectively.
At the least, you'll probably need to reposition and perhaps resize your images to integrate them into your document. However, you can do much more. Graphics can be cropped, brightened, recolored, and even redrawn. You can also adjust how graphics work with other page elements.
Positioning and Sizing Images
Before you insert an image, you position your insertion point where you want the image to appear. Still, it's likely that you'll have to make adjustments to the image's size or position after it is placed in your document. The next few sections show you how.
Resizing Images Using Sizing Handles
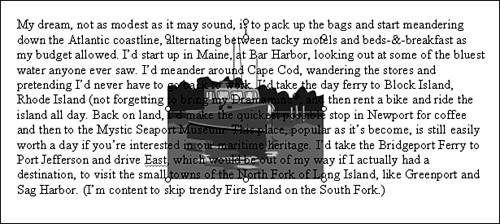
The easiest way to resize an image is by dragging its edges to match the size and shape you want. To do so, click the image once to select it. A box appears around the image with eight sizing handles (see Figure 13.17).
Figure 13.17. Selecting and dragging an image.
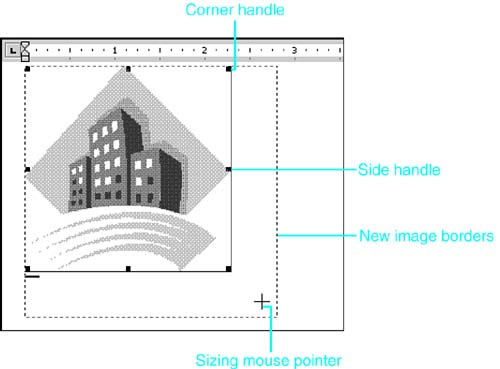
The different handles have different effects:
Dragging the corner handles resizes your image diagonally, making it wider and taller (or narrower and shorter) at the same time. By default, the aspect ratio of the image remains the same?so the image doesn't appear oddly stretched in any direction.
Dragging the middle handles resizes the object only vertically (using just the top and bottom handles) or only horizontally (using the handles on the side). Of course, this does change the aspect ratio?stretching the image out of its original proportion.
TIP
The results you get from resizing a graphic can depend on the type of graphic you are resizing.
Generally, vector graphics?graphics built from lines, such as WMF files?adjust well to being enlarged or stretched. Bitmap graphics?graphics composed of pixels, such as JPEG photographs?do not survive with the same quality. Stretching can introduce unattractive roughness into these images.
NOTE
The size of the image Word inserts is equal to the size of the original image. If the image is quite large, you will likely want to reduce the size of the image after you've inserted it, to accommodate text and graphics in a layout that gives appropriate importance to each.
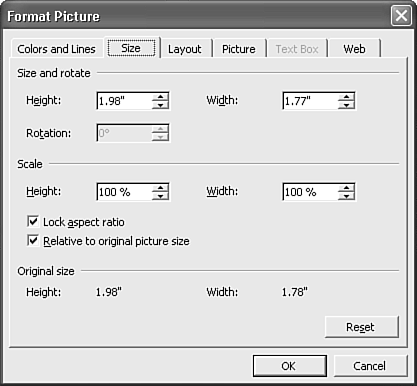
Resizing Images Precisely, by Using Format, Picture
Word also has a way for you to resize an image more precisely than you can by dragging its edges by hand. If you want to resize an image while retaining all its contents, right-click the image and choose Format Picture from the shortcut menu. Select the Size tab of the Format Picture dialog box that appears (see Figure 13.18).
Figure 13.18. Resizing images through the Size tab of the Format Picture dialog box.
NOTE
Notice that the Rotation scroll box is grayed out. Rotation is available for only those images you create in Word using Word's AutoShape and WordArt drawing tools. These tools are covered in Chapter 14, "Using Word's Quick and Easy Drawing Tools."
In the Height scroll box (in the Size and Rotate area), enter the exact height you want the picture to be. When you do so, the value in the Width scroll box changes as well to maintain the picture's proper proportions (aspect ratio).
Alternatively, you can resize an image by scaling it up or down. To do so, enter a new value in the Height scroll box in the Scale area. Again, the value in the accompanying Width box changes proportionally.
If you want to stretch an image out of proportion, clear the Lock Aspect Ratio check box before you make changes in the height or width scroll boxes.
TIP
Even if the Lock Aspect Ratio check box is cleared, you can still use sizing handles to stretch an image proportionally if you need to do so. Select the image, press and hold the Shift key, and drag the corner sizing handles. Word resizes the image proportionally as you drag its borders. Release the mouse pointer; then release the Shift key.
NOTE
If you want to resize an image by cutting out (cropping) parts of it, see the section "Cropping an Image," later in this chapter.
Wrapping Text Around Your Images
After you've placed an image in your document and sized it appropriately, the next thing to control is how text flows around that image. In Word, this is called text wrapping.
In Word 2003, pictures are placed "in line with text" by default. That means that a picture, no matter how large, acts just like any other character of text you might insert. Figure 13.19 shows how this works, and how to control text wrapping from the Text Wrapping button on the Picture toolbar.
Figure 13.19. Graphics placed "inline," such as this one, are placed just as if they were characters in text.

The options that appear in the Text Wrapping toolbar work as explained here:
In Line with Text? As already mentioned, this option allows the picture to move as surrounding text moves around it. In other words, the picture behaves just like a character in the document's flow of text, always staying immediately ahead of the character behind it.
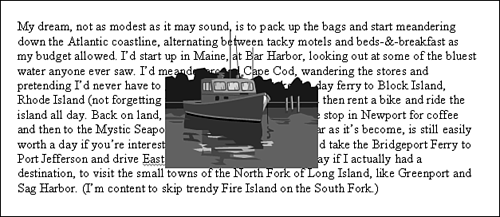
Square? This option wraps text to the left and right of the bounding box that contains the picture. If the picture is inserted at the left margin, Square wraps to the right only (see Figure 13.20).
Figure 13.20. Graphics placed using Square wrapping.
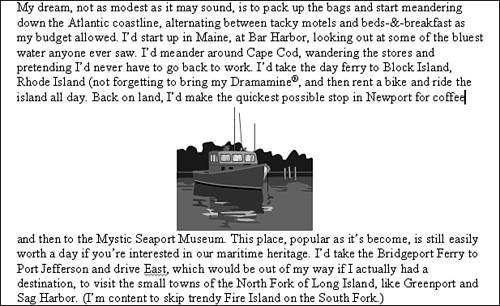
Tight? This option wraps text so that it follows the left and right edges of the actual image, not just the bounding box (see Figure 13.21).
Figure 13.21. Graphics placed using Tight wrapping.
Behind Text? Choosing this option enables text to be superimposed on the picture. This is the setting normally used with watermarks (see Figure 13.22).
Figure 13.22. Graphics placed behind text.
In Front of Text? With this option selected, the picture is superimposed on top of the text. With many graphics, this makes the text unreadable. In other cases, such as GIFs with transparent backgrounds or text created with WordArt, the text can still show through. Use this option sparingly, however, because even when the text is visible, it is often difficult to read (see Figure 13.23).
Figure 13.23. Graphics placed in front of text.
Top and Bottom? Choosing this option prevents text from wrapping around the image; the text instead jumps from above the image to below it (see Figure 13.24).
Figure 13.24. Graphics placed using top and bottom wrapping.
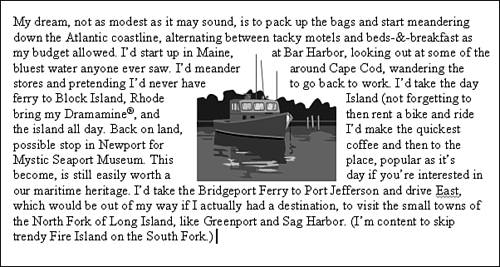
Through? Same as Tight, but without a fixed outer wrapping boundary. This option lets text fill gaps in the image (if there are any). Use Edit Wrap Points to allow more or less text in each gap (see Figure 13.25).
Figure 13.25. Graphics placed using Through wrapping.
Edit Wrap Points? This enables you to wrap text around any corner or edge of an image, as discussed in the next section.
Setting Precise Text Wrapping with Edit Wrap Points
The final text wrapping option available through the Text Wrapping button is called Edit Wrap Points. This option enables you to control precisely where text wraps to refine your page layout?for example, to accommodate a long word that would otherwise wrap oddly. If you click Edit Wrap Points, all the edges of the image are highlighted. Figure 13.26 shows the wrap points in a vector image. (In a bitmap image, the only wrap points are the edges of the bounding box.)
Figure 13.26. Dragging wrap points to customize the way text wraps around and through an image.
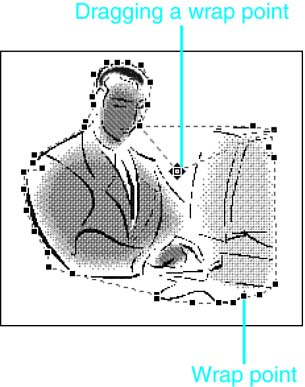
When wrap points are displayed, you can click and drag any small square to adjust the edge of the image Word recognizes for text wrapping. When you're finished editing wrap points, click outside the image to deselect it.
NOTE
Changes you make to Edit Wrap Points don't change the actual content of the image.
Setting Text Wrapping from the Format Picture Dialog Box
Word's "one click" toolbar options are all you need in most cases. But you can get even more control through the Layout tab of the Format Picture dialog box (see Figure 13.27). Select your image, right-click and choose Format Picture from the shortcut menu, and click the Layout tab.
Figure 13.27. Adjusting wrapping styles and horizontal alignment.
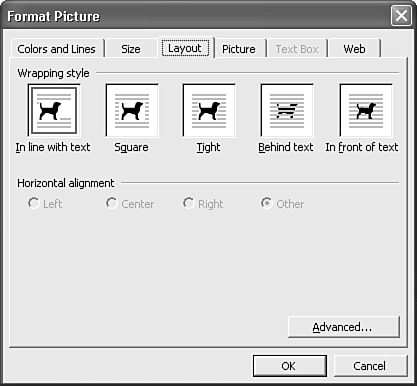
After you've displayed the Layout tab, follow these steps to control the layout of your image:
Choose the wrapping style you want: In Line with Text (the default setting), Square, Tight, Behind Text, or In Front of Text (the pictures associated with each option depict their effect).
If you choose a setting other than In Line with Text, you can also choose where you want the text to wrap: to the Left, Center, Right, or Other.
For even more control, click Advanced to display the Advanced Layout dialog box. There, in the Text Wrapping tab, you can control whether text wraps on both sides of your image and exactly how far from the image the text appears.
If you want to control any of the following, work from the Picture Position tab:
The alignment of your image
How images fit into a book layout (for example, whether they always appear nearest the spine or the edge of the page)
The absolute position of an image on a page
Whether images should move when text moves
Cropping an Image
Cropping means cutting away a portion of an image. Images are typically cropped to eliminate extraneous elements, to focus the reader's attention on a particular area, or simply to make the graphic fit on a page. When you use Word's cropping tools, you merely hide part of the image you're cropping?you can restore it later, if necessary.
Word provides two ways to crop an image: with the Crop tool, and through the Format Picture dialog box. To use the Crop tool, first display the Picture toolbar. To do so, select the image. If the Picture toolbar doesn't appear, choose View, Toolbars, Picture (see Figure 13.28).
Figure 13.28. Display the Picture toolbar to show Word's Picture tools.
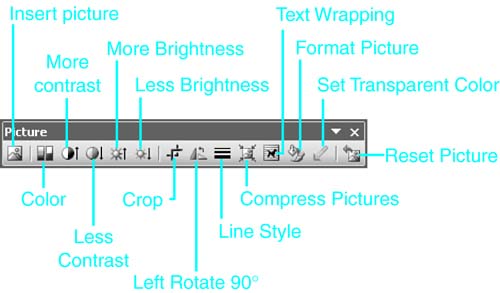
After the Picture toolbar is displayed, click on the image to select it. Next, click the Crop button on the Picture toolbar. Then, click and drag any sizing handle on the edges of the image. The handles enlarge or shrink the borders of the image just as they do with resizing.
To reveal a cropped section of a picture, you must reverse the process. Follow these steps:
Select the graphic.
Click the Crop tool from the Picture toolbar.
Click a sizing handle and drag away from the picture to "uncrop" the image, displaying the parts of the image that were hidden when it was originally cropped.
TIP
Just as you can precisely resize an image using the Format Picture dialog box, you can crop an image "by the numbers." Select your image and then choose Format, Picture to open the dialog box. Click the Picture tab. In the Crop From section, change the values in the Left, Right, Top, and/or Bottom boxes.
Recoloring Whole Images
Most images today are produced in color. Word enables you to convert any image from full color to grayscale, consisting of levels of gray, or to straight black and white. You can also adjust the brightness and the contrast of an image to deemphasize it or make it stand out even more. Finally, Word includes a default watermark setting that converts your picture to one that works well behind text. Change your image in any of these ways:
Click the image to select it.
Display the Picture toolbar if it isn't already displayed.
Click the Color button.
Make a choice from the drop-down list that appears. Word eliminates or softens the colors in your picture, displaying it as you've requested:
Automatic uses the same colors as your original image. Use it to reset the colors, if necessary.
Grayscale converts colors to their gray equivalent, preserving relative contrast and brightness.
Black & White changes multicolored images to two colors. It is useful for creating high-contrast line art.
Washout, formerly called Watermark, sets Brightness to 85% and the Contrast to 15%. This usually results in an image that is visible, but which can appear underneath text without reducing legibility much.
NOTE
The same settings are available through the Color drop-down box in the Picture tab of the Format Picture dialog box.
Inserting a Printed Watermark
Word's Printed Watermark feature makes it easy to insert watermarks: very light images or text that appear "behind" the other contents of your document. In the following two sections, you learn how to create watermarks first from pictures, and then from text.
Inserting a Picture Watermark
To create a watermark using a picture, follow these steps:
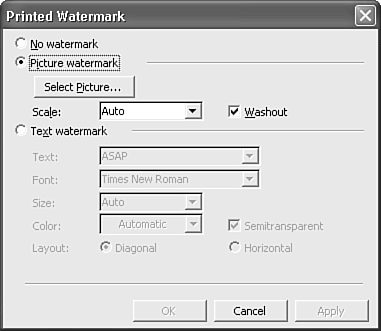
Choose Format, Background, Printed Watermark. The Printed Watermark dialog box opens (see Figure 13.29).
Figure 13.29. Inserting a printed watermark.
NOTE
The Printed Watermark option is not available in Web Layout or Reading Layout view.
Choose Picture Watermark.
Click Select Picture; the Insert Picture dialog box opens.
Browse to, and select the picture; then click OK.
In the Scale drop-down box, specify whether you want to enlarge or shrink the picture, or use Word's Auto setting (which enlarges or shrinks the picture to fit the left and right margins of the page).
By default, your picture watermark appears in light, "washed out" colors that make it easier to read the type that may be superimposed on it. If you want the picture to appear with its original brightness and contrast, clear the Washout check box.
Click OK.
Inserting a Text Watermark
To create a watermark using text, follow these steps:
Choose Format, Background, Printed Watermark. The Printed Watermark dialog box opens.
NOTE
The Printed Watermark option is not available in Web Layout or Reading Layout view.
Choose Text Watermark.
In the Text drop-down box, enter the text you want to appear (or select one of Word's built-in watermark text blocks, such as ASAP or CONFIDENTIAL.
In the Font drop-down box, choose a font.
In the Size drop-down box, specify a font size, or use Word's Auto setting (which enlarges the text to fit the left and right margins of the page).
In the Color drop-down box, choose a color.
Choose either a Diagonal or a Horizontal layout.
If you want your text to appear partially transparent, check Semitransparent.
Click OK.
Controlling Image Brightness and Contrast
You may sometimes want to brighten or darken an image, or adjust its contrast. You can do so from the Picture toolbar; or if you need more precise control, you can use the Format Picture dialog box. First, select the image you want to adjust.
To brighten the image, click the More Brightness button, or to darken the image, click the Less Brightness button. Each time you click the button, Word adjusts the image's brightness by 3%.
To sharpen the image's contrast, click the More Contrast button, or to reduce the contrast, click the Less Contrast button. Each time you click the button, Word adjusts the image's contrast by 3%.
If you need more precise control, select the image and click Format Picture. In the Picture tab, enter precise values in the Brightness or Contrast scroll boxes. Click OK to see the results.


