Working with Microsoft Office Picture Manager
Word 2003 and Office 2003 include a new tool for managing, editing, and sharing pictures: Microsoft Office Picture Manager. As a standalone Windows application, Microsoft Office Picture Manager can work with any Office application?or virtually any other Windows application as well. |
CAUTION
Microsoft Office Picture Manager replaces Microsoft Photo Editor. However, Microsoft Photo Editor had several features that are not present in Microsoft Office Picture Manager?for example, effects such as posterization and embossing. (Note also that Microsoft Office Picture Manager and Microsoft Photo Editor in Office XP/Word 2002 have lost support for the older .PCX graphics format.)
If you own an older version of Word or Office, you may want to keep both Microsoft Office Picture Manager and Microsoft Photo Editor on your computer.
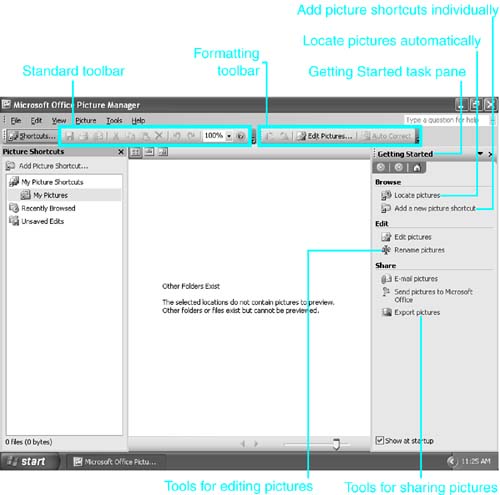
To work with Microsoft Office Picture Manager, choose Start, Programs (or in Windows XP, All Programs), Microsoft Office, Microsoft Office Picture Manager. Microsoft Office Picture Manager appears, showing thumbnails of any images that appear in your My Pictures folder (see Figure 13.40).
Figure 13.40. Microsoft Office Picture Manager shows thumbnails of images in your My Pictures folder.
Locating Your Pictures
Microsoft Office Picture Manager makes it easy to work with your pictures by displaying a visual thumbnail "picture shortcut" to every picture it knows about. When you run it for the first time, however, Microsoft Office Picture Manager has no picture shortcuts, and displays only the sample pictures in your My Pictures folder?or, in some cases, no pictures at all.
To locate other pictures available on your computer, click Locate Pictures on the Getting Started task pane. The Locate Picture Shortcuts task pane appears (see Figure 13.41). Click the Look In drop-down box, and choose the drive you want to search. Click OK to begin the search.
Figure 13.41. Specifying which drives to search for pictures.
Microsoft Office Picture Manager can search any drive on your computer or any mapped drive on your network. Depending on network performance, searching mapped drives may take some time.
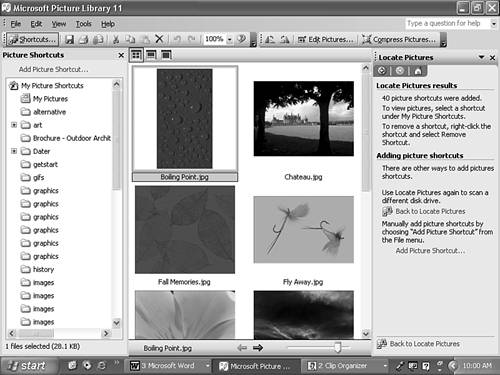
When Microsoft Office Picture Manager finishes searching, it displays picture shortcuts for all the images it finds (see Figure 13.42).
Figure 13.42. Microsoft Office Picture Manager displays picture shortcuts for all the images it finds.
You can now right-click on the image to work with it from the shortcut menu:
Click Send To, Mail Recipient to send the picture by email using Outlook.
Click Cut or Copy to place a copy of the image in the Windows Clipboard; from there, you can copy it into Word or any other application.
Click Delete to delete a picture and its picture shortcut.
Click Rename to rename a picture from the Rename task pane.
Editing Pictures with Microsoft Office Picture Manager
To edit a picture using Microsoft Office Picture Manager, right-click on the picture, and choose Edit Pictures from the shortcut menu; or click the Edit Pictures button on the Formatting toolbar. The Edit Pictures task pane (see Figure 13.43) appears.
Figure 13.43. When you choose Edit Pictures, the Edit Pictures task pane presents tools for editing the picture you've selected.
From here, you can control brightness and contrast, color, and cropping. You also can rotate or flip your picture, remove unwanted red eye from photographic portraits, or resize your picture. To perform any of these tasks, click the corresponding hyperlink on the Edit Pictures task pane, and work in the task pane that appears. For example, to correct brightness and contrast, click Brightness and Contrast to view the Brightness and Contrast task pane (see Figure 13.44).
Figure 13.44. Controlling brightness and contrast from the Brightness and Contrast task pane.
You can then either work from the Brightness, Contrast, and Midtone slider bars, or click Auto Brightness to let Microsoft Office Picture Manager attempt to automatically correct your image. If you aren't satisfied with the results, you can click Undo.
Viewing Detailed Information About an Image
You may occasionally want to learn more about an image. For example, before using an image on a Web page, you may want to know how large it is so that you can determine whether it will take too long to load. To view detailed information about an image, right-click on it and choose Properties from the shortcut menu. The Properties task pane opens (see Figure 13.45).
Figure 13.45. Displaying detailed information about an image in the Properties task pane.
The Properties task pane displays detailed information about file size, format, dimensions, file location, and most recent edit date, as well as (if the image was captured with certain digital cameras) additional technical information captured along with the image.
Compressing Images with Microsoft Office Picture Manager
To reduce file sizes, you can also compress images from Microsoft Office Picture Manager. To do so, select the image (or images) you want to compress. Next, choose Picture, Compress Pictures. The Compress Pictures task pane appears (see Figure 13.46).
Figure 13.46. Choosing how to compress images from the Compress Pictures task pane.
NOTE
Many images, such as JPGs, are already compressed. Compressing them again will have little or no impact on file size; in some cases, the images may even get bigger.
Compression will, however, dramatically reduce the size of BMP and TIF or TIFF images, among other formats. And Compress Pictures can still significantly reduce an image's file size by shrinking the image (as in the case of the E-mail Messages setting).
You can now choose which purpose you intend to use the compressed image for:
Documents: The image is compressed using JPG compression. If it is very large, it is also shrunk to fit within a 1,024x768 window.
Web Pages: The image is compressed using JPG compression, and (if necessary) shrunk to fit within a 448x336 window.
E-mail Messages: The image is compressed using JPG compression, and (if necessary) shrunk to fit within a 160x160 window for especially quick delivery.
At the bottom of the Compress Pictures task pane, Word tells you how small the image will become, based on the option you've selected. When you've made your selection, click OK.
CAUTION
Don't compress images that you intend to use for photo-quality printing. Remember, after an image is compressed, data is removed from it permanently and cannot be restored unless you have a duplicate copy of the original.


