Adding Depth to Your Graphics
Word 2003 includes two effective tools to make your graphics appear to leap off the page. First, any drawing object?including lines, free-form drawings, and clip art?can cast a shadow, in almost any direction and in any color. Shadows help separate a graphic from its background on the page. Second, you can apply 3D effects to drawing objects. Both tools are available through the Drawing toolbar.
CAUTION
You can't apply shadowing and 3D to the same object. If you apply a shadow effect to an object formatted as 3D, the shadow replaces the 3D effect.
Using Shadowing
You can instantly add a 50% gray drop-shadow to the border of a line or shape. The shadow appears on any side of an object, appears on top of the object, or surrounds the object like a picture frame.
To add a drop-shadow, first select the object you want to shadow. Next, click the Shadow button on the Drawing toolbar and choose from among the 20 preset shadows displayed in Figure 14.19. To adjust the shadow's position and color, select Shadow Settings. The Shadow Settings toolbar appears; there, you can select the settings you want.
Figure 14.19. Choosing a shadow from the list of shadows available.
If you don't like the way the shadow looks, choose a different shadow. If you decide that you don't want a shadow after all, select the shape and choose No Shadow from the Shadow palette.
You can change the shadow's style settings by choosing the Shadow Settings command on the Shadow palette. The Shadow Settings toolbar appears, as shown in Figure 14.20.
Figure 14.20. You can control a shadow's settings from the Shadow Settings toolbar.
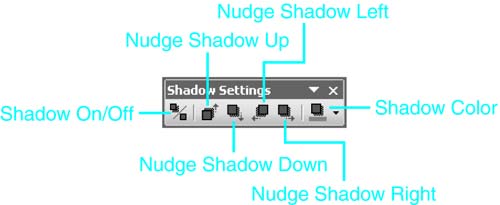
From this toolbar, you can choose several options to change the look of a shadow. To add or remove a shadow, click the Shadow On/Off button. You can even move the shadow a little bit at a time in a particular direction. Choose Nudge Shadow Up, Nudge Shadow Down, Nudge Shadow Left, or Nudge Shadow Right.
To change the color of the shadow, click the Shadow Color drop-down arrow and select the color of your choice. Clicking More Shadow Colors displays the Colors dialog box. From there, you can choose from a wider set of colors or create a custom color.
The Shadow Color settings include a special Semitransparent Shadow option that enables text to be seen through the shadow. When combining text and an object's shadow, however, it's usually a better idea to move the object behind the text via the Order command (covered later in this chapter).
Using 3D Effects
Word 2003's 3D tool goes beyond shadowing, giving 2D drawing objects apparent depth by extending their edges and rotating them to any angle.
Expanding an object's edges is called extruding. You can control both the depth of the extrusion and the direction. What makes the extrusion look three-dimensional is the use of a computer-generated light source that creates an illusion of light and shadow. Word even gives you control over the direction and intensity of the light. Finally, you can choose from four different surface types: Wire Frame, Matte, Plastic, or Metal.
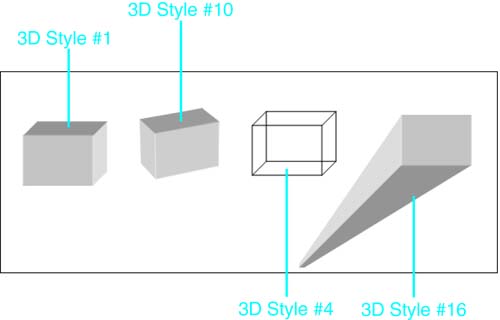
The 3D tool works much like the Shadow tool. Select a drawing object and click the 3D button on the Drawing toolbar. Choose any of the 20 preset 3D effects. Figure 14.21 shows what four standard 3D styles look like when applied to the same object.
Figure 14.21. Any drawing object can be extended into the third dimension with the 3D tool.
After you have applied a basic 3D style, you can adjust the settings by selecting the 3-D Settings option from the 3D menu. Table 14.3 outlines the options available.
Button | Name | Description |
|---|---|---|
| 3D On/Off | Enables or disables the 3D effect. |
| Tilt Down | Each mouse click tilts the object down 5°. Shift+click tilts the object in 45° increments. Ctrl+click tilts the object in 1° increments. |
| Tilt Up | Each mouse click tilts the object up 5°. Shift+click tilts the object in 45° increments. Ctrl+click tilts the object in 1° increments. |
| Tilt Left | Each mouse click tilts the object 5° to the left. Shift+click tilts the object in 45° increments. Ctrl+click tilts the object in 1° increments. |
| Tilt Right | Each mouse click tilts the object 5° to the right. Shift+click tilts the object in 45° increments. Ctrl+click tilts the object in 1° increments. |
| Depth | Controls the size of the extrusion. There are six preset values, including Infinity for 3D extrusions that have perspective (direction), as well as a Custom option. |
| Direction | Controls the direction of the extrusion. There are nine preset values and Parallel or Perspective options. |
| Lighting | Controls the direction and intensity of the light. There are nine preset directions and three preset intensities. |
| Surface | Controls the reflectiveness of the extruded surface. Surface types include Wire Frame, Matte, Plastic, and Metal. |
| 3D Color | Controls the color of the extrusion. Displays the color palette; choosing More 3D Colors displays the Colors dialog box. |
The depth of your 3D object is expressed in point size?the preset values include 0 pt. (no extrusion), 36 pt., 72 pt., and so on. Think of the depth as how thick your object appears; a depth of 72 pt. makes your object an inch thick. (There are 72 points in an inch.)
In addition to the Custom option, which enables you to enter your own depth value, there is an Infinity alternative for objects that have perspective. Selecting Infinity causes your object to extrude to its vanishing point?a term used in perspective drawing to indicate the place where all lines meet.
Perspective also comes into play when selecting the direction of your 3D object. You can choose between Parallel and Perspective style for any direction. Perspective uses the vanishing point when drawing the extrusion, whereas Parallel continues all edges in their original direction. In general, Perspective gives a more three-dimensional appearance.
NOTE
You can use 3D effects only on AutoShapes and WordArt. With text boxes, you have access to all 3D options, but only the frame around the text is affected, not the text itself.


