AutoShapes: Word's Library of Predrawn Shapes
You may find that you need more complicated shapes than are easily drawn manually. Fortunately, Word may have done much of the work for you, with AutoShapes. Word's AutoShapes collection gives you arrows, banners, callouts, and many other predrawn shapes, all of them easy to insert into your document and customize to your precise needs. Word provides these categories of predrawn AutoShapes:
Lines? Word's tools for creating free-form shapes and "scribbles."
Connectors? Straight lines, angled lines, curly lines, and arrows that can help you neatly connect any shapes you've drawn.
Basic Shapes? Both 2D and 3D shapes, lightning bolts, suns, moons, hearts, smiley faces, and other commonly used shapes.
Block Arrows? Both 2D and 3D arrows that are fancier than the arrows covered earlier and can be filled with colors, patterns, or gradients.
Flowchart? Twenty-eight symbols most commonly used in building flowcharts.
Stars and Banners? Starbursts and other objects ideal for newspaper advertising and fliers.
Callouts? Text boxes connected to arrows; these allow you to annotate anything on a page in a single step.
More AutoShapes? Displays the Clip Art task pane, where you can choose from more than 100 additional AutoShapes?including, for example, drawings of computer equipment and furniture for use in network and office layouts.
All AutoShapes can be resized, rotated, flipped, colored, and combined with other shapes (or your basic ovals and rectangles) to make even more intricate shapes.
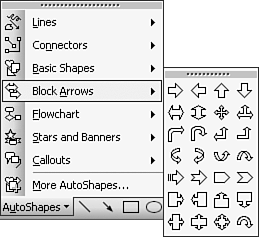
To use an AutoShape, click AutoShapes on the Drawing toolbar, choose a category, and choose an AutoShape (see Figure 14.9). Then, click in your document and drag the AutoShape to the proportions you want.
Figure 14.9. Word provides an extensive library of predefined graphic AutoShapes.
NOTE
You can also choose More AutoShapes to display the Clip Art task pane, with many more AutoShapes that can be dragged directly into your document.
 For more information on working with More AutoShapes, see "Using More AutoShapes to Create Room Designs and Other Drawings," p. 495.
Setting AutoShape Defaults
Often, it can take some effort to get an AutoShape formatted just the way you want it. After you've done so, you may want all the AutoShapes you create in the same document to use the same formatting. If so, right-click on the shape you've formatted and choose Set AutoShape Defaults from the shortcut menu. Among the attributes you can adjust with Set AutoShape Defaults are line width, color, and style; fill color; fill effects such as textures; types of arrows; and transparency.
CAUTION
Setting AutoShape defaults changes the formatting of all the AutoShapes you create in the same document from now on?not just AutoShapes identical to the one you formatted. In other words, if you choose Set AutoShape Defaults with a rectangle selected, your new defaults will affect circles, callouts, flowchart shapes, and any other AutoShape you create.
TIP
Unfortunately, Set AutoShape Defaults works only for a single document; if you open a new document, you will have to set them all over again. One workaround is to format a shape exactly as you want it?including colors, borders, types of lines, and (if it's a text box) text size, color, and margins. Having done so, select the shape and save it as an AutoText entry: Choose Insert, AutoText, New; type the shortcut name you want to use for the AutoText entry; and click OK. Then, you can insert a properly formatted shape simply by typing the AutoText shortcut and pressing F3.
Using Word's Stars and Banners AutoShapes
Stars and Banners AutoShapes are ideal for retail advertising and fliers but might also have uses in newsletters and company publications. Be careful how you use them, though: They can be a bit garish.
Figure 14.10 shows part of a sales flier created using AutoShape starbursts. This was created by right-clicking on the AutoShape, choosing Format AutoShape from the shortcut menu, clicking the Colors and Lines tab, clicking Color in the Fill section, choosing Fill Effects from the drop-down list, and choosing a one-color horizontal gradient. You'll learn more about these formatting options later in the chapter.
Figure 14.10. An AutoShape starburst used as part of a sales flier.

Making Flowcharts with Word's Flowchart AutoShapes
Word's library of 28 flowchart AutoShapes is sufficient for a wide variety of flowcharting tasks. In fact, you may find that you'll be able to do all you need with a small fraction of them. Table 14.2 lists several of the most commonly used flowchart icons.
Icon | What It Represents |
|---|---|
| A process. |
| An alternative process. |
| A point where a decision must be made. |
| A point where preparation is required. |
| A manual operation that must be performed. |
| A document is generated. |
| Many documents are generated. |
Among the tasks you may be able to perform with Word's flowchart AutoShapes are
Simple process descriptions and business process reengineering
Charting for ISO quality management
Planning a small to moderate-sized project or Web site
NOTE
If you find that Word's flowchart tools are insufficient to meet your needs, two popular (but expensive) alternatives from Microsoft are the Visio drawing program and Microsoft Project. Less costly alternatives include FlowCharts&More from IMSI (www.imsisoft.com).
Using Callouts
What do you do if you need to annotate a visual element of your document, such as a logo or photograph? Use callouts. A callout combines an arrow with a text box in which you can type. To use one of the 20 types of callouts provided, follow these steps:
From the Drawing toolbar, click the AutoShapes button.
Choose Callouts and then select the particular callout you want to insert. The pointer changes to a small crosshair.
To use a line callout, click the subject of your callout first and then hold down the mouse pointer while you drag away from it to the point where you want the callout box to appear. Release the mouse pointer. Word inserts both a line (called a leader) and a text box where you can enter the text of your callout. An insertion point flashes within the text box.
To use a rectangular (non-line) callout, first click where you want to place the callout. If you want to enlarge the callout, select it; then hold down the mouse pointer and drag it outward.
Note that when you choose Callouts, Word inserts a drawing canvas, but you need not use it. You can point your callout anywhere in your document, inside or outside the drawing canvas, and if you point it outside, the drawing canvas will disappear. Many users find the drawing canvas an annoyance. If you want to get rid of it permanently, choose Tools, Options, General; clear the Automatically Create Drawing Canvas When Inserting AutoShapes check box, and click OK.
Type your text and apply any formatting.
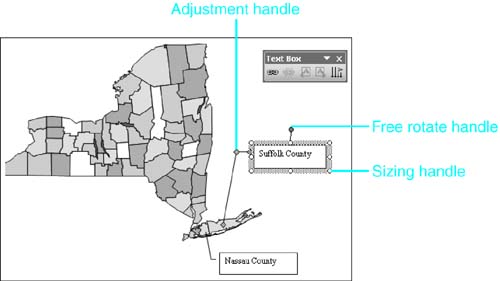
If necessary, resize the callout box by clicking and dragging any of the sizing handles.
You can adjust the placement of the leader by clicking the yellow diamond adjustment handle at the end of the line, as seen in Figure 14.11. Some callouts have multiple adjustment handles, enabling you to manipulate the angles of the line that stretches between the callout and the element to which you are calling attention.
Figure 14.11. Callouts can be used to label parts of an image.
Click anywhere outside the callout box to return to the regular document.
Using More AutoShapes to Create Room Designs and Other Drawings
In addition to the six categories of AutoShapes you've already learned about, Word provides a separate library called More AutoShapes. This library's contents include outlined images of furniture, electronic appliances, and widely used symbols such as padlocks and puzzle pieces.
To display More AutoShapes, click AutoShapes on the Drawing toolbar and choose More AutoShapes. The Clip Art task pane appears, displaying more AutoShapes (see Figure 14.12).
Figure 14.12. The Clip Art task pane contains many additional widely used symbols.
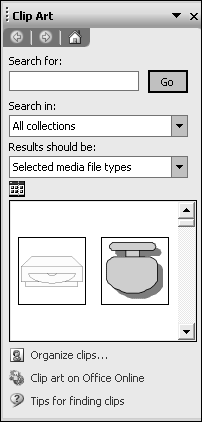
After you've displayed the Clip Art task pane by choosing More AutoShapes, you can browse to the image you want, and click on it. The image is inserted.
For more information about inserting clip art, see "Working with Microsoft Clip Organizer," p. 447.
Freehand Drawing
Although Word offers many preset shapes to choose from, sooner or later you are likely to need a graphic that isn't provided. The Drawing toolbar gives you access to three freehand drawing tools. You can choose from a tool that creates curves, one that uses a combination of straight lines and freehand drawing, and one that relies entirely on freehand drawing.
The freehand drawing tools are all located under the Lines submenu of the AutoShapes button (see Figure 14.13). (Lines also contains a basic Line tool, a regular Arrow tool, and a Double Arrow tool along the top row of the submenu. You create any of these shapes by clicking and dragging.)
Figure 14.13. Options on the AutoShape Lines submenu.
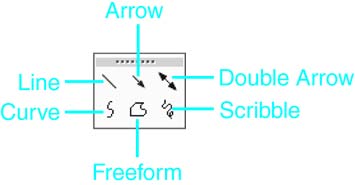
Line and Arrow tools work just like the Line and Arrow tools covered earlier in this chapter, in the "Drawing Lines and Other Basic Shapes" section. Double Arrow works just like the Arrow tool, except that it creates an arrow with arrowheads at both ends. The other three tools?Curve, Freeform, and Scribble?are covered in the next three sections.
Drawing Curves with the Curve Tool
Use the Curve tool to create a smooth-turning line or shape. After selecting the Curve tool, click where you want your shape to start, and move the mouse?a line follows your movement. Click again where you want the line to begin to curve. Continue clicking and moving the mouse to build your shape. Press Esc or double-click where you want the shape to stop. To close a shape, click your starting point instead.
NOTE
You can't convert a closed freehand shape to a text box, so you can't add text inside it, except by superimposing a separate text box on it.
Drawing Freehand with the Freeform Tool
The Freeform tool enables you to draw freehand, using a mixture of straight lines and "hand-drawn" shapes that do not follow straight lines. After selecting Freeform from the Lines submenu, you can draw freehand, without straight lines, by clicking, holding down the mouse button, and dragging the mouse. A freehand line follows as you drag. If part of your drawing needs to be a straight line, release the mouse button; then drag to extend your drawing with a straight line. If you need to extend your drawing further with a hand-drawn (non-straight) line, click and hold down the mouse button again as you draw.
You can keep drawing until you're finished. When you're finished, press Esc or double-click to end the line. Or, if you want to close the shape, click on its starting point.
Drawing Freehand with the Scribble Tool
To draw freehand, with no straight lines at all, use the Scribble tool. Click the Scribble icon, click in the document, and start dragging. Word inserts lines as you drag, until you release the mouse pointer. Because your mouse isn't a precise input tool, drawings you make with the Scribble tool are likely to look, well, scribbled.


