Understanding How Word Drawings Work
Before you start working with Word's drawing tools, it's helpful to understand the types of images they create. Word's drawing tools create vector graphics. This is to say that they create digital images through commands and mathematical statements that instruct your computer where to place points, lines, and shapes. This is in contrast to bitmapped graphics, such as digital photos, which simply assign color data to each pixel in an image. Vector graphics have two important advantages over bitmapped graphics. First, they can be enlarged or stretched without blurring. Second, they are generally far smaller, leading to smaller files.
Word calls its vector graphics drawing objects. These drawing objects can be edited separately or grouped so that they can be edited together. They can also be layered so that some components of your drawing appear "on top of" others. You'll learn how to use the grouping and layering tools later in the chapter.
Because Word drawing objects are made of lines and shapes, you can often edit drawings to remove elements you don't need and add elements you do want.
When to Use Word's Drawing Tools?And When Not To
Chapter 13, "Getting Images into Your Documents," discusses how to import existing graphics into Word. But what if the graphic you want doesn't exist? Often, you can create it yourself, using Word's drawing tools.
It's helpful to understand what Word's drawing tools can do well?and what they can't do well. Word's drawing tools can be invaluable when you need
Simple flowcharts and other diagrams that can't be created automatically with Word's Diagram Gallery or Organization Chart applets
Annotations for text or other elements in your document (using arrows, lines, or callouts)
Starbursts and other shapes for advertisements or fliers
Simple room or office designs using prefabricated shapes
Edits to a vector image you already have?such as a .WMF clip art file?especially to delete an element you don't want to include
Images that can be built from simple, regular shapes such as rectangles and circles
In short, Word's drawing tools are well suited for solving a wide variety of specific business problems. But they're poorly suited for projects in which superb aesthetics are required, such as complex freehand illustrations, images that must be printed with precise coloring, or "painted" bitmapped graphics. In such cases, use another tool for the job. For example:
To edit photographs or scanned images, use professional-quality tools such as Adobe Photoshop or JASC PaintShop Pro, or consumer tools such as Adobe Photoshop Elements or Microsoft Picture It! For simple tasks such as adjusting brightness or contrast, use Microsoft Office Picture Manager, which is included in Microsoft Office 2003 and is covered in Chapter 13.
To create complex freehand vector illustrations, use Adobe Illustrator or Microsoft Freehand.
To create professional-quality sketches and paintings that mimic the output of traditional media, use Corel Painter.
Using Word 2003's Drawing Toolbar
To draw in Word, first display the Drawing toolbar. To do so, either click the Drawing button on the Standard toolbar or choose View, Toolbars, Drawing. The Drawing toolbar appears at the bottom of the Word application window (see Figure 14.1).
Figure 14.1. The Drawing toolbar centralizes all of Word's tools for drawing objects.
![]()
The Drawing toolbar brings together all of Word's tools for drawing. Some of these tools?such as callouts?are valuable even if you never create an image from scratch. Table 14.1 presents an overview of each button and what it does.
Button | Name | Description |
|---|---|---|
| Draw | Contains editing controls for manipulating drawing objects |
| Select Objects | Enables the selection of one or more drawing objects |
| AutoShapes | Contains the library of automatic shapes, including lines, basic shapes, block arrows, flowchart elements, stars and banners, and callouts |
| Line | Enables you to click and drag a line |
| Arrow | Enables you to click and drag an arrow |
| Rectangle | Enables you to click and drag a rectangle |
| Oval | Enables you to click and drag an oval |
| Text Box | Enables you to click and drag out a text box |
| WordArt | Starts the creation of a fancy text object |
| Insert Diagram or Organization Chart | Displays the Diagram Gallery for inserting diagrams or organization charts |
| Insert Clip Art | Displays the Clip Gallery for inserting clip art |
| Insert Picture | Displays the Insert Picture dialog box for inserting image files of any kind |
| Fill Color | Controls the color, pattern, or effect inside a drawing object |
| Line Color | Controls the color, pattern, or effect of a drawing object's border |
| Font Color | Controls the color of selected text |
| Line Style | Enables quick formatting for a line's thickness and style |
| Dash Style | Enables quick formatting for a line's appearance |
| Arrow Style | Enables quick selection from a variety of arrowhead styles |
| Shadow Style | Controls shadow appearance for any drawing object |
| 3D Style | Controls the 3D appearance for any drawing object |
 For information on WordArt, see Chapter 13, "Getting Images into Your Documents," p. 437; on text boxes, see Chapter 16, "Word Desktop Publishing," p. 557; and on diagrams and organization charts, see Chapter 15, "Visualizing Your Message with Graphs, Diagrams, and Org Charts," p. 511.
Understanding the Drawing Canvas
Long-time Word users have sometimes encountered difficulties in controlling the position and elements of their images?especially the way images interact with surrounding text and page breaks. To help address this problem, Microsoft introduced the Drawing Canvas.
The Drawing Canvas is, in essence, a separate layer of a Word document for drawings. All drawing objects placed within a Drawing Canvas have an absolute position and remain together as you placed them, regardless of where the Drawing Canvas itself may move as you edit surrounding text.
When you insert a new line, shape, or other drawing element in Word 2003, Word switches to Print Layout view and displays the Drawing Canvas, as shown in Figure 14.2. If you want, you can then create your image within the borders of the Drawing Canvas. By default, the Drawing Canvas extends from your left to right margins and is 4.5" high.
Figure 14.2. Word 2003's Drawing Canvas.

NOTE
If you are superimposing a drawing object on an existing graphic, the Drawing Canvas does not appear. You simply draw the new object on top of the graphic.
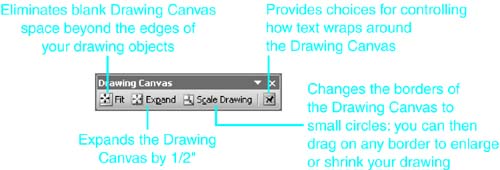
Word's Drawing Canvas toolbar (see Figure 14.3) provides four tools that make it easier to use the Drawing Canvas. To display the toolbar, right-click within the Drawing Canvas and choose Show Drawing Canvas Toolbar.
Figure 14.3. The Drawing Canvas toolbar.
You can format other elements of a Drawing Canvas by right-clicking on it and choosing Format Drawing Canvas from the shortcut menu. The Format Drawing Canvas dialog box appears (see Figure 14.4).
Figure 14.4. The Format Drawing Canvas dialog box.
From here, you can control the following:
Colors and Lines? Fill colors, transparency, and the appearance of borders around the Drawing Canvas
Size? The size and scale of the Drawing Canvas
Layout? Text wrapping options for the Drawing Canvas, including horizontal alignment options not available from the Drawing Canvas toolbar
Web? Alternative text that can appear in place of (or before) graphics appear, if your document is saved as a Web page or viewed on a browser
The settings provided in the Format Drawing Canvas dialog box are similar to those in the Format Picture dialog box covered in Chapter 13.
Drawing Without Using the Drawing Canvas
You may not always want to use the Drawing Canvas. For example, if your drawing is simple, and you don't expect to encounter problems aligning your drawing with other document elements, you may not need the Drawing Canvas. If your drawing is far smaller than the default Drawing Canvas, you may not want to take the trouble to resize the canvas. In certain cases, the Drawing Canvas can introduce new problems; for example, it can make creating accurate callouts more difficult.
To avoid using the Drawing Canvas, press Esc after Word inserts it. The Drawing Canvas will disappear.
If you really can't stand the Drawing Canvas, you can instruct Word not to display it automatically. Choose Tools, Options, General; then clear the Automatically Create Drawing Canvas When Inserting AutoShapes check box.


