Using Text Boxes
Normally, when you work in Word, your text adjusts up, down, or sideways when you make other editing changes. But sometimes you want something?text, a graphic, a table, or some other document element?to stay put, no matter what.
Perhaps you want to include sidebar or pullquote text in your document and make sure that the other text flows around it (see Figure 16.9). Or perhaps you want to create copy that flows between one location and the next?as you would if you were producing a newsletter with a story that "jumped" from one page to another. You might want an address block on the back cover or a form that recipients could return. These are some of the many valuable uses for Word's text box feature.
Figure 16.9. Text box used for a pullquote.
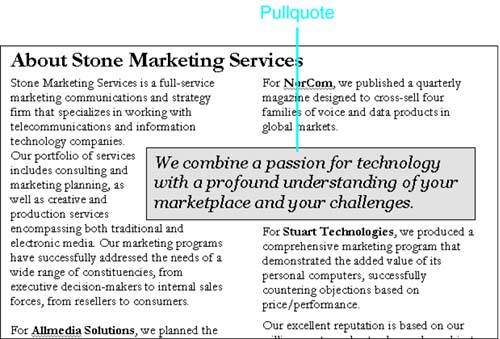
Text boxes are free-floating objects, independent of your regular document. You can specify precise locations and sizes for text boxes, as well as borders, fills, and other formatting.
TIP
Because it's also possible to wrap text around tables, you can sometimes use tables rather than text boxes for sidebars and similar applications.
This is a valuable alternative whenever you have a multiple-column document and you need to call attention to information that is tightly structured, such as a row-and-column set of names, products, or financial results. More information on tables can be found in Chapter 12.
Inserting a Text Box
To insert a text box, follow these steps:
Choose Insert, Text Box. Your pointer becomes a small crosshair, and Word switches to Print Layout view (if you aren't already in that view). Unless you have turned off the Drawing Canvas, Word also inserts a Drawing Canvas containing the text "Create your drawing here."
Click where you want the upper-left corner of your text box to appear.
If you want your text box to appear within the Drawing Canvas, click inside the Drawing Canvas. If you want your text box to appear outside the Drawing Canvas, click outside it; the canvas will disappear.
 For more information about working with Drawing Canvases, see Chapter 14, "Using Word's Quick and Easy Drawing Tools," p. 483.
Drag out a rectangle to the size and shape you want your text box to have.
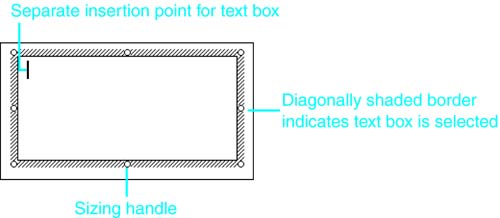
Release the mouse button. Word displays a text box with shaded borders, as shown in Figure 16.10.
Figure 16.10. A typical text box, selected.
Your text box has its own insertion point, which you can use to enter text. You can also insert graphics, tables, fields, or virtually anything else Word can place in a document, with the following exceptions:
Page and column breaks
Comment marks
Footnotes and endnotes
Indexes and tables of contents (note that although entries for your index and table of contents can be placed in text boxes, Word won't find them when it compiles your index and table of contents)
Columns
Drop caps
NOTE
You can use frames for these tasks, as is covered in the following section.
When a text box is selected (refer to Figure 16.11), it has a special diagonal-line border with eight sizing handles around it. The text box also has its own ruler settings, which enable you to set tabs independently from the rest of the document. Setting a tab works the same inside a text box as it does outside.
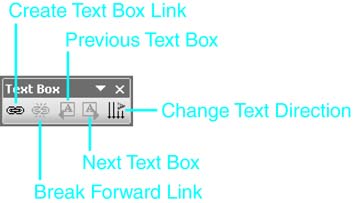
Figure 16.11. The Text Box toolbar.
For more information about setting tabs, see Chapter 4, "Quick and Effective Formatting Techniques," p. 107.
Whenever you're finished working with a text box, you can deselect the text box by clicking outside it.
TIP
If you're not sure how large you want your text box to be, you can use Word's default size. Choose Insert, Text Box; when the pointer becomes a small crosshair, just click once. A default text box appears. You can later size it as needed by using the sizing handles.
When you create a text box, Word displays the Text Box toolbar (see Figure 16.11). The Change Text Direction button can turn text in a text box sideways. As you click, the direction toggles, first to the right (read top to bottom), then to the left (read bottom to top), then back to normal (read left to right). You can't turn text upside down, nor can you turn only some of the text in a text box?it's all or nothing.
NOTE
Using text boxes can add a bit of extra work because you have to worry about how they're positioned and formatted. For example, default text boxes have .75-point borders that you may not want. If you get a text box formatted perfectly and want to use it as a pattern for others you create, right-click to select it and choose Set AutoShape Defaults.
Converting Text Boxes to Frames
Many of the tasks now performed by text boxes were performed by frames. Word largely abandoned frames several years ago. Although they still exist in Word 2003, they are rarely used. (These frames should not be confused with Web frames, which you can use to structure Web pages. Although the names are identical, the concepts are completely different.) Use a frame if
You want to insert text or graphics that contain comments or refer to footnotes or endnotes.
You want to insert certain fields, including AUTONUM, AUTONUMLGL, and AUTONUMOUT (used for numbering lists and paragraphs in legal documents).
Word also ignores certain fields if they are placed in a text box; these fields are recognized if they are placed in a frame instead. They are
TC (Table of Contents Entry)
TOC (Table of Contents)
RD (Referenced Document)
XE (Index Entry)
TA (Table of Authorities Entry)
TOA (Table of Authority)
If you want to create an index or table of contents entry in a text box, use a frame instead.
Because frames are rarely used, there is no built-in menu command for creating them. To create a frame, follow these steps:
Insert a text box, as described in the preceding section.
Choose Format, Text Box.
Click the Text Box tab.
Click Convert to Frame.
Click OK to confirm.
Other Types of Text Boxes
Word text boxes aren't limited to rectangles. As you learned in Chapter 14, Word provides more than 100 AutoShapes that enable you to include practically any shape in your document, from flowchart symbols to starbursts to cartoon-style callouts. You can easily transform any of these to a text box (except for lines and arrows, which lack an inside area where text could be entered). Follow these steps:
Click the Drawing button on the Standard toolbar (or choose View, Toolbars, Drawing) to display the Drawing toolbar.
Click AutoShapes on the Drawing toolbar and select the AutoShape you would like to insert.
Your mouse pointer changes to a crosshair; drag the shape to the size and proportions you want.
Right-click the shape to display its shortcut menu.
Select Add Text. Word displays an insertion point inside it (see Figure 16.12), and you can type your text.
Figure 16.12. An AutoShape, formatted and converted into a text box, displaying text.
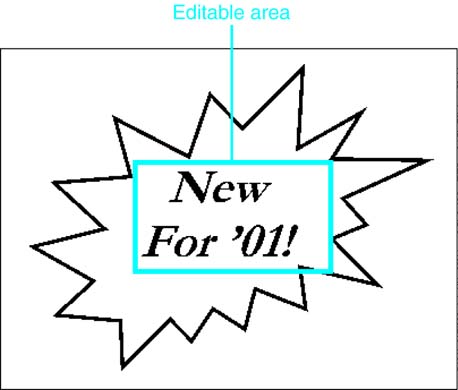
From here, you can use your shape like any other text box. However, even though the AutoShape itself can be irregular, the area in which you can edit text is still rectangular, fitting entirely inside the AutoShape. This means that your editing area can be much smaller than you might expect.
Formatting Your Text Box
By default, text boxes are surrounded by thin (.75-point) black lines; the interior is white (but not transparent). Text boxes are also set to appear in front of text, which means that they will obscure text behind them.
All these settings can be changed, using essentially the same techniques that are covered in Chapter 14 for formatting pictures with the Format, Picture dialog box. To display text box formatting controls, select a text box and choose Format, Text Box. (If you converted an AutoShape to a text box, choose Format, AutoShape.) Or select the text box, right-click, and choose Format Text Box or choose Format, AutoShape from the shortcut menu.
Whatever procedure you follow, the Format Text Box dialog box, along with its various tabs, opens (see Figure 16.13).
Figure 16.13. The Format Text Box dialog box.
Each tab gives you control over a different aspect of your text box's appearance. These tabs are covered in detail in Chapter 14. Briefly, here's what you can do with each of them:
In the Colors and Lines tab, you can control the Fill Color that appears within a text box, and the Line Color, Style, and Weight that appear at the edge of the text box.
In the Size tab, you can control the size, rotation, and scale of the text box.
In the Layout tab, you can control text wrapping, the precise position of a text box on a page, and how (or whether) the text box moves if surrounding page elements move.
In the Text Box tab, you control the internal Left, Right, Top, and Bottom margins of the text box; the default settings are 0.1" at the left and right, and 0.05" at the top and bottom.
Finally, in the Web tab, you can specify Alternative Text that appears in Web browsers when the text box itself does not appear. If your text box contains text, Word automatically uses that text as the alternative text.
TIP
You can also format text inside a text box using any of Word's Font and Paragraph formatting tools, or use tools on the Drawing toolbar, such as Fill Color, Line Color, Shadow, and 3D (see Chapter 14).
Linking Text Boxes
If you've ever tried to create a newsletter, you know that it can be difficult to manage the "jumps" from one page to another within an article?especially if you're still editing that article. You may have found yourself moving small chunks of copy manually from one page to the next?and then having to do it again after you made more edits.
With Word's linked text box feature, that's not necessary. As you edit an article to become longer or shorter, the contents of each linked text box can automatically adjust accordingly.
You can create links between as many as 31 text boxes; if you need to link more, you can link a separate set of 31 text boxes together. In Word, a set of linked text boxes is called a story.
After you've linked text boxes, if you start entering text in the first text box and run out of room, the text flows into the next linked text box in the story, and continues flowing from one linked text box to the next. If there's not enough text to fill them all, the text boxes at the end of the chain remain empty. If you have too much text to fit in all the text boxes, the excess text will run below the borders of the last text box. You may notice part of a line of text, depending on how the last text box has been sized.
Linked text boxes were traditionally found only in dedicated desktop publishing applications such as Adobe PageMaker and Microsoft Publisher. Using text boxes, you may be able to publish many documents in Word that you once could create only with desktop publishing software.
Follow these steps to link one text box to another:
Create at least two text boxes.
Select the first text box.
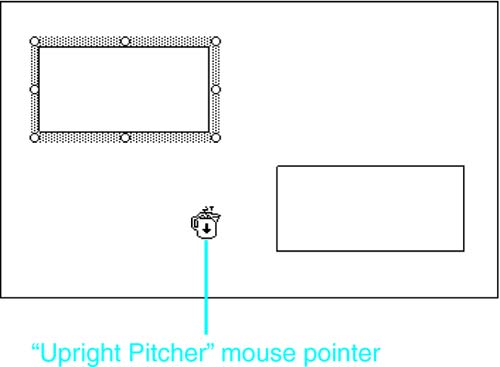
Click the Create Text Box Link button from the Text Box toolbar. The pointer changes to an upright pitcher (see Figure 16.14).
Figure 16.14. After you click the Create Text Box Link button, the mouse pointer changes to an upright pitcher shape.
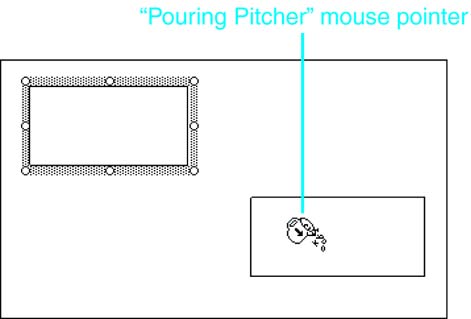
Move through the document until you find the second text box. Note that when you are over a text box available for linking, the upright pitcher changes into a pouring pitcher (see Figure 16.15).
Figure 16.15. When you're over a linkable text box, the pitcher mouse pointer changes to a pouring pitcher shape.
Click the second text box.
You can now create another text box and link it to the second box by again following steps 2 through 5. You can either create and link all your text boxes ahead of time?when you are designing your newsletter?or add your boxes and link them as needed.
CAUTION
Word doesn't display any markers to indicate whether overflow text exists.
TIP
If you place an end-of-article slug first and then insert all your linked text before it, you can quickly tell whether the entire article has fit into the text boxes you've created. If you see the slug, you know that everything fit into the available text boxes. If you don't see the slug, you know there is overflow copy.
You can format the contents of all linked text boxes at the same time. Press Ctrl+A within one text box to select all the text in all text boxes linked to it. (Conversely, if you press Ctrl+A to select all text outside a text box, no text inside any text box is selected.)
After you've linked text boxes, you can easily move from one text box to the next by clicking the Previous Text Box or Next Text Box buttons on the Text Box toolbar. You can also break links between text boxes whenever you want, as covered in the next section of this chapter.
NOTE
You can have multiple articles running through separate sets of links. From a practical point of view, you don't want to do this with every item in your newsletter; it makes the articles too difficult to follow.
Breaking Links Between Text Boxes
Occasionally you need to break a link between text boxes?maybe you need to reflow some text and start over, or perhaps the wrong text boxes were linked. Whatever the reason, it's simple to break a link between two text boxes. Select the text box where you want the text to end and then click the Break Forward Link button on the Text Box toolbar.
CAUTION
If you break a link between two text boxes (say, "Text Box A" and "Text Box B"), all the links connecting after the second text box are also lost (such as Text Box C and Text Box D, in this example).
When you break a link, all the text that previously appeared in the linked (second) text box is now moved into the first text box. Of course, if the first text box is too small, not all the text you have moved into it will be visible. To make the text visible, either reformat its text in a smaller font size or expand the remaining text box. You can expand a text box manually, by dragging its sizing handles. You can also do so automatically, like this:
Right-click on the text box, and choose Format Text Box from the shortcut menu.
Click the Text Box tab.
Check the Resize AutoShape to Fit Text check box.
Click OK.
Following a Link
After your text boxes are linked, you can follow the links, forward or backward. When you have finished editing a story or an article, it's good practice to follow your text through all the linked boxes to make sure that it looks the way you want it to.
It's common for the last line of text in a series of linked text boxes to appear by itself at the top of a text box, much as "orphan" text sometimes appears at the top of a page. This can be unsightly: You can fix the problem by enlarging the preceding text box slightly, adjusting the font size, or, in some cases, condensing the text slightly from the Character Spacing tab of the Format, Font dialog box.
To follow a series of linked text boxes, select the first text box and then
To move to the next linked text box, click the Next Text Box button.
To move to the previous linked text box, click the Previous Text Box button.
CAUTION
Linked text boxes must stay within one document; you can't link a text box to another in a separate file. Nor can you link text boxes between subdocuments when you're using a Master Document structure.


