Printing or Delivering Your Merged Documents
You're finally ready to print your merged documents (or deliver them electronically). Word provides different tools for controlling how your merged documents will be printed or delivered, depending on the type of merged documents you're creating. These are covered in the following sections.
Printing Merged Letters, Envelopes, or Labels
If you don't need to edit individual merged letters, envelopes, or labels, you can print them directly from the Complete the Merge window of the Mail Merge Wizard. Click Print; the Merge to Printer dialog box opens.
This dialog box contains the same options as were available in Merge to New Document: You can print all letters, just the currently selected letter, or a specific range of letters. Make your selections and click OK. The Print dialog box opens; choose a printer and print settings, and click OK.
After all the copies of your letter print, the Save As dialog box appears. You can now save the merge letter you created, including all merge fields, database links, and selected recipients.
Merging to Email
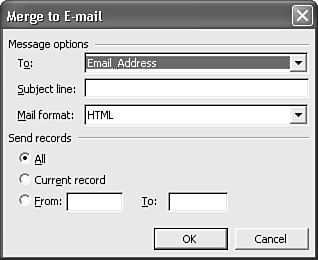
If you are merging to email, the final step in the process is to click the Electronic Mail button in the Complete the Merge window of the Mail Merge Wizard. The Merge to E-mail dialog box opens (see Figure 17.24).
Figure 17.24. The Merge to E-mail dialog box.

Here, in addition to specifying which messages to send, you can
Make sure that Word is using the database field that contains the email addresses you want to use; if not, choose a different database field from the To drop-down box.
Enter a Subject Line that appears at the top of all your messages.
Specify whether your message should be sent in Plain Text format, in HTML format, or as an attachment.
When you're finished, click OK, and Word sends the messages, using Outlook (or whatever MAPI-compatible program you've chosen as your default email software).
Merging to a Directory
If you are merging a directory, Word provides only one option for completing the merge: creating a new document containing the contents of the directory. To perform this step, click To New Document in the Complete the Merge window of the Mail Merge Wizard. The Merge to New Document dialog box opens (refer to Figure 17.23).
As you've already seen, you can choose a specific record or a range of records for inclusion in your directory, or choose All records. After you've done so, click OK, and Word creates the new document.


