Using List Styles
Word allows you to create custom lists using the List Styles feature. You can easily create and reuse lists of any kind, both ordered lists (such as the alphabetical and numerical lists available in Outline Numbering) and unordered lists (such as lists that use different symbols or icons).
Word provides three predefined list styles:
1 / 1.1 / 1.1.1 (for purely numeric sequences)
1 / a / i (for sequences mixing numbers and letters)
Article / Section (for sequences such as are commonly used in legal documents)
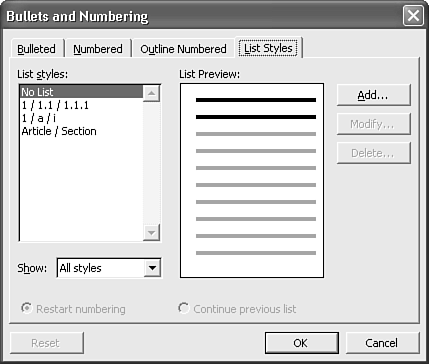
Each of these list styles corresponds to options you've already seen in the Outline Numbered tab of the Bullets and Numbering dialog box. To use one of these sequences, do the following:
Select the paragraphs you want to apply a list style to.
Choose Format, Bullets and Numbering.
Click the List Styles tab (see Figure 18.23).
Figure 18.23. You can choose one of three built-in list styles or create your own.

Select a list style from the List Styles scroll box. Word previews the list style you've chosen in the List Preview box.
Click OK. Word applies the list style you've chosen.
Adding a New List Style
Sometimes you might want to create a list style of your own. For example, you might want to use a set of bullets or symbols drawn from the Wingdings or Webdings font, or precisely control numbering in ways that cannot easily be done through the Customize Outline Numbered List dialog box. To create a new list style, follow these steps:
Select the paragraphs you want to apply a list style to.
Choose Format, Bullets and Numbering.
Click the List Styles tab.
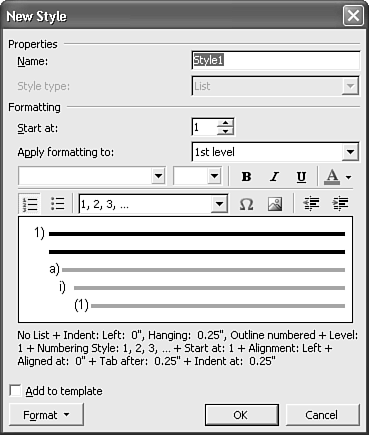
Click Add. The New Style dialog box appears (see Figure 18.24).
Figure 18.24. You can create a new list style in the New Style dialog box.

In the Name text box, enter a descriptive name for your list style that will help you identify it in the future.
In the Start At spin box, specify where in the sequence you want Word to begin numbering; by default, Word begins with the first number, element, symbol, or picture you define.
In the Apply Formatting To drop-down box, specify which outline level you want to create formatting for.
Use the formatting tools on the following two rows to specify formatting for the outline level you just chose. For example, if you want to specify a different font, choose it from the Font drop-down box. If you want to use a specific symbol, click the Insert Symbol button and choose it from the Symbol dialog box.
You can control the font, font size, whether text is boldface and/or italic, whether your list style uses Latin or Asian character sets, or whether numbering or bullets are included. You can also start from a built-in sequence (such as 1, 2, 3… or First, Second, Third…), or use pictures or symbols in place of numbers and letters.
If you want to store your new list style in the template associated with the current document, check the Add to Template check box. If you plan to reuse the list style in other documents that use the same template, it makes sense to check this box.
If you want to control formatting for a different outline level, choose the next outline level from the Apply Formatting To drop-down box. Then repeat step 8.
When you have finished setting formatting for all outline levels, click OK.
Modifying an Existing List Style
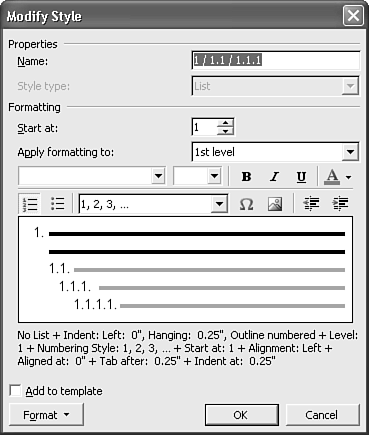
Word allows you to modify both its existing list styles and any you may have created. To do so, choose Format, Bullets and Numbering, and click the List Styles tab. Select the style you want to change; then click Modify. The Modify Style dialog box appears (see Figure 18.25).
Figure 18.25. You can modify a list style through the Modify Style dialog box.

This dialog box offers identical choices to the New Style dialog box discussed in the preceding section. The current name of the list style is displayed in the Name text box; if you want to create a second list style instead of simply modifying the one that already exists, enter a new name there.
As with the New Style dialog box, you can use the Modify Style dialog box to change formatting for each outline level individually. You can control the font, font size, whether text is boldface and/or italic, whether your list style uses Latin or Asian character sets, or whether numbering or bullets are included. You can also start from one of Word's built-in sequences, or use pictures or symbols in place of numbers and letters. Finally, if you have not done so already, you can add your list style to the template associated with the current document.
When you have finished making the changes you want to make, choose OK.
NOTE
If you want to delete a custom list style you created, display the List Styles tab of the Bullets and Numbering dialog box, choose the list style in the List Styles scroll box, and click Delete. Click Yes to confirm that you want to delete the style.
You cannot delete list styles that are built into Word.


